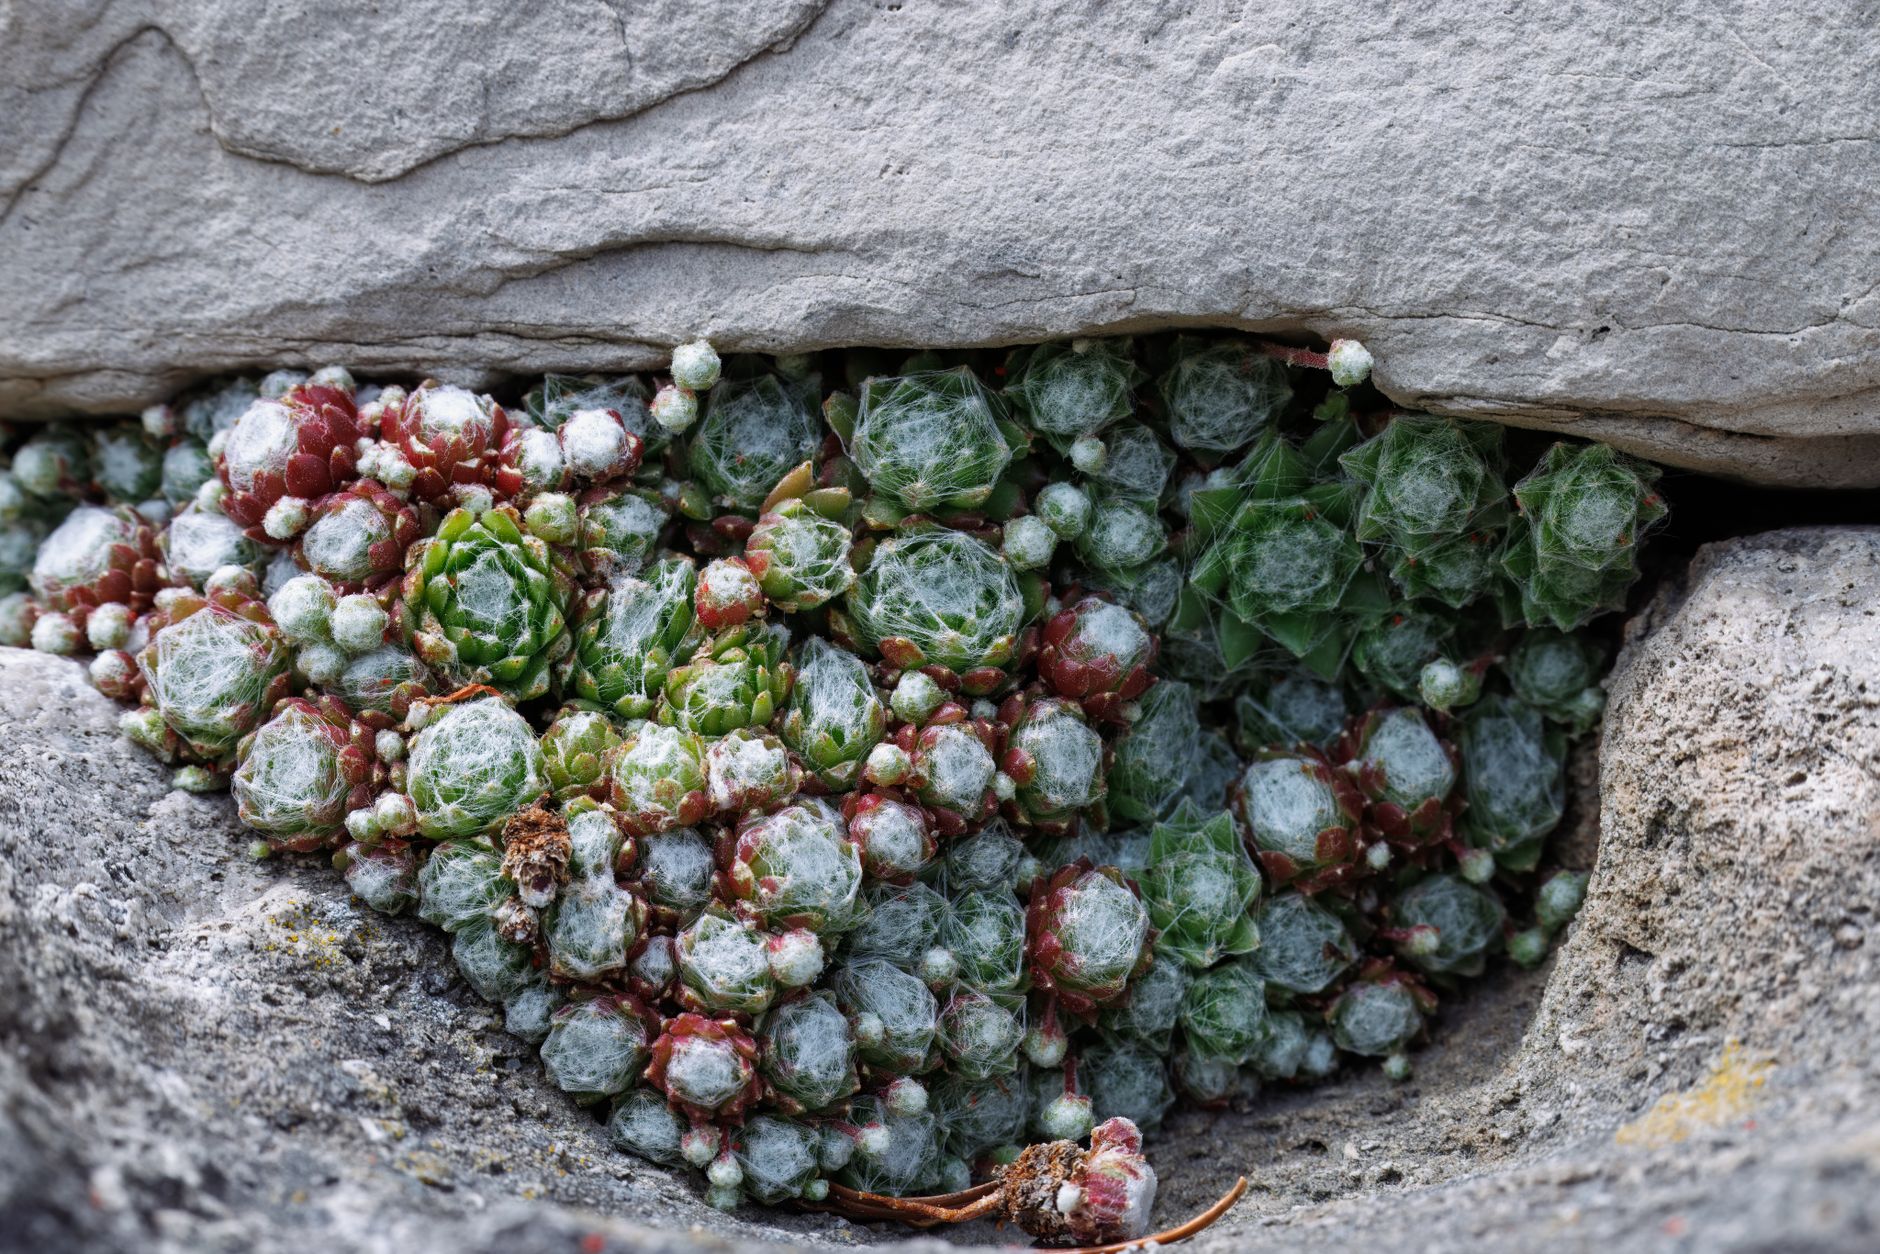
If you're anything like me, your UK garden, no matter how big or small, eventually starts to feel a bit... flat. For years, I packed my 800 sq ft Midlands backyard with raised beds overflowing with heirloom tomatoes (my greenhouse is a haven for 'Cherokee Purple' and 'Gardener's Delight' every summer!), herbs, and every vegetable imaginable. But after five years of intensive gardening, constantly experimenting and pushing the boundaries of what I could grow, I started looking up. Literally. I'd always been fascinated by those incredible images of plants clinging to cliff faces or nestled into rock cracks, thriving in seemingly impossible conditions. That's when I discovered the magic of crevice gardens.
For a former IT worker like me, who found his true calling in the soil, the idea of engineering a miniature mountain range for true alpines and drought-tolerant miniatures was an irresistible challenge. It's not just about stacking rocks; it's about recreating an authentic vertical habitat, a microclimate that offers perfect drainage, root protection, and a stunning display of plants that often struggle in our typically wet British borders. I've spent the last couple of years diving headfirst into this, learning through trial and error, and I'm genuinely thrilled to share what I've discovered about building these vertical rock habitats right here in my UK garden.
Unveiling the Beauty of Crevice Gardens: A Vertical Oasis for UK Alpines
A crevice garden, at its heart, is a highly specialised rock garden designed to mimic the natural conditions found in mountainous regions, where plants root deeply into narrow fissures in rock faces. Think of those hardy little gems you see clinging to the sides of crags in the Lake District, or the stunning flora of the Alps. We're talking about creating that exact environment, but scaled down and perfectly tailored for your backyard.
For me, it started as a way to grow plants I simply couldn't get to thrive in my regular raised beds. I love the challenge of coaxing life from difficult spots, and after seeing a particularly stunning display of Saxifraga oppositifolia at a local RHS show, I was hooked. These plants, often labelled "finicky" or "difficult" in our damp UK climate, absolutely sing when given the precise conditions a crevice garden provides. It’s not just about aesthetics – though they are undeniably striking – it’s about providing the perfect home for true alpines, many of which are specifically adapted to root into deep, cool, well-drained pockets between rocks.
I remember my first attempt, a small, rather haphazard pile of reclaimed paving slabs from a neighbour. It wasn’t perfect, but even then, seeing a tiny Draba aizoides settle in and flower made me realise the potential. What I've learned since is that the key is authenticity: understanding how these plants grow in nature and replicating those conditions as closely as possible, especially with our unpredictable British weather.
Why Build a Crevice Garden? Unique Benefits for UK Gardeners
So, why go to the effort of building what amounts to a miniature mountain in your garden? Well, for us UK gardeners, especially those of us battling limited space or tricky conditions, the benefits are huge. I’ve found that a well-built crevice garden offers unique advantages that conventional gardening just can't match.
Firstly, and perhaps most importantly for our often-damp British climate, crevice gardens offer unparalleled drainage. True alpines absolutely detest sitting in wet soil, especially during our long, soggy winters. In a crevice garden, the rocks themselves act as a natural drainage system, channelling excess water away from delicate root crowns. I learned this the hard way with a few choice Androsace varieties that simply melted away in my regular rockery after a particularly wet Midlands spring. The deep, narrow crevices mean roots can dive down for moisture in summer but are never waterlogged.
Secondly, they are fantastic space-savers. In my 800 sq ft backyard, every inch counts. A crevice garden allows you to grow a surprisingly large collection of plants in a relatively small footprint, taking advantage of vertical space. It’s like having a multi-storey car park for plants! I’ve managed to fit dozens of miniature treasures into a bed no bigger than 1.5m x 1m, a feat impossible with traditional planting.
Finally, there’s the sheer aesthetic appeal and the joy of growing plants that genuinely thrive. The dramatic rock formations, the intricate textures of the plants, and the unexpected bursts of colour create a focal point unlike anything else. I love watching the tiny rosettes of my Sempervivum 'Red Rubin' spread across a sunny crevice, or the delicate flowers of Gentiana acaulis emerge in spring. It's a living sculpture, constantly evolving, and a real testament to nature's resilience.

Selecting Your Stone & Site: Foundation for a Thriving Crevice Garden
Before you even think about lifting a spade, selecting the right stone and the perfect spot in your garden is absolutely crucial. This isn't just about aesthetics; it's about creating a stable, long-lasting habitat that will work with our specific UK climate. I’ve made mistakes here, and believe me, trying to fix a wobbly, poorly-draining crevice garden is not a job for the faint-hearted!
Choosing Your Stone
The type of stone you use will define the character and, crucially, the long-term success of your crevice garden. You want stones that are relatively flat, with natural fissures, and ideally, local to prevent excessive transport costs and for an authentic look. I started with some reclaimed local sandstone from a builder down the road – always worth asking around!
Here’s a comparison of common stone types suitable for UK crevice gardens:
| Stone Type | Pros for UK Conditions | Cons for UK Conditions | Randy's Experience (UK Midlands) |
|---|---|---|---|
| Sandstone | Excellent drainage, good texture for root grip, often local. | Can be crumbly if very soft; can acidify soil slightly over time. | My go-to. Readily available, weathers beautifully. Holds plants well. Look for harder varieties. |
| Limestone | Buffers acidic rain, good for calcicole plants, lovely grey tones. | Can be very heavy; can leach calcium, altering soil pH significantly over time. | Used sparingly in one bed for specific calcicole alpines. Be mindful of plant selection. |
| Slate | Very flat, easy to create narrow, deep crevices, striking look. | Can be brittle; can heat up in full sun; fewer natural textures. | Great for ultra-narrow fissures and a modern look. Ensure good depth for roots to stay cool. |
| Granite | Extremely durable, doesn't break down, good thermal mass. | Very hard to work with; often rounded, making tight crevices difficult; can be expensive. | Haven't used extensively due to cost and difficulty finding suitable shapes, but incredibly tough. |
When sourcing stone, think about how it will weather. Here in the Midlands, with our mix of sun, rain, and occasional frosts, you want something that will stand the test of time. I always look for pieces that have at least one relatively flat side and some natural fractures – these are your future plant homes!
Selecting Your Site
The location of your crevice garden is just as important as the stone itself. Most alpines crave sunlight, so a spot that receives at least 6-8 hours of direct sun a day is ideal. Here in the Midlands, finding that perfect sun trap can sometimes be a challenge, especially with fences and buildings casting shadows.
Beyond sun, consider these factors:
- Drainage of the underlying ground: Even before you build your crevice garden, the spot itself needs to drain reasonably well. If you have heavy clay soil, like much of what I have in my garden, you might need to dig out a deeper base and incorporate a thick layer of rubble or gravel to ensure robust drainage under your construction. One mistake I made with my very first crevice garden was assuming the excellent drainage within the rock structure would compensate for a boggy patch – it didn't, and some bottom layers struggled.
- Accessibility: You’ll need to water, weed, and admire your plants! Make sure you can easily reach all parts of your crevice garden.
- Wind exposure: While many alpines are tough, strong, persistent winds can dry out smaller plants quickly. A slightly sheltered spot, perhaps near a wall or a sturdy hedge, can be beneficial, especially for newly planted specimens.
- Visual impact: Consider it a permanent feature. I placed my second, larger crevice garden near the greenhouse, where I can enjoy it every day, even when popping in to check on my tomatoes.
Mastering the Build: Step-by-Step Construction for Lasting Habitats
Alright, you've got your stones, you've picked your perfect spot – now for the exciting part: getting your hands dirty and building your vertical oasis! This is where my IT background sometimes kicks in; it’s all about planning, precision, and understanding the structure. Remember, we're not just piling rocks; we're creating an engineered habitat.
Preparing the Foundation: The Unseen Hero
This is where many first-timers (myself included, years ago) cut corners, and it always comes back to bite you. A solid foundation is non-negotiable for a stable, well-drained crevice garden.
- Excavation: Dig out the area to a depth of at least 30-40cm, depending on the size of your planned garden. For my largest crevice garden, which is about 1.5m tall, I went down nearly 60cm.
- Drainage Layer: Fill the bottom 15-20cm with coarse rubble, broken bricks, or large gravel. This is your primary drainage layer, essential for preventing waterlogging at the base, especially important during our wet British winters. I compact this layer well by walking all over it.
- Weed Barrier (Optional but Recommended): On top of the drainage layer, I often lay a layer of sturdy landscape fabric to prevent weeds from growing up through your precious soil mix.
Crafting the Perfect Soil Mix: Alpine Elixir
The soil mix for a crevice garden is vastly different from your standard border soil. Alpines need extremely sharp drainage and very little organic matter. My go-to recipe, perfected over several seasons in my UK garden, is incredibly free-draining.
- My Preferred Mix:
- 2 parts sharp horticultural grit: This is the backbone, providing drainage and aeration. Don't skimp on this!
- 1 part coarse sand: Adds further drainage and helps with structure.
- 1 part John Innes No. 2 or No. 3 compost: Provides a minimal amount of nutrients and organic matter, but crucially, it's soil-based, offering better stability than peat-based composts.
- A handful of slow-release fertiliser (optional): I sometimes add a small amount, especially for hungry alpines, but generally, they don't need much.
Mix this thoroughly. It should feel gritty and drain almost instantly when wet. This mix, combined with the rock structure, is what allows those delicate alpine roots to thrive without rotting.
Laying the Stones: The Art of the Crevice
This is where the magic happens and where patience truly pays off. You're not just stacking rocks; you're creating a network of vertical fissures and pockets.
- Starting Strong: Begin with your largest, flattest stones at the base, setting them firmly into your prepared soil mix. These form the anchors.
- Vertical Orientation: The key is to place stones vertically or at a steep angle, leaning slightly inwards towards the centre of the garden. This encourages rain to run down the rock faces and into the crevices, rather than pooling. It also creates that essential deep rooting space.
- The Crevices: Aim for tight crevices, generally 1-5cm wide. These are the lifeblood of your garden. Fill these crevices with your special soil mix as you go, ensuring it's packed in firmly around the stones. I use a small trowel and sometimes even an old kitchen knife to push the soil deep down.
- Stability: Ensure each stone is stable before moving to the next. You can use smaller stones or shims to wedge larger rocks firmly in place. It’s a bit like playing Jenga with rocks, but with much higher stakes! I always stand on the placed stones (carefully!) to test their stability before adding more.
- Angling for UK Rain: Because of our frequent rainfall, angle the tops of your stones so that water sheds away from the plant crowns and into the crevices below. This prevents the dreaded winter rot that plagues many alpines in wetter conditions.
Here's a breakdown of the key steps and my personal insights:
| Step | Key Action | Randy's Tip/Mistake for UK Conditions | Why it's Important for UK Gardeners |
|---|---|---|---|
| Foundation | Dig deep, create rubble drainage layer. | Mistake: Not digging deep enough in heavy clay. Tip: Go at least 40cm deep, even for a smaller build, especially if your garden gets waterlogged. | Prevents basal waterlogging; crucial for plant survival in our wet winters and ensures structural stability over time. |
| Soil Mix | Use a very gritty, lean, soil-based mix. | Tip: Don't be tempted to add too much compost or loam; it holds too much moisture. I've found a 2:1:1 grit:sand:John Innes ratio works perfectly for drainage. | Mimics natural alpine scree; prevents root rot; provides ideal growing conditions for plants intolerant of rich, damp soils. |
| Stone Placement | Place vertically, lean inwards, create tight gaps. | Tip: Always test stability. If a stone wobbles, reposition it or wedge it. Mistake: Leaving gaps too wide – they fill with weeds and don't provide the necessary root protection. | Ensures stability; creates capillary action for water; provides deep, cool root runs; protects crowns from excessive moisture. |
| Filling Crevices | Pack soil mix firmly as you go. | Tip: Use a stick or thin tool to ensure no air pockets. Mistake: Only filling from the top after all stones are in place – the soil won't reach deep enough. | Eliminates air pockets that can dry out roots; ensures good contact between roots and growing medium for establishment. |
| Top Dressing | Apply a layer of grit/small gravel after planting. | Tip: Use a generous layer of 5-10mm grit around plant crowns. This is particularly vital in the UK to prevent splash-back from rain and reduce moisture around the crown, preventing rot. | Suppresses weeds; keeps soil cool; prevents crown rot; acts as a slug/snail deterrent (somewhat!). |
Building a crevice garden is a labour of love, but the rewards are immense. The sense of accomplishment when you step back and see your vertical landscape, knowing you've created a thriving habitat for these special plants, is truly unparalleled. In my next article, I’ll dive into the exciting world of planting your new crevice garden and maintaining it for years of enjoyment!
Planting Perfection: Thriving Alpines & Drought-Tolerant Miniatures for UK Climates
Alright, you've built the structure, filled it with grit, and now comes the truly exciting part – bringing your crevice garden to life with plants! This is where your vision truly takes shape, creating those stunning miniature landscapes. In my 800 sq ft Midlands garden, I've spent years experimenting with what truly thrives in our often-unpredictable British climate, and I've learned that choosing the right plant for the right crevice is absolutely key.
Choosing Your Crevice Garden Inhabitants
When I'm picking plants for my crevice garden, I'm looking for tough, resilient characters that appreciate excellent drainage and can cope with both our damp winters and surprisingly dry summer spells. Think true alpines that naturally cling to mountainsides, and small, drought-tolerant miniatures that thrive on neglect.
Here's what I consider:
- Rooting Habits: Many alpines have surprisingly long taproots, perfect for reaching deep into the narrow crevices for moisture. Others are mat-forming, spreading slowly over the rock face. I've found that using a chopstick or a thin trowel to gently guide roots down into the gritty mix is far more effective than just pushing the plant in.
- Sun Exposure: My main crevice garden faces south-east, so it gets a good blast of morning sun, then dappled shade in the afternoon. This suits most of my chosen plants beautifully. If yours is shadier, look for alpines that tolerate less light, like some of the smaller ferns or certain Saxifraga.
- Ultimate Size: Remember, these are miniature habitats. Don't be tempted by something that will quickly overwhelm its neighbours or obscure your beautifully placed rocks. I learned this the hard way with a particularly vigorous Campanula that tried to stage a takeover!
- Seasonal Interest: I try to pick a mix that gives me something to look at year-round. Early spring blooms are a must, but I also value interesting foliage, tiny rosettes, and late-season colour.
My Top Picks for a UK Crevice Garden
After several seasons of trial and error in my own garden, battling everything from late frosts to torrential summer downpours, these are some of the stars that have truly shone in my crevice gardens:
| Plant Name (Common/Scientific) | UK Hardiness | Sun Preference | Mature Size (cm) | Notes |
|---|---|---|---|---|
| Saxifraga paniculata (Alpine Saxifrage) | H5 (Very Hardy) | Full sun to part shade | 10-15 (spread 20-30) | Forms tight rosettes, lovely white flowers. Excellent for tight crevices. |
| Androsace sarmentosa (Rock Jasmine) | H4 (Hardy) | Full sun | 5-10 (spreads) | Pink flowers, silvery rosettes. Spills beautifully over edges. |
| Dianthus alpinus (Alpine Pink) | H5 (Very Hardy) | Full sun | 5-10 (spread 15) | Fragrant pink flowers, neat cushions. Great for a splash of colour. |
| Sedum spathulifolium 'Cape Blanco' | H5 (Very Hardy) | Full sun | 5-8 (spread 20+) | Silvery-grey succulent foliage, yellow flowers. Very drought-tolerant. |
| Sempervivum tectorum (Houseleek) | H6 (Extremely Hardy) | Full sun | 5-10 (spreads) | Classic rosette, produces 'chicks'. Indestructible, perfect for cracks. |
| Thymus serpyllum (Wild Thyme) | H5 (Very Hardy) | Full sun | 2-5 (spreads) | Creeping, fragrant, tiny flowers. Good for softening edges. |

The Planting Process
Once you've got your plants, the actual planting is delicate work but incredibly rewarding.
- Preparation: Gently tease out the roots of your chosen plant. For alpines, often their root systems are already quite compact.
- Placement: Identify a suitable crevice. For plants with longer roots, I'll use a thin stick or a long-handled spoon to create a narrow channel in the grit, then carefully lower the plant in, making sure the roots are facing downwards and deep.
- Backfilling: Gently firm the plant in place by working more of your gritty planting mix around its base and into the crevice. You want good root-to-grit contact, but no air pockets.
- Watering In: This is crucial. Give each newly planted alpine a good, gentle watering. I use a watering can with a fine rose to avoid dislodging the grit or the tiny plants. This settles the soil around the roots and helps them establish. I've often seen plants struggle simply because they weren't watered in properly at this stage.
Long-Term Care & Maintenance: Ensuring Your Crevice Garden Flourishes
Building your crevice garden is a big step, but keeping it thriving in the long run is all about consistent, thoughtful care. The good news is that once established, these gardens are surprisingly low-maintenance, which is a massive plus for me with my busy schedule here in the Midlands. My goal is always to mimic nature, and these resilient plants are pretty self-sufficient.
Watering Wisdom
- Establishment Phase: For the first few weeks, especially during dry spells, your new plants will need regular watering. I usually check mine every other day for the first month, making sure the grit feels damp deep down.
- Established Plants: Once established, crevice gardens are incredibly drought-tolerant thanks to their excellent drainage and the way the rocks help retain moisture deep within. I rarely water my main crevice garden unless we've had a solid two weeks without rain during the summer – a situation that, let's be honest, is becoming more common in our British summers! In winter, our natural rainfall usually takes care of everything. Overwatering is a far greater risk than underwatering for these plants.
Feeding (or Not)
These plants are adapted to nutrient-poor environments, so go easy on the fertiliser. Too much can lead to lush, soft growth that's more susceptible to disease and less hardy. I might give my crevice garden a very light top-dressing of fine grit mixed with a tiny bit of well-rotted leaf mould every couple of years, but that's about it.
Weeding Woes
Weeding is essential, especially in the early days. Undesirable weeds will compete for the limited moisture and nutrients, and can quickly smother your tiny alpines.
- Regular Patrols: I make it a habit to quickly scan my crevice garden every week or so. It's much easier to pull out tiny weed seedlings than established ones.
- Hand-Weeding: Forget hoes or trowels; your fingers are your best tools here. Gently tease out weeds, making sure to get the root. I've had many a battle with bittercress and tiny grasses trying to muscle in!
Pruning & Deadheading
- Deadheading: Snip off spent flowers to encourage more blooms and keep the garden looking tidy. For plants like Dianthus or Saxifraga, this helps maintain their neat form.
- Light Pruning: Some mat-forming plants might get a bit leggy over time. A light trim in spring or after flowering can encourage bushier growth. For Sempervivum, once a rosette flowers, it will die, but it will have produced plenty of 'chicks' to take its place. Just snip off the spent flower stalk and remove the dead rosette.
Pest and Disease Management
Generally, crevice gardens are quite healthy environments. The good air circulation and drainage mean fungal diseases are rare.
- Slugs and Snails: Ah, the bane of every UK gardener! While the gritty environment isn't their favourite, I still find them lurking in the damp, shady crevices, especially after rain. I manually remove them during my evening patrols.
- Aphids: Occasionally, I'll spot a few on new growth, but a quick spray with soapy water usually sorts them out.
Winter Care in the UK
Most true alpines are incredibly hardy and built to withstand harsh mountain winters, so they cope well with our British climate.
- Wet Protection: The biggest threat in a UK winter isn't necessarily the cold, but prolonged wet. Your excellent drainage should mitigate this. For very sensitive, woolly-leaved alpines (though I don't tend to plant many of these), some gardeners place a pane of glass on props over them to keep them dry, but I've found that my hardy choices cope just fine with our Midlands winters without special protection.
- Snow: Snow is actually a fantastic insulator! Don't worry about it.
Troubleshooting & Creative Expansion: Solving Issues and Elevating Your Design
Even with the best planning, gardening always throws up a few curveballs. I’ve certainly made my share of mistakes in my UK garden, and my crevice garden has taught me a lot. But that’s part of the fun, isn’t it? Learning to troubleshoot and then thinking about how to expand creatively can really elevate your gardening game.
Common Crevice Garden Challenges (and How I've Tackled Them)
- Plants Struggling/Dying Back:
- Diagnosis: This is usually down to one of three things: too much water, not enough water, or insufficient light. In my early days, I lost a beautiful Gentiana acaulis because I assumed it needed constant moisture like my veg, when in fact, it hated having wet feet.
- Solution: Gently check the soil moisture deep in the crevice. If it's soggy, you might have a drainage issue (unlikely if built correctly) or you're overwatering. If bone dry, increase watering during establishment or dry spells. Re-evaluate the light conditions – is it getting scorched or too shaded? Sometimes, a plant just isn't happy in its spot, and it's okay to move it.
- Weeds Taking Over:
- Diagnosis: You've missed a few weeding sessions, and now they're established. Common offenders in my UK garden are bittercress, speedwell, and various grasses.
- Solution: Persistence! Dedicate some time to carefully hand-weed, making sure to get the entire root. A pair of fine-nosed tweezers can be surprisingly useful for those tiny weeds nestled right next to your prized alpines.
- Algae or Moss Growth:
- Diagnosis: This usually indicates consistent dampness and/or shade.
- Solution: A thin layer of moss can actually add character and make your garden look more established, so don't fret over a little bit. If it's excessive and starts to smother small plants, it might be a sign of poor air circulation or too much moisture. Ensure plants aren't too crowded. You can gently scrape off thick layers if desired.
- Stone Shifting:
- Diagnosis: Usually happens after a very wet winter or if the initial build wasn't stable enough. I had one corner of my first crevice garden subtly shift after a particularly heavy downpour.
- Solution: Carefully remove any affected plants, re-wedge the stones, adding more grit and smaller stones to lock them into place. It’s a bit of a faff, but worth it for long-term stability.
Creative Expansion: Beyond the Basics
Once you've mastered your first crevice garden, you might find yourself, like me, looking for new ways to incorporate this brilliant technique into other areas of your garden.
Integrating with Existing Features:
- Rockeries: If you have an existing rockery, adding crevice-style pockets can dramatically improve drainage and create new microclimates for a wider range of plants.
- Raised Beds: I've even experimented with a small crevice section within one of my raised beds, using slates to create a distinct, well-drained area. It’s great for Mediterranean herbs that hate wet feet.
- Path Edges: A low, linear crevice garden along a path can be a fantastic way to define a border and bring interest right up to your walking space.
Adding Artistic Touches:
- Miniature Troughs: Consider placing a small, planted alpine trough nearby, echoing the crevice garden's aesthetic. I’ve got a couple of small, hypertufa troughs that sit perfectly next to my main crevice garden.
- Interesting Stones: Occasionally, I'll find a particularly beautiful piece of weathered stone on a walk and incorporate it into the design, just to add another layer of natural appeal.
- Subtle Lighting: Small, solar-powered spot lights, strategically placed, can highlight the textures of the rocks and plants in the evening, creating a magical atmosphere.
Building a Series: My ultimate dream for my 800 sq ft garden is to create a 'crevice garden trail,' connecting several smaller crevice features with winding paths. Imagine the diversity of plants and the different aspects you could capture!
Conclusion: A Small Space, A Big Impact
Stepping back from the grit and the rocks, what truly makes a crevice garden special, especially for us UK gardeners, is the incredible sense of achievement and the unique beauty it brings. From my early days hunched over a keyboard, staring at a screen, to now, digging in the soil of my Midlands garden, I've found an immense satisfaction in creating these miniature, resilient landscapes.
We've explored why these vertical rock habitats are perfect for our often-damp, sometimes-dry British climate, offering superb drainage for those delicate alpines and drought-tolerant miniatures. We've walked through the practicalities of selecting the right stone and site, mastering the build with careful rock placement, and selecting the perfect plants that will truly thrive here in Britain. And we've talked about how to keep them flourishing, and how to troubleshoot those inevitable little issues that pop up.
What I've learned most from my own crevice garden is that it's more than just a collection of rocks and plants; it's a living sculpture, a testament to nature's resilience, and a little piece of mountain majesty brought right into your backyard. It's a way to connect with the incredible diversity of plant life, even in a small space. The joy of seeing a tiny Saxifraga burst into bloom against a backdrop of ancient stone, knowing you've provided the perfect, authentic habitat, is truly unmatched.
So, if you've been inspired, I wholeheartedly encourage you to give it a go. Start small, experiment, and don't be afraid to make a few mistakes – I certainly have! The rewards, the beauty, and the sheer satisfaction of creating something so unique and beneficial for these wonderful plants are well worth the effort.
Have you built a crevice garden in your UK garden? What are your favourite plants? Share your experiences and questions in the comments below – I'd love to hear from you! Happy gardening!
