
You know that feeling, don't you? The one where you've poured your heart and soul into a plant, watched it grow, and then, slowly but surely, it just… declines. It's frustrating, especially here in our unpredictable British climate, where every successful plant feels like a small victory. I've been there more times than I care to admit, scratching my head, wondering if it was a nutrient deficiency, a sneaky pest, or perhaps just our notoriously soggy Midlands weather getting the better of it.
For years, I tended to a beautiful little ornamental cherry, 'Prunus 'Kanzan'', that I’d planted near the back fence of my 800 sq ft garden. It started off strong, giving us those glorious pink blossoms every spring. But after about three or four years, its growth slowed right down. One side of the canopy started looking sparse, the leaves were smaller and a bit yellowish, and it just never seemed to perk up, no matter how much compost tea I brewed or how carefully I watered it during our drier spells. I even thought it might be a fungal issue at one point, convinced I was doing everything right.
It was only when I was doing some major soil improvement around my raised beds and decided to take a closer look at the cherry’s base that I found the culprit: a thick, woody root snaking right around the trunk, essentially strangling it. This, my friends, was my introduction to girdling roots, a problem far more common and insidious than many of us UK gardeners realise. It was a proper "aha!" moment, and honestly, a bit of a kick in the teeth, knowing I could have prevented it. Since then, saving established trees and shrubs from this slow decline has become a bit of an obsession for me, and I want to share everything I've learned, often the hard way, right here from my little patch in the Midlands.
Understanding Girdling Roots: A Silent Killer of UK Garden Trees
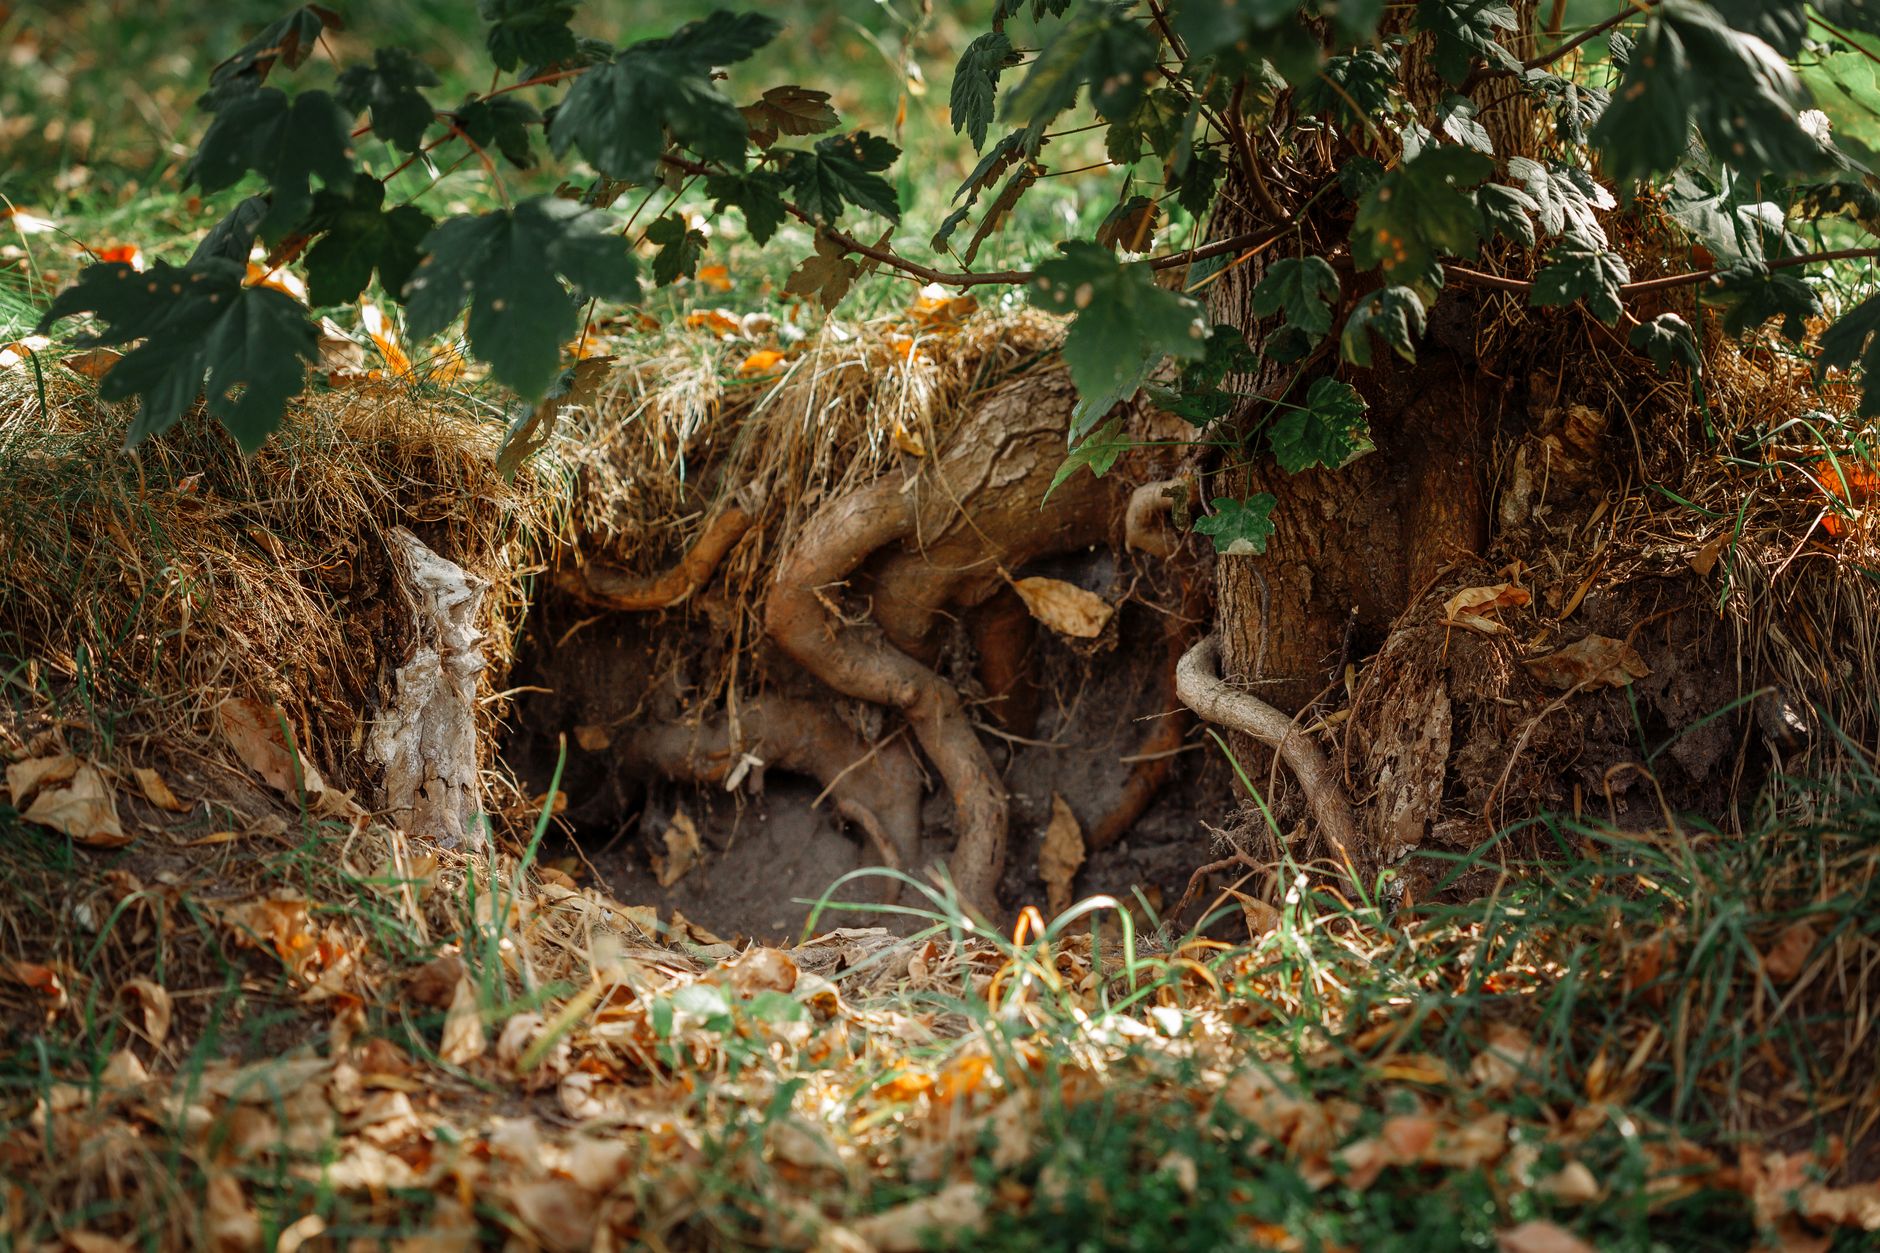
So, what exactly are girdling roots? Imagine your tree's trunk as a series of pipes, carrying water and nutrients up from the roots to the leaves, and sugars (the plant's food) down from the leaves to the roots. Now, picture a root, instead of growing outwards into the soil as it should, decides to grow in a circle, tightening its grip around the trunk or other main roots. That's a girdling root. As both the root and the trunk grow thicker, they essentially squeeze each other, like a constrictor.
This constriction chokes off those vital transport systems. Water and nutrients struggle to reach the canopy, leading to the kind of decline I saw in my cherry. Equally, the food produced by the leaves can't make its way down to nourish the roots, which further weakens the entire root system. It's a slow, silent killer, often taking years to show obvious symptoms, which is why it's so easy to misdiagnose. Here in the UK, where our trees often face enough challenges from unpredictable frosts, heavy rain, or sudden dry spells, girdling roots just add another layer of stress they simply don't need. I've learned that understanding this fundamental mechanism is the first step to saving our precious garden investments.
Spotting the Symptoms: How to Recognise Girdling Root Damage
Recognising girdling root damage can be tricky because the symptoms often mimic other common problems we face in our UK gardens – nutrient deficiencies, drought stress, or even some diseases. However, once you know what to look for, you'll start seeing patterns that point directly to this hidden issue.
I remember thinking my 'Malus domestica 'Discovery'' apple tree, which I grow as a small espalier against a sunny wall, was just struggling with our typical Midlands summer one year. The leaves were a pale, yellowish-green, and it seemed to grow much slower than its neighbour. It was only when I compared it closely to other plants that I noticed the subtle differences.
Here are the key things I've learned to watch out for:
- Stunted or Slowed Growth: This is often the first, most general sign. Your tree or shrub simply isn't growing as vigorously as it should for its age and type. It might be significantly smaller than others of the same variety planted at the same time.
- Reduced Vigor & Overall Decline: The tree just looks "unthrifty." It lacks that healthy, vibrant appearance. My cherry tree was a prime example – it just looked tired.
- Yellowing Leaves (Chlorosis): Often, the leaves will turn yellow, particularly between the veins, while the veins themselves remain green. This is a classic sign of nutrient deficiency, as the girdling root prevents the uptake of essential micronutrients like iron or manganese. I've seen this on my 'Acer palmatum' (Japanese Maple) that I keep in a large pot, making me think it was just hungry, when the root flare was actually the issue.
- Smaller Leaves & Sparse Canopy: The leaves might be noticeably smaller than normal, and the overall foliage can appear thin and sparse, especially in the upper canopy.
- Early Autumn Colour & Leaf Drop: The tree may develop autumn colours prematurely and drop its leaves earlier than other healthy trees of the same species. Our British autumns can be variable, but a significantly early leaf drop is a red flag.
- Branch Dieback: Sections of the crown, or individual branches, may start to die back, particularly on one side of the tree. This asymmetry is a strong indicator, as the girdling root often restricts flow to specific parts of the canopy.
- Lack of Trunk Flare: This is crucial. When you look at the base of a healthy tree, the trunk should visibly flare out as it meets the ground, creating a wider base where the main roots emerge. If your tree goes straight into the ground like a telephone pole, or if the soil level is too high, it's a huge sign that girdling roots might be present. This is where I found the problem with my cherry.
Why Do Girdling Roots Form? Common Causes from Nursery to Garden
Understanding why girdling roots form is crucial for prevention, and honestly, it’s often a combination of factors, many of which start long before the tree even reaches your UK garden. I've made my share of mistakes here, especially in my early days, and I've learned that a keen eye at the nursery and careful planting are key.
One common culprit is the nursery growing process. Trees grown in pots, especially if they've been left in the same pot for too long, can become root-bound. The roots hit the sides of the pot, start circling, and if not corrected before planting, they continue this circling growth pattern in the ground. I've definitely bought plants from garden centres here in the Midlands that were a tangled mess of roots when I took them out of their containers – a sure sign of potential future girdling issues.
Then there's improper planting technique in our gardens. Planting too deep is a major one. When the root flare is buried under soil, roots tend to grow upwards or horizontally around the trunk instead of spreading outwards, seeking oxygen. With our often heavy clay soils here in the Midlands, burying the root flare can also lead to waterlogging around the trunk, stressing the tree further. I confess, when I first started, I thought burying the root ball deeper would somehow protect it from our winter frosts – a completely misguided idea that I've since corrected!
Finally, site conditions can contribute. Compacted soil, common in new build gardens or areas with heavy foot traffic, makes it difficult for roots to penetrate outwards, forcing them to grow closer to the trunk. Even planting too close to foundations or other obstacles can deflect root growth inwards.
Here’s a breakdown of the common causes I've encountered:
| Cause Category | Specific Causes | Randy's UK Garden Notes |
|---|---|---|
| Nursery-Induced | Pot-Bound Plants: Roots circling the inside of the pot. | I've seen this far too often in garden centres. Always check the roots before buying! I gently lift the plant out of the pot to inspect. If it's a dense, circling mat, I either choose another or know I have a job to do untangling before planting. |
| Container Size: Plants outgrowing their pots. | A tree kept in a small pot for too long, especially over a couple of seasons, is highly susceptible. This is why I'm careful with my greenhouse tomatoes; healthy roots are everything! | |
| Improper Potting Mix: Poor drainage leading to circling. | Less common, but a very dense potting mix can encourage roots to stay near the edges. | |
| Planting & Garden-Induced | Planting Too Deep: Root flare buried below soil level. | My biggest early mistake! The root flare must be visible at or just above ground level. For my fruit trees, I now use a planting board to ensure precise depth. |
| Uncorrected Circling Roots: Not spreading out roots. | If you buy a pot-bound plant and just plonk it in the ground, those circling roots will continue to girdle. I now carefully tease out and even prune circling roots before planting. | |
| Compacted Soil: Roots struggle to penetrate outwards. | Here in the Midlands, our heavy clay can be a nightmare. I always amend my planting holes with plenty of good quality compost and grit to encourage outward root growth. | |
| Obstructions: Foundations, paving, other roots. | Roots will take the path of least resistance. If there's a wall or pipe, they might turn inward. Always consider mature size when planting! |
Confirming the Culprit: A Step-by-Step Guide to Diagnosing Girdling Roots
So, you've spotted some suspicious symptoms, and you have a hunch. Now comes the dirty work – confirming if girdling roots are indeed the issue. This is where my old IT troubleshooting skills come in handy; it’s all about methodical investigation, getting right to the source of the problem.
The key to diagnosing girdling roots is to expose the root flare. This is the area where the trunk widens out as it enters the soil. For a healthy tree, this flare should be visible just above the soil line. If it’s buried, you’ll need to carefully excavate.
Here's how I go about it in my UK garden:
- Clear the Area: Gently remove any mulch, soil, or turf from around the base of the tree for about 1-2 feet outwards. I use a hand trowel or even my fingers to avoid damaging any surface roots.
- Locate the Root Flare: Start by carefully scraping away soil from the trunk, working outwards. You're looking for that natural widening. If the trunk goes straight down like a post, you're probably too deep.
- Excavate Carefully: Use a small hand trowel, a stiff brush, or even an air spade (if you're serious and have one!) to remove soil from the upper root system. I tend to use a small trowel and my hands, taking my time. The goal is to expose the top 2-4 inches of the main root system radiating from the trunk. Be incredibly gentle; you don't want to damage healthy roots.
- Inspect for Girdling Roots: Once the root flare and main roots are exposed, look for roots that are:
- Circling the trunk: These are the classic girdling roots, growing horizontally around the trunk, often pressing directly against it.
- Growing over other main roots: One root might be crossing and constricting another major root.
- Growing upwards: Roots that have grown up towards the soil surface and then started to circle.
- Assess the Severity: Note how many girdling roots you find, their size, and how tightly they are constricting the trunk or other roots. Sometimes it's just one or two, other times it can be a tangled mess.
This process can be a bit messy, especially with our often damp UK soil, but it's absolutely vital. I've spent a good hour or two carefully digging around a struggling shrub before, and the feeling of identifying the problem is incredibly satisfying.
To help differentiate girdling roots from other issues that might cause similar symptoms, here's a quick comparison:
| Symptom/Observation | Girdling Roots | Nutrient Deficiency (e.g., Iron) | Drought Stress (Severe) | Pest/Disease (e.g., Verticillium Wilt) |
|---|---|---|---|---|
| Root Flare Appearance | Buried, or roots visibly circling/constricting trunk. No clear flare. | Normal and visible. | Normal and visible. | Normal and visible (unless root disease is present). |
| Trunk/Root Inspection | Physical constriction of trunk/roots by other roots. | No physical constriction. | No physical constriction. | May see cankers, lesions, or signs of borers on trunk/branches. |
| Leaf Yellowing Pattern | Often interveinal chlorosis, can be unevenly distributed across the canopy. | Classic interveinal chlorosis (veins green, tissue yellow), often uniform across new growth. | General wilting, browning, crisping of leaves, starting at edges. | Wilting, discolouration, spots, or sudden dieback, often affecting one side or branch. |
| Growth Stunting | Slow, gradual decline over years, often asymmetrical. | Can be stunted, but usually less severe than girdling roots, affects entire plant. | Sudden wilt and decline if severe, or gradual if chronic. | Highly variable, from sudden branch death to gradual decline depending on specific pest/disease. |
| Response to Fertiliser | Little to no improvement, as uptake is physically blocked. | Often responds well to targeted fertilisers (e.g., chelated iron). | Responds to adequate watering. | Requires specific treatments for the pest/disease. |
| Affected Area | Can be one-sided or general, but always originates from the root system constriction. | Generally affects the entire canopy, sometimes more pronounced on younger leaves. | Entire canopy, especially in direct sun. | Can be localised to specific branches, or widespread if systemic. |
Practical Solutions: Safely Removing Girdling Roots from Established Trees
Right, so you’ve done the detective work, you’ve peered under the soil, and you’ve confirmed the unwelcome presence of a girdling root. Don't despair! This isn't a death sentence for your tree, but it does mean it's time for some careful, targeted surgery. I've had to tackle this myself on a couple of occasions, once on a rather sentimental 'Katy' apple tree in my old garden, and more recently on a mature shrub here in the Midlands – a viburnum that was looking increasingly stressed. It's a delicate operation, but incredibly rewarding when you see the tree bounce back.
Here's my step-by-step guide to safely removing those strangling roots:
- Gather Your Toolkit: Before you start, make sure you have the right gear. I always recommend a sturdy hand trowel, a root hook (invaluable for teasing soil away without damaging roots), bypass pruners (sharp, clean ones!), and a small hand saw designed for roots. For larger, older roots, you might even need a chisel and mallet. Safety glasses are a must, believe me – soil and root fragments fly! And good gardening gloves, of course.
- Excavate the Root Collar (Again): Carefully, and I mean carefully, excavate around the base of the tree. You want to expose the entire root collar – that flare where the trunk widens and transitions into the root system. Work slowly with your trowel and root hook, gently pushing soil away. I remember how painstaking this was on my apple tree, trying to distinguish between the main support roots and the problem ones without doing more harm than good.
- Identify the Culprit(s): Once the root collar is exposed, clearly identify the girdling roots. These are the ones growing across the trunk or main radial roots, pressing tightly against them. They often look different – sometimes flattened on the side where they're pressing, or just clearly out of place, not radiating outwards as they should. Don't be tempted to cut every root you see; focus only on the ones that are actively constricting.
- The Cut – Precision is Key: This is the critical bit. For smaller girdling roots (up to an inch or so thick), I use my sharp bypass pruners. For thicker roots, the root saw comes out.
- Make two cuts: The first cut should be on the side of the girdling root away from the trunk, ensuring you don't nick the main trunk.
- Remove a section: Then, make a second cut closer to the trunk, removing a small section (a couple of inches) of the girdling root. This ensures it can’t grow back and re-girdle.
- Clean cuts: Always aim for clean, smooth cuts. Ragged edges are an open invitation for disease, something we definitely want to avoid, especially with our damp UK weather creating ideal conditions for fungal issues.
- Don't damage the trunk: Be incredibly careful not to cut into the main trunk or any healthy, primary structural roots. If a girdling root is deeply embedded, it might be better to remove it in stages or even leave a small section rather than risk major damage to the tree.
- Post-Removal Inspection: After removing the offending roots, take a moment to inspect the area. Are there any other smaller girdling roots you missed? Is the root collar now clear and unobstructed?
- Backfill Gently: Once satisfied, carefully backfill the excavated area with the original soil. Avoid mounding soil up against the trunk – keep that root collar exposed to the air, just as nature intended. I always gently firm the soil, but never compact it, to allow for good aeration and water penetration.
Prevention is Key: Best Practices for Planting and Ongoing Tree Care
While it's great to know how to fix girdling roots, an ounce of prevention is worth a pound of cure, especially when it comes to established trees. I've learned this the hard way, making a few classic mistakes in my early gardening days here in the UK. One of my biggest learning curves was with a beautiful little birch tree I planted. I didn't tease out the roots enough from its pot, and sure enough, a few years later, it started showing signs of struggle. Now, I'm absolutely meticulous, and I reckon it's saved me a lot of heartache (and backache!).
Here are my top tips for preventing girdling roots from the very start, and through ongoing care:
The Planting Stage: Get it Right From Day One
- Inspect Nursery Stock Thoroughly: This is where it all begins. Before you even buy a tree or shrub, gently slide it out of its pot (if possible) and check the roots. If they're tightly circling the inside of the pot, or you can already see large roots spiralling around the main stem, it's a red flag. I'd honestly advise walking away and finding a healthier specimen. It might seem picky, but you're saving yourself years of potential problems. I’ve become quite the expert at the garden centre, carefully unpotting things before buying them – much to the amusement of the staff sometimes!
- Prepare the Root Ball: If the roots are slightly circling but not too severe, gently tease them out and spread them radially. Sometimes I even make a few vertical cuts with a sharp knife down the sides of the root ball to encourage outward growth. For bare-root trees, which are fantastic for planting in the dormant season here in the UK, make sure the roots are spread out like spokes on a wheel in the planting hole.
- Plant at the Correct Depth: This is perhaps the most crucial step. The root collar (that natural flare where the trunk meets the roots) must be at or slightly above the soil line. Planting too deep is a common mistake and practically guarantees girdling roots will form. I always make sure I can see that distinct flare, even if it means raising the tree slightly in the hole. My rule of thumb is, if I can't see the flare, it's too deep.
- Dig a Wide, Shallow Hole: Don't dig a narrow, deep hole. Trees need space for their roots to spread outwards. Aim for a hole that's two to three times wider than the root ball, but only as deep as the root ball itself (or slightly less, to ensure that root collar exposure).
- Backfill with Original Soil: Unless your soil is truly awful, use the native soil you dug out to backfill the hole. Amending with lots of compost can sometimes create a 'pot effect,' discouraging roots from venturing out into the surrounding soil.
Ongoing Care for Long-Term Health
- Proper Mulching: Mulch is brilliant for retaining moisture, suppressing weeds, and regulating soil temperature – all good things for root health. However, apply it correctly! Create a 'doughnut' shape around the tree, keeping the mulch a few inches away from the trunk. Never create a 'volcano' of mulch piled up against the stem, as this can encourage rot and hide future girdling roots. I use well-rotted compost or wood chippings from a local tree surgeon for my mulching here in the Midlands.
- Deep, Infrequent Watering: Encourage roots to grow deep and wide by watering deeply but less frequently, rather than shallowly and often. This is especially important during dry spells, which, despite our reputation, we definitely get here in the UK, even in the Midlands! A good soak once a week during a dry summer is far better than a light sprinkle every day.
- Regular Root Collar Inspections: Especially for young trees, make it a habit to check the root collar every few years. Just gently scrape away a little soil to ensure no roots are beginning to encircle the trunk. It's much easier to snip off a small, young girdling root than a thick, established one.
Here’s a quick comparison of good practices versus common mistakes, which I've unfortunately experienced a few of myself!
| Good Planting/Care Practice | Common Mistake Leading to Girdling Roots |
|---|---|
| Inspect roots at nursery; avoid root-bound trees | Buying trees with circling roots; not checking below soil line |
| Plant with root collar visible at or slightly above grade | Planting too deep; burying the root flare |
| Tease out roots from root ball; spread radially | Planting a tightly circling root ball directly into the ground |
| Dig wide, shallow planting hole | Digging a narrow, deep hole; creating a 'pot' effect |
| Use native soil for backfill | Over-amending soil in the hole; creating a distinct soil interface |
| Apply 'doughnut' mulch away from trunk | Piling mulch high against the trunk ('volcano' mulching) |
| Deep, infrequent watering to encourage deep roots | Shallow, frequent watering; encouraging surface root growth |
| Regularly check root collar for emerging girdling roots | Neglecting the root collar area after planting |
After the Fix: Nurturing Your Tree Back to Health
You’ve done the hard work, you've removed the offending roots, and now it's time for the recovery phase. Think of it like a patient after surgery – they need a bit of TLC to get back on their feet. In my garden, I’ve found that patience and consistent care are absolutely key. It’s not an overnight transformation, but the signs of improvement can be incredibly gratifying.
Here's how to nurse your tree or shrub back to full health:
- Consistent Watering is Crucial: This is probably the most important step post-surgery. Root disturbance is stressful, and the tree will need ample moisture to recover and grow new feeder roots. For a few weeks, especially if our typical UK weather isn’t providing consistent rain, make sure the soil around the base stays consistently moist but not waterlogged. I usually give a good, deep soak every few days if there’s no rain, checking the soil moisture with my finger before I reach for the hose. My 'Katy' apple tree certainly appreciated this during a drier spell we had in the Midlands after I'd worked on it.
- Maintain Proper Mulching: A layer of organic mulch (like well-rotted compost or wood chips) around the base of the tree will help retain soil moisture, regulate soil temperature, and slowly release nutrients. Just remember that 'doughnut' shape – keep it away from the trunk itself. This provides a stable, healthy environment for the recovering root system.
- Go Easy on Fertiliser: Resist the urge to 'feed' your tree heavily. Its priority right now is recovery, not rapid growth. A strong dose of fertiliser can actually stress a recovering tree. If you feel it needs a boost, a very light application of a balanced, slow-release organic fertiliser, or simply letting your mulch break down, is usually sufficient. I tend to stick to adding a fresh layer of my homemade compost around the base – it’s gentle and effective.
- Monitor for Signs of Stress and Recovery: Keep a close eye on your tree. Continue to look for symptoms like wilting, yellowing leaves, or dieback. On the flip side, look for positive signs: new, healthy leaf growth, better colour, and an overall more vigorous appearance. These improvements might be subtle at first, especially if the tree was severely affected, but they will come. It’s like watching my 'Cherokee Purple' tomatoes slowly fill out after a tough start to the season – it takes time, but the reward is immense.
- Avoid Further Stress: During the recovery period, avoid any other major stressors. This means no heavy pruning (beyond removing any dead or clearly diseased branches), no digging near the root zone, and protecting it from pests if possible.
- Patience, Always Patience: Trees operate on a much slower timescale than us gardeners. It can take several months, or even a year or two, for a tree to fully recover from significant girdling root removal. Don't get discouraged if you don't see immediate, dramatic changes. Continue with good cultural practices, and your tree will thank you for it in the long run. The satisfaction of seeing a struggling tree regain its vigour is one of the most rewarding aspects of gardening, in my opinion!
Conclusion
Girdling roots are a silent, insidious threat to the health and longevity of our beloved trees and shrubs, often going unnoticed until significant damage has occurred. But as I've hopefully shown, they don't have to be a death sentence. By learning to recognise the subtle symptoms, understanding the causes, and taking proactive steps, we can diagnose and correct this common problem.
My journey into intense gardening over the last five years, here in my 800 sq ft Midlands garden, has taught me that prevention truly is the best medicine. Meticulous planting, careful inspection of nursery stock, and consistent, thoughtful care are the foundations of a healthy, thriving garden. However, when nature throws a curveball, knowing how to intervene safely and effectively is an invaluable skill.
So, take a moment to look at your trees and shrubs. Get down on your hands and knees, gently clear some soil, and check that root collar. It might just be the most important bit of detective work you do in your garden this year. Saving an established tree from slow decline is not only incredibly satisfying but also a vital contribution to our local environment. Happy gardening, and here’s to many more years of healthy, happy trees!
