
Introduction: The Enduring Reward of Homegrown Asparagus
There's something truly magical about the first spear of asparagus pushing through the soil in spring. For me, here in my 800 sq ft Midlands garden, it signals the real start of the growing season, a promise of deliciousness that no supermarket stalk can ever quite match. I still remember the first time I harvested my own asparagus – a few skinny spears, carefully steamed, tasting of pure sunshine and earthy goodness. It was a moment of pure triumph, especially after the patience it took to get there!
Asparagus is often called the "king of vegetables," and for good reason. It’s a perennial crop, meaning once you’ve put in the initial effort, it will reward you with harvests for 15, even 20 years or more. Think about that: a planting that outlives most of your other crops and just keeps on giving. I’ve been intensively gardening for over five years now, constantly experimenting and learning in my raised beds and greenhouse, and establishing my asparagus patch was one of the most satisfying projects I’ve undertaken. It’s not a quick win, mind you, but the enduring reward makes every bit of the initial work absolutely worth it.
If you’re ready to embark on this incredibly rewarding journey and bring the taste of spring to your own UK garden, you're in the right place. This guide is built on my own trials, errors, and successes here in the British climate, taking you step-by-step from choosing the perfect spot and the best crowns, all the way to that glorious first harvest. Let's dig in!
Choosing Your Patch: Site Selection for Asparagus Success in the UK
Picking the right spot for your asparagus patch is arguably the most critical decision you’ll make. Asparagus is a long-term commitment, so you can’t just pick it up and move it if you change your mind. I learned this the hard way with my first patch – I underestimated the afternoon shade from a neighbour's tree, and while it grew, it never truly thrived. My current, much more successful patch is in a dedicated raised bed, specifically chosen for its prime location.
Here in the UK, especially with our often unpredictable weather, asparagus needs a site that offers a few key things:
- Full Sun: Asparagus absolutely loves sunshine. Aim for a spot that gets at least 6-8 hours of direct sunlight per day. In my Midlands garden, I’ve found that a south-facing spot, unshaded by fences or my greenhouse, yields the strongest, thickest spears. Anything less, and you’re likely to get thinner, less vigorous growth.
- Excellent Drainage: This is non-negotiable for asparagus, especially in our often wet British climate. Asparagus crowns hate sitting in soggy soil; it’s a sure-fire way to encourage rot and disease. My raised beds are a huge advantage here, as they naturally provide superior drainage. If you’re planting in open ground, assess your soil carefully. If you have heavy clay like I do in some parts of my garden, you’ll need to put in some serious work amending it (more on that in the ground preparation section). A simple test is to dig a hole about a foot deep, fill it with water, and see how long it takes to drain. If it’s still standing water after a few hours, you’ve got drainage issues to address.
- Shelter from Strong Winds: While they love sun, young asparagus shoots can be surprisingly delicate. Strong, persistent winds can damage the ferny growth, which is essential for the crowns to photosynthesise and build up energy for the following year's harvest. My current patch benefits from a low fence that acts as a windbreak without casting too much shade. Think about prevailing winds in your specific UK location and how you might provide a little protection.
- Freedom from Weeds: Asparagus doesn't compete well with weeds, especially in its early years. Once established, the ferny growth can shade out some weeds, but during establishment, they can quickly outcompete your young crowns for nutrients and water. Choose a spot that you can thoroughly clear of perennial weeds like bindweed or couch grass before planting. Trust me, trying to remove deep-rooted weeds once your asparagus is in place is a nightmare I wouldn't wish on anyone.
- Longevity: Remember, this patch is going to be there for decades. Don't plant it where you might want to put a shed in five years or where it might block future access. Give it pride of place.
I’ve seen firsthand the difference a well-chosen site makes. My first patch, tucked into a slightly shadier, heavier corner, never produced spears as thick or as abundant as the one now basking in full sun in a well-drained raised bed. It's truly a testament to getting the foundation right from the start.
Selecting the Best Crowns: Varieties, Quality, and Male vs. Female
Once you’ve nailed down your perfect spot, it’s time for the exciting part: choosing your asparagus crowns! This is where a little knowledge goes a long way, especially when aiming for productivity here in the UK. I’ve experimented with a few types over the years, and I’ve definitely found what works best for our British climate.
Crown Quality: Don't Skimp!
When you receive your crowns (usually in late winter/early spring), inspect them carefully. They should be firm, plump, and have several healthy "tentacles" or roots radiating from a central bud. Avoid any that look shrivelled, mouldy, or damaged. You’re investing in a long-term crop, so don't settle for anything less than top quality from a reputable UK supplier. I usually order mine from specialist nurseries online or from my local garden centre if I can verify their freshness.
Male vs. Female Plants: The Productivity Secret
This is a crucial point for maximising your harvest. Asparagus plants are either male or female.
- Female plants produce smaller, fewer spears and also put energy into developing berries (seeds), which can self-seed and become weedy.
- Male plants don't produce seeds. Instead, they channel all their energy into spear production, leading to significantly higher yields of larger, thicker spears.
Modern asparagus varieties are predominantly "all-male" hybrids, specifically bred for increased productivity and vigour. This is what I plant exclusively in my garden. While heritage varieties like 'Mary Washington' are still popular, if you're serious about getting the best yield, go for an all-male hybrid suitable for the UK.
Best UK Varieties: My Top Picks
Here’s a comparison of some popular and reliable asparagus varieties, focusing on what works well in the UK:
| Variety Name | Type | Key Characteristics for UK Gardeners |
5. The Planting Process: From Trench to Crown for Optimal Growth
Right, so you've done the hard graft of preparing your bed, and your beautiful asparagus crowns are waiting. This is the moment where we get them settled into their new home. I always find a real sense of satisfaction here, knowing these little bundles of roots are about to start a decades-long journey in my UK garden. Getting this right is absolutely crucial for their long-term health and productivity.
First, you'll want to create little mounds along the bottom of your trench. I usually aim for a mound about 10-15cm high, spaced about 30-45cm apart, depending on the variety and how much space I can spare in my 800 sq ft Midlands patch. These mounds are important because they give the crown's roots something to spread over, like a little throne for future spears.
Next, carefully place a crown on top of each mound. This is the delicate bit. Spread its roots out as evenly as you can, draping them down the sides of the mound. Think of it like a spider with its legs splayed out – you want them all pointing outwards, not tangled up. I remember my first time planting; I was so focused on getting them in the ground, I didn't quite spread the roots properly on one or two, and those crowns were always a bit weaker than the others in subsequent years. Live and learn, eh?
Once the roots are nicely splayed, backfill the trench with about 5-8cm of your prepared soil mixture, just enough to cover the crown. Gently firm the soil around them – you don't want air pockets, but don't compact it so much you squeeze the life out of them. Water them in really well. Even if the British weather has been doing its thing and it’s a bit damp, a good watering helps settle the soil around those precious roots. Over the next few weeks, as the shoots start to emerge, you'll gradually fill the trench with more soil until it's level with the surrounding ground. This gradual covering encourages strong root development and protects the young shoots.
6. First-Year Care and Patience: Nurturing Your Young Asparagus Patch
Now comes the hardest part for an impatient gardener like me: waiting. Asparagus is a long-term investment, and the first year (sometimes even the second!) is all about nurturing those crowns and letting them build up their energy reserves. Resist the urge to harvest any spears in their first year. I know, it's tough when you see those little green shoots poking through, but trust me, your future self will thank you for this patience.
The primary tasks for this first year are consistent watering, meticulous weeding, and a good thick mulch.
- Watering: Young asparagus plants need regular moisture, especially during dry spells, which we get even here in the UK Midlands. I keep an eye on the soil moisture, aiming for consistently damp, but not waterlogged, conditions. A good deep watering once or twice a week if it's dry is better than frequent shallow sprinkles.
- Weeding: This is non-negotiable. Asparagus hates competition. Weeds will steal precious nutrients and water from your developing crowns. I spend time every weekend in my 800 sq ft garden diligently hand-weeding around my asparagus, making sure not to disturb the emerging shoots or delicate roots.
- Mulching: Once the plants are established and growing, a good 5-10cm layer of organic mulch (like well-rotted garden compost or manure) will be your best friend. I've found it makes a huge difference in my UK garden. It suppresses weeds, retains moisture in the soil (vital during those unexpectedly hot British summers), and slowly releases nutrients. This is especially helpful as our UK spring weather can be quite unpredictable, swinging from wet to dry in a matter of days.
Throughout the growing season, your asparagus will produce tall, fern-like foliage. This is exactly what you want! These "ferns" are vital; they photosynthesise, converting sunlight into energy that gets stored in the crowns for next year's spears. Don't cut them back prematurely. Leave them be until they yellow and die back naturally in the autumn, usually around October or November here in the Midlands. Once they've yellowed, I cut them down to ground level and add them to the compost heap. This helps prevent diseases and makes the bed tidy for winter.
7. Harvesting Your Reward: When and How to Enjoy Your First Spears
Oh, the anticipation! After all that waiting and nurturing, this is the moment you've been dreaming of. Harvesting your very first homegrown asparagus spear is a pure moment of gardening bliss, a true testament to patience. I still remember the thrill of snapping my first pencil-thick spear from my patch in the Midlands – it tasted like victory!
The general rule of thumb for harvesting is to wait until the third year after planting crowns. Some vigorous varieties might give you a small harvest in the second year, but I always err on the side of caution and wait for that third season to ensure the crowns are truly strong and established. Over-harvesting too early is one of the biggest mistakes you can make; it weakens the crowns and significantly reduces their future productivity. I learned this the hard way when I got a little too excited and took a few too many spears from a second-year patch, and that section never quite recovered its vigour.
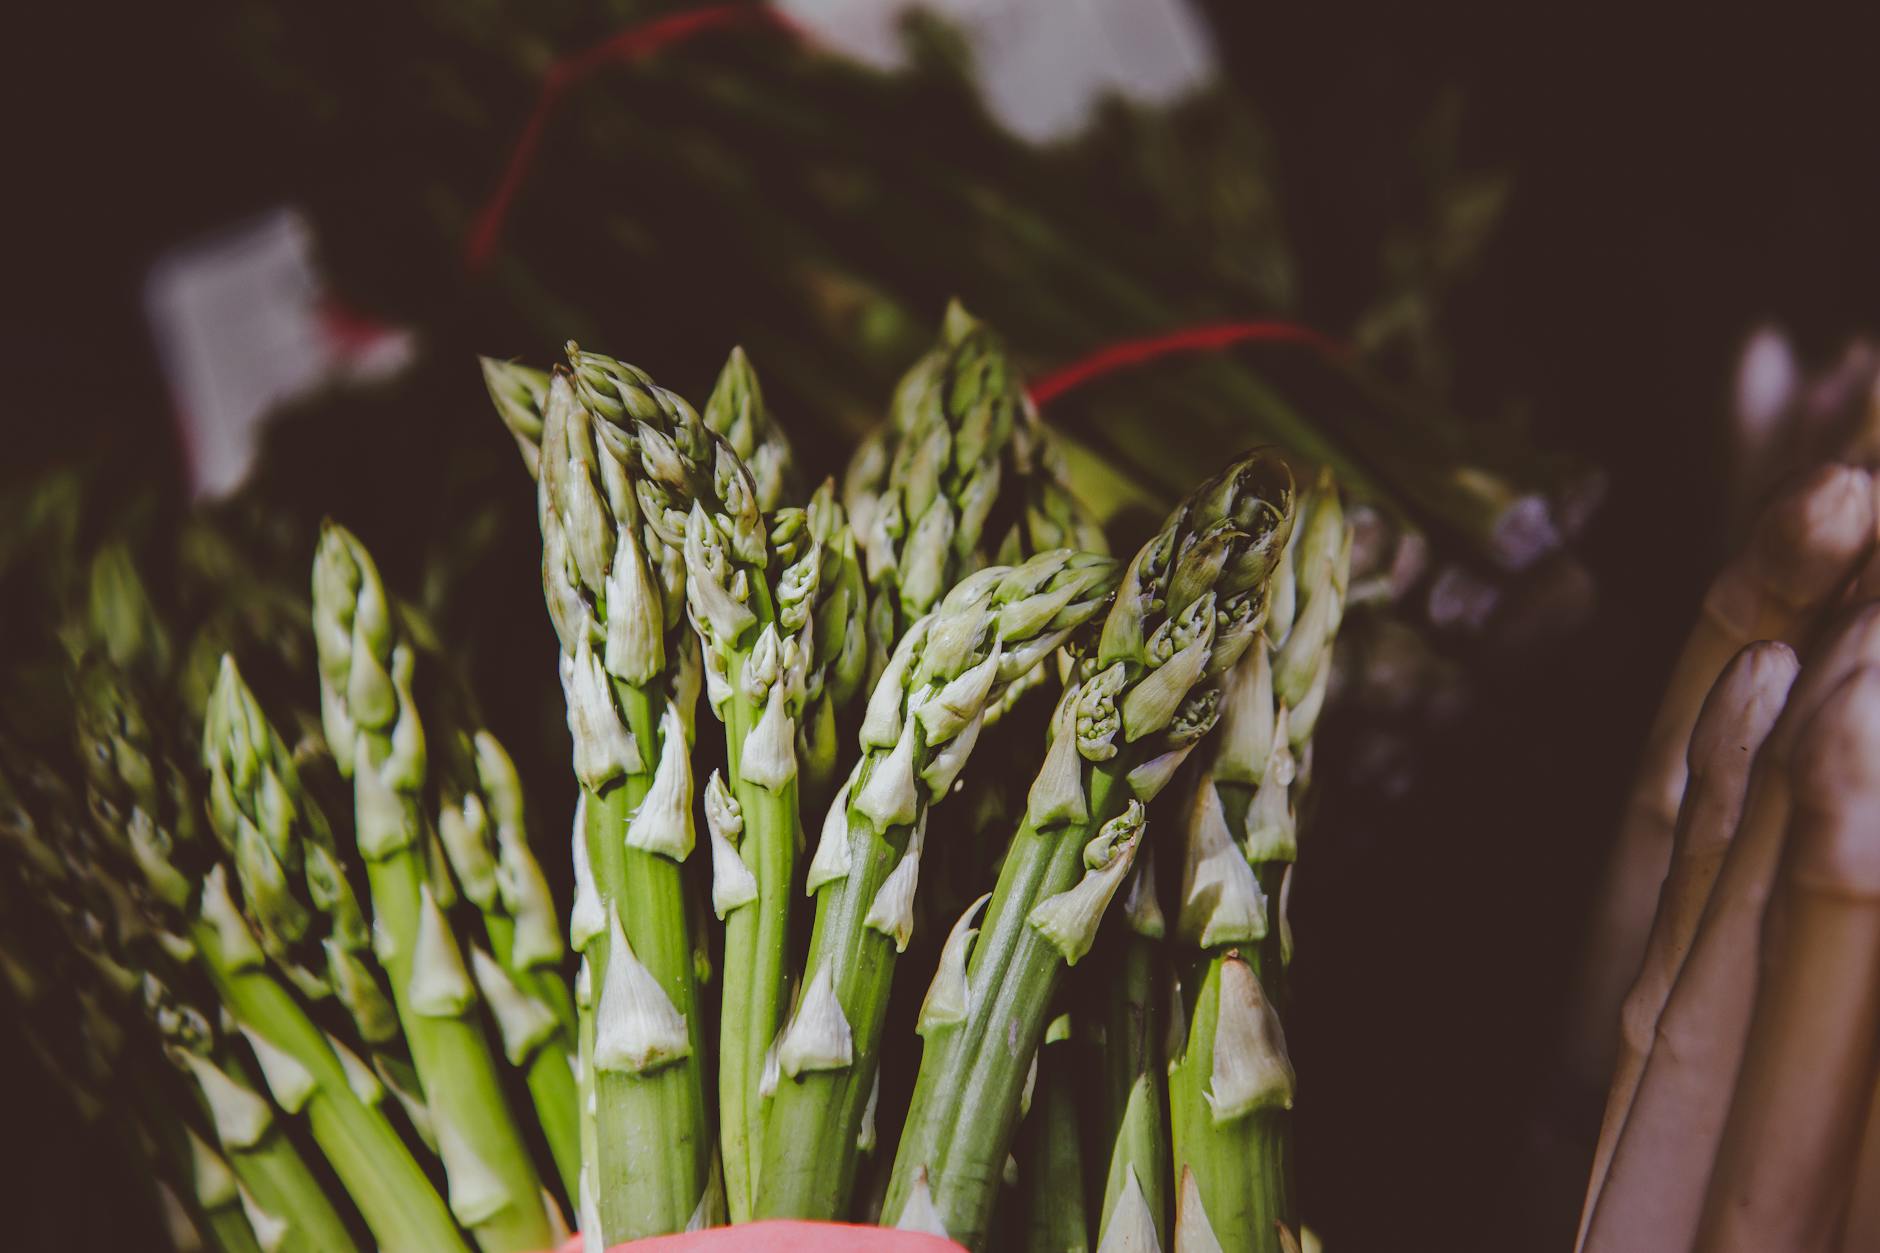
When it's time to harvest, typically from April to June here in the UK, look for spears that are about 15-20cm tall and about the thickness of a pencil. Thicker spears are generally more tender and flavourful.
How to Harvest: Snapping vs. Cutting
There are two main schools of thought here, and I've tried both in my UK garden:
- Snapping: This is my preferred method. Simply bend the spear near the base until it snaps cleanly. It's surprisingly satisfying! The spear will naturally break at its tender point, leaving behind the tougher, woody part. This also means you don't accidentally damage any emerging young spears below the soil.
- Cutting: You can also use a sharp knife to cut the spear just below ground level. While some gardeners prefer this for a cleaner look, I find it carries a higher risk of accidentally damaging other emerging spears or the crown itself. Plus, you end up with more woody stem that needs trimming later.
For your very first harvest season (usually year three), be conservative. Harvest for only 2-3 weeks, or until the spears start to become thinner. As a general guide, aim for no more than 2-3 spears per crown in this initial harvest year. This allows the plant to build up plenty of energy for future seasons. In subsequent years, as your patch matures, you can extend the harvest period to 6-8 weeks, typically from late April to late June here in Britain, always stopping when spears become noticeably thinner.
Here's a quick guide to help you manage your expectations and harvest:
| Aspect | Year 1 (Planting Year) | Year 2 (First Full Growth Year) | Year 3 (First Harvest Year) | Year 4+ (Mature Patch) |
|---|---|---|---|---|
| Harvesting | NONE (Crucial for establishment) | NONE (Or very minimal if vigorous) | Light Harvest (2-3 weeks) | Full Harvest (6-8 weeks) |
| Spear Quantity/Crown | 0 | 0-1 (if very strong) | 2-3 spears | As many as the plant produces |
| Primary Focus | Root establishment, fern growth | Crown strengthening, fern growth | Initial energy replenishment for future | Sustained productivity, annual fern growth |
| Long-Term Impact | Foundation for decades of harvest | Ensures strong, productive crowns | Establishes harvest rhythm | Maximizes yield, maintains plant health |
Remember to always leave some spears to grow into ferns, even in a mature patch, especially towards the end of the harvest season. These ferns are the powerhouse for next year's crop!
Conclusion: The Enduring Reward
And there you have it – the full journey from selecting your asparagus crowns to enjoying those incredibly tender, sweet spears right from your own back garden here in the UK. Establishing a productive asparagus patch is undeniably a labour of love, requiring patience, careful planning, and a little bit of faith in nature's rhythm. But believe me, as a gardener who's been through the whole process in my Midlands garden, the reward is beyond compare.
There’s nothing quite like walking out to your garden on a crisp spring morning, seeing those vibrant green spears poking through the soil, and knowing they've come from your own efforts. The taste of freshly harvested asparagus, cooked minutes after picking, is a culinary experience that no shop-bought variety can ever truly match. It’s a flavour that encapsulates spring in Britain, a taste of pure, unadulterated goodness.
Yes, there's the initial wait, and yes, our unpredictable British weather can throw a curveball or two. I’ve battled slugs in wet springs and had to water diligently through dry spells. But by choosing the right spot, preparing your soil with care, selecting healthy crowns, and providing consistent care in those crucial first years, you'll be setting yourself up for decades of delicious harvests.
So, if you've been contemplating adding asparagus to your plot, I urge you to take the plunge. It might just be the most rewarding long-term investment you make in your garden. Trust the process, enjoy the journey, and prepare for a lifetime of homegrown culinary delights. Happy planting, fellow UK gardeners!
