Introduction: Why Grow Oyster Mushrooms on Spent Coffee Grounds at Home?
Now, if you're anything like me, your UK garden – whether it's a sprawling patch like my 800 sq ft in the Midlands or a collection of pots on a patio – is a constant source of experimentation. I've spent the last five years, since trading my IT desk for a trowel, absolutely obsessed with growing anything and everything. From coaxing 'Cherokee Purple' tomatoes to ripen in my greenhouse despite our often-iffy British summers, to nurturing a riot of herbs and battling slugs (a perennial UK gardener's woe!), I'm always looking for the next exciting challenge. But what if I told you that some of the most satisfying harvests don't even need soil, or even a patch of sunshine? What if I told you that you could be growing gourmet oyster mushrooms right there in your kitchen, on something you'd usually just chuck in the bin?
That's right, we're talking about growing delicious oyster mushrooms on spent coffee grounds. It sounds a bit mad, I know, but trust me, it’s a game-changer. For a keen gardener like myself, dedicated to making the most of every resource and embracing sustainable practices, this method is a dream. We Brits drink a lot of coffee, don't we? Instead of sending those grounds to landfill or even just the compost bin (though they're great there too!), we can turn them into a thriving ecosystem that yields fresh, flavourful mushrooms. I first stumbled upon this idea a couple of years back, intrigued by the low-tech promise and the sheer audacity of it. After a few initial fumbles – which I’ll share, because that’s how we learn, eh? – I’ve now got a system that consistently provides me with beautiful flushes of oyster mushrooms, even when the rain is lashing down outside my greenhouse. It's incredibly satisfying, remarkably simple once you get the hang of it, and a brilliant way to add a unique, home-grown ingredient to your plate.
Essential Supplies: Gathering Your Low-Tech Cultivation Kit
Right, let's get down to brass tacks. The beauty of growing oyster mushrooms on coffee grounds is that it's wonderfully low-tech. You don't need fancy equipment, just a few bits and bobs you might already have around your UK home, or can easily pick up. I’ve tried a few different setups in my time, from elaborate contraptions to the absolute bare minimum, and I’ve distilled it down to what truly works for a beginner here in Britain.
Here’s what you’ll need to get started:
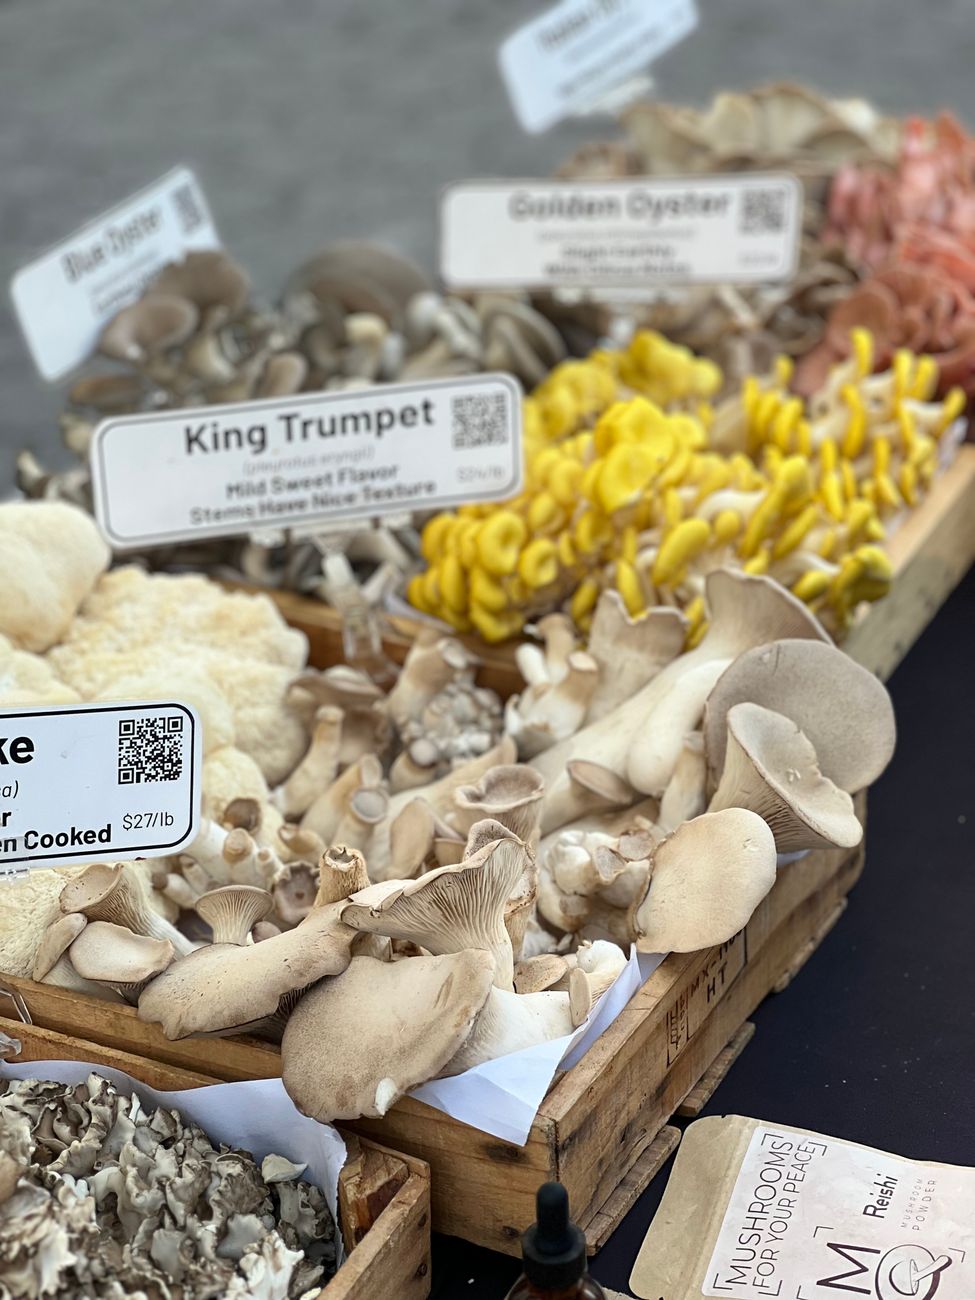
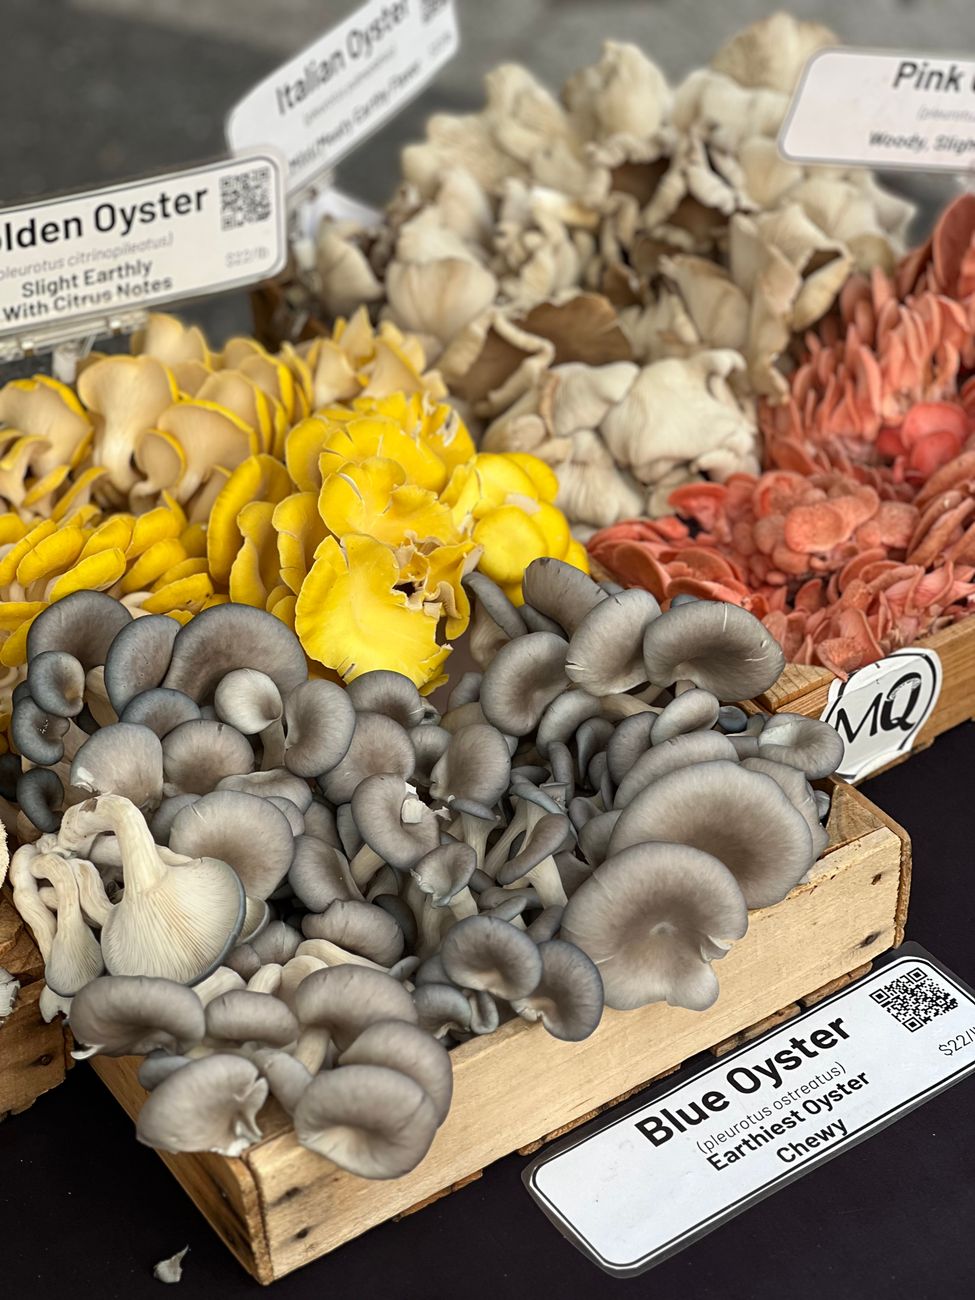
- Oyster Mushroom Grain Spawn: This is your starter culture, basically mushroom seeds on a grain base. Don't skimp here; quality matters. I usually go for a reputable UK supplier online. I've found that about 100-200g of spawn is plenty for a decent first batch with coffee grounds.
- Spent Coffee Grounds: Your substrate! The fresher, the better – ideally collected the same day they were brewed. More on this in the next section, but start saving those morning grounds.
- A Container: This is where your mushrooms will grow. You want something that allows for good gas exchange but retains moisture. I’ve experimented with everything from old plastic takeaway tubs to purpose-built grow bags.
- Spray Bottle: Essential for maintaining humidity, especially in our often-dry centrally heated homes here in the UK during winter.
- Rubbing Alcohol (Isopropyl Alcohol) or Bleach Solution: For sterilising your workspace and tools. Hygiene is paramount in mushroom growing, trust me, I learned that the hard way with my first batch getting a rather unappetising green mould!
- Gloves: Disposable gloves help maintain a sterile environment.
- A Dark, Warm Spot: For incubation. Think airing cupboard, under a sink, or a warm cupboard.
- A Bright, Humid Spot: For fruiting. A bathroom or kitchen corner can work well.
To give you a better idea of your container options, here’s a quick comparison based on my own trials here in my Midlands garden:
| Item | Option 1: Filter Patch Grow Bags | Option 2: 5-Litre Food Grade Bucket (with drilled holes) | Option 3: Plastic Food Containers (e.g., takeaway tubs) |
|---|---|---|---|
| Cost | ££ (mid-range, reusable for a few cycles) | £ (very cheap, often free if repurposed) | £ (often free, repurposed from household waste) |
| Ease of Use | Very easy – designed for mushroom growing, good gas exchange | Moderate – requires drilling holes, good for larger batches | Easy – readily available, good for small-scale experiments |
| Sterilisation | Autoclavable (if you have one), or pasteurisation in hot water bath | Easy to wash with hot soapy water and sanitiser | Easy to wash with hot soapy water and sanitiser |
| Pros | Optimal gas exchange, robust, good yields, reusable | Durable, cheap, good for sequential flushes, can handle more substrate | Super accessible, great for trying it out, low commitment |
| Cons | Requires purchase, not as aesthetically pleasing for some | Requires basic DIY skills (drilling), can dry out if holes are too big or many | Smaller yields, can be prone to drying out, less ideal gas exchange |
| Randy's Pick | Filter Patch Grow Bags (for consistency and ease) or Repurposed Buckets (for sustainability and larger yields once confident). |
I generally recommend starting with a few plastic food containers or a small grow bag. It’s less commitment and allows you to get a feel for the process before scaling up. My very first successful flush came from an old ice cream tub – true story!
Prepping Your Substrate: Sterilising Coffee Grounds and Inoculating with Spawn
This is where the magic really begins, and where good hygiene is absolutely non-negotiable. Think of it like sowing seeds indoors for your garden – you want a clean start to give your plants (or in this case, fungi!) the best chance.
First things first, collecting your coffee grounds. You want them fresh, ideally used within 24 hours. The longer they sit, the more chance for competing moulds and bacteria to start growing, which we absolutely don't want. I usually collect mine from my own morning brew, but I’ve also had great success popping into my local independent coffee shop here in the Midlands and asking if they’d mind saving some for me. Most are more than happy to help a keen gardener, and it’s a fantastic way to divert waste. Once collected, try to keep them in a sealed container in the fridge if you're not using them immediately.
Now, for sterilisation. We need to kill off any unwanted microorganisms that might compete with our oyster mushroom spawn. For coffee grounds, it's actually quite simple and doesn't require a pressure cooker, which is brilliant for us low-tech home growers.
Here's my preferred method:
- Boiling Water Method:
- Place your fresh coffee grounds into a large, heat-proof bowl or bucket.
- Boil a kettle of water and pour it directly over the grounds until they are thoroughly saturated, like a thick, muddy paste.
- Cover the bowl with a lid or cling film and let it sit for at least 30 minutes, or until the grounds have completely cooled down to room temperature. This is crucial! If the grounds are too hot, they will kill your spawn. I learned this when I was too impatient on a chilly autumn day here in the UK and wondered why nothing was happening. Patience, Randy, patience!
- Once cool, drain off any excess water. You want the grounds to be moist, but not waterlogged – they should feel like a wrung-out sponge. If they're too wet, your mycelium might struggle to colonise, and you risk anaerobic conditions.
Once your coffee grounds are prepped and cooled, it's time for inoculation. This is where we introduce the mushroom spawn to its new home.
- Prepare Your Workspace: Find a clean, clear surface. Wipe it down thoroughly with your rubbing alcohol or bleach solution. Put on your gloves.
- Break Up the Spawn: Your oyster mushroom grain spawn will likely be a solid block of white mycelium. Break it up into individual grains – you can do this by squeezing the bag, or carefully opening it and crumbling it with your gloved hands.
- Mix the Spawn with Coffee Grounds: This is the fun bit! In your sterilised container (grow bag, bucket, or tubs), layer your drained coffee grounds and sprinkle some of the broken-up spawn. I usually aim for a ratio of about 10-15% spawn to coffee grounds by weight. So, for 1kg of coffee grounds, I’d use 100-150g of spawn. You can also just dump all the grounds and all the spawn into a large, clean bowl and mix it thoroughly with your gloved hands. Ensure the spawn is evenly distributed throughout the coffee grounds. This gives the mycelium the best chance to spread quickly and colonise the entire substrate.
- Pack Your Container: Once mixed, firmly but gently pack the inoculated coffee grounds into your chosen container. If using a grow bag, seal it up according to its instructions, usually with a heat sealer or a tight knot. If using a bucket, put the lid on. For tubs, simply place the lid on. You’re aiming for a compact block that retains moisture but still has some air pockets for gas exchange.
Incubation and Fruiting: Creating the Perfect Environment for Mycelial Growth
With your coffee grounds inoculated and packed, the next stage is all about giving the mycelium (the root-like structure of the mushroom) the ideal conditions to grow and colonise its new home. This phase is called incubation.
The Incubation Period:
- Darkness is Key: During incubation, your block needs to be kept in a dark place. The mycelium doesn't need light at this stage; it's busy spreading its network. In my UK home, I've found an airing cupboard or a cupboard under the sink works perfectly. Even a dark corner of a shed (if it's warm enough) could work.
- Temperature Matters: Aim for a consistent temperature between 20-24°C (68-75°F). Here in Britain, this means a heated indoor space, especially during cooler months. My airing cupboard typically sits around 22°C, which is absolutely ideal. If it's too cold, the mycelium will be sluggish; too hot, and you risk encouraging contaminants.
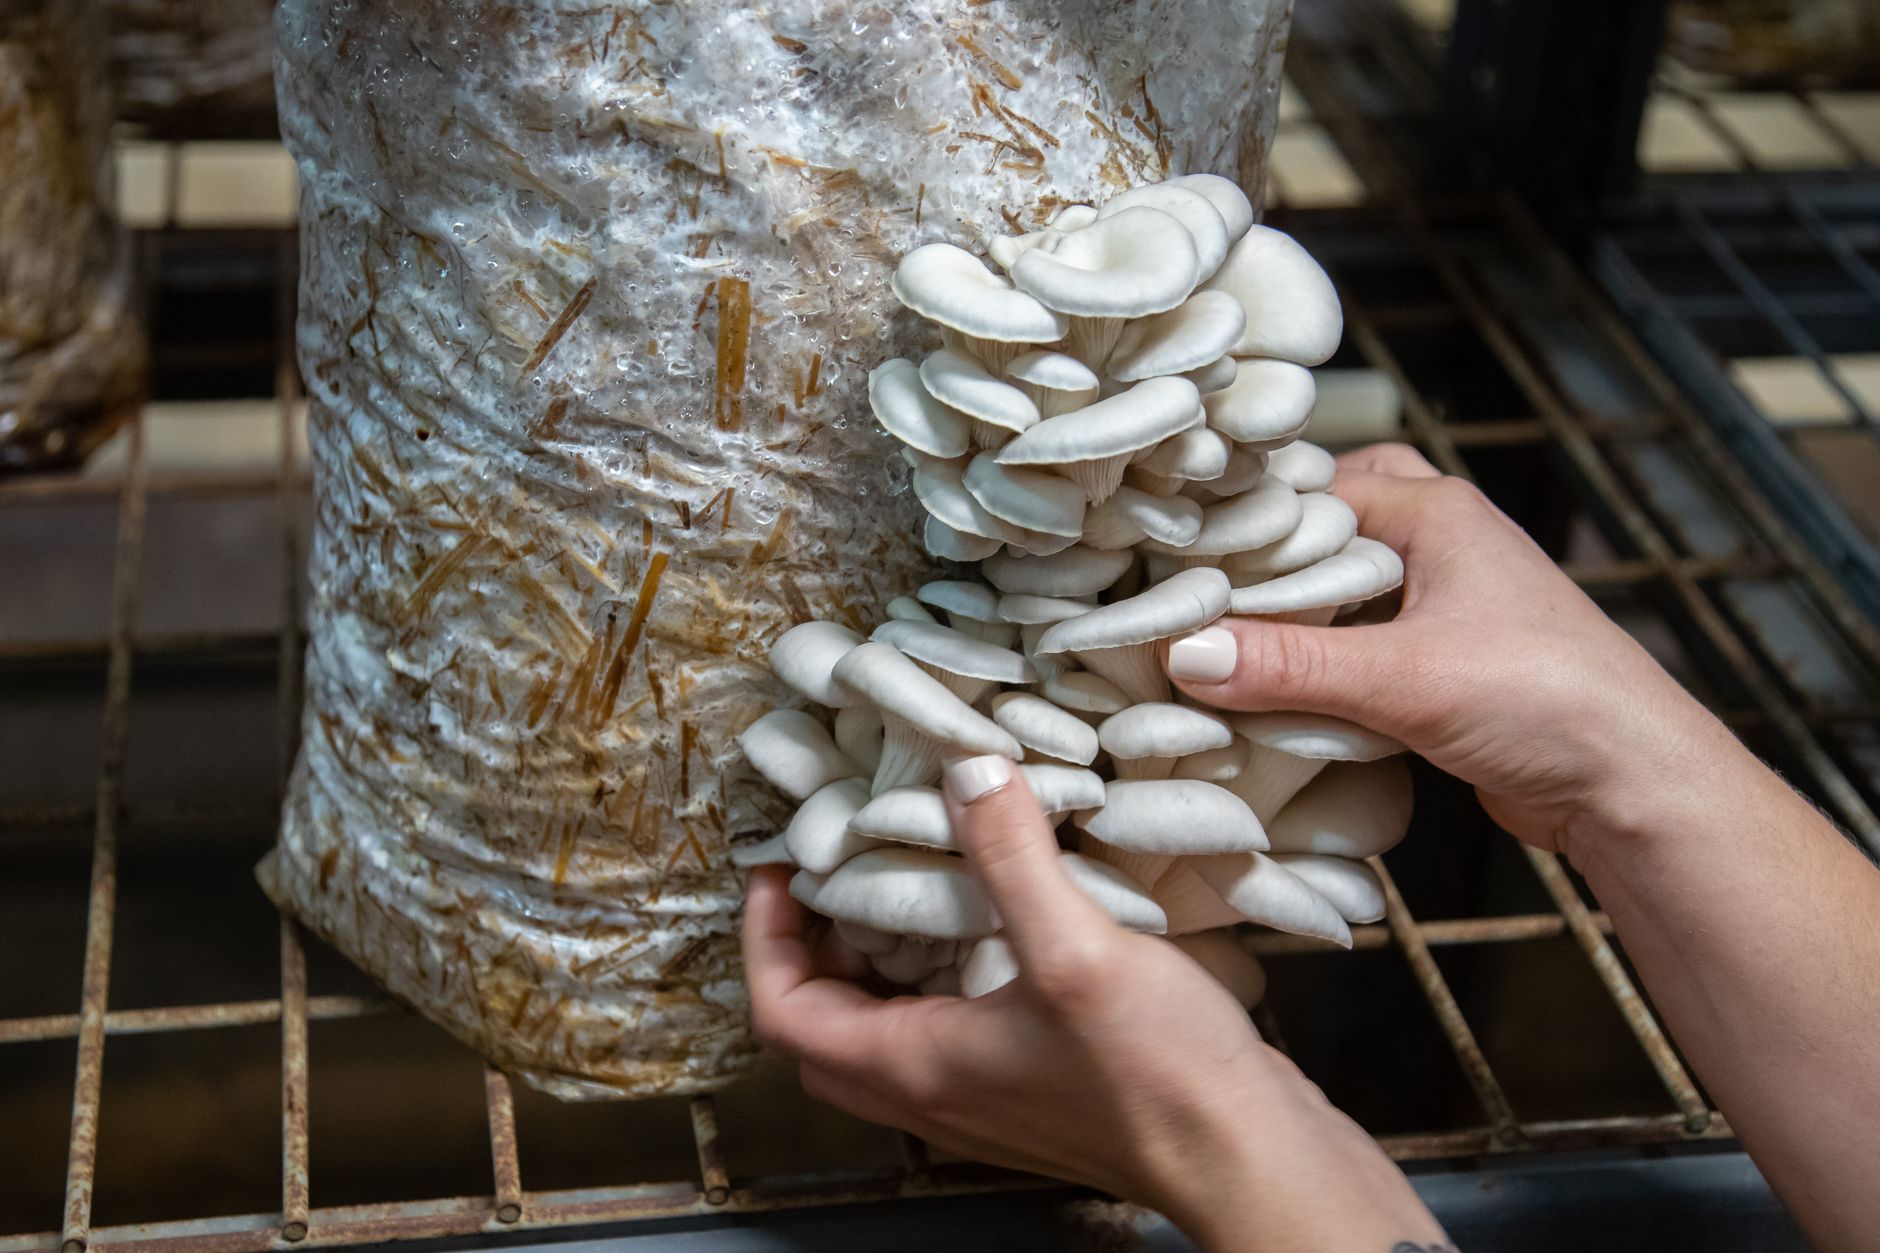
- Wait and Watch: Over the next 2-4 weeks, you’ll start to see a beautiful white, fuzzy growth spreading through your coffee grounds. This is the mycelium colonising the substrate. It will eventually turn the entire block into a solid, white mass. This sight never fails to thrill me – it’s like watching a tiny, alien landscape form! Don't open the container during this time unless absolutely necessary, as it can introduce contaminants.
Transition to Fruiting:
Once your coffee grounds block is fully colonised and a solid white, it's time to introduce it to the conditions that will make it produce mushrooms – the fruiting phase. This is when you'll start to see tiny pins (baby mushrooms) emerge!- Light: Unlike incubation, fruiting requires some indirect light. Not direct sunlight, which can dry out your block, but a well-lit room. A windowsill (out of direct sun) or a spot in your kitchen or bathroom works well. The light helps tell the mycelium it's time to start forming mushrooms.
- Humidity: This is probably the most critical factor for successful fruiting, especially in our often-dry UK homes, particularly with central heating on in winter. Oyster mushrooms love high humidity (85-95%). To achieve this, you have a few options:
- Spray Bottle: My go-to method. I mist the block with water 2-3 times a day, making sure to wet the surface where the mushrooms will emerge.
- Humidity Tent: For a more consistent approach, you can create a mini humidity tent. Place your block inside a clear plastic bag (like a large food bag) with a few small holes poked in it for air exchange. Mist the inside of the bag. I’ve even used a clear plastic storage box with the lid slightly ajar.
- Fresh Air Exchange (FAE): While humidity is vital, so is fresh air. Mushrooms respire, just like us, and they need oxygen while producing CO2. If your block smells musty or like fermentation, it might need more FAE. If using a grow bag, you'll cut small 'X' shaped slits in the sides where you want the mushrooms to emerge. For buckets, the drilled holes serve this purpose. For tubs, simply remove the lid or crack it open for a few hours each day, especially after misting. I've found that a gentle fan nearby (not blowing directly on the block) can also help circulate air in a stagnant room.
- Temperature: Aim for slightly cooler temperatures during fruiting, around 16-21°C (60-70°F). Our typical UK room temperatures are often just right for this.
Within a week or two of introducing these fruiting conditions, you should start to see tiny pins forming from the slits or holes in your block. These will rapidly grow into clusters of beautiful oyster mushrooms! It's an incredibly exciting moment, one that makes all the preparation worthwhile.
5. Harvesting Your Bounty: When and How to Pick Your Fresh Oyster Mushrooms
Now, this is the moment you've been waiting for, isn't it? After all that patient waiting, the sight of those beautiful oyster mushroom clusters ready for harvest is truly a sight to behold. It’s right up there with spotting the first ripe 'Marmande' tomato blushing in my greenhouse or pulling up a perfect carrot from my raised beds here in the Midlands – pure gardening satisfaction!
When to Harvest
Knowing when to pick your oysters is crucial for flavour and texture. You'll want to harvest them just as the caps begin to flatten out but before the edges start to curl upwards significantly. Think of them like a perfectly ripe berry – you don't want to pick it too early when it's still tight, nor too late when it's past its prime.
In my UK garden setup, I've found this usually happens about 5-7 days after you first see the tiny pins forming. The caps will have grown to a decent size, often between 3-10 cm across, depending on the variety and how densely they’re growing. They’ll look plump and vibrant. If you let them go too long, the spores will start to drop – you’ll see a fine white dust around the base of the block – and while they're still edible, the texture can become a bit tougher, and the flavour can diminish. I made that mistake once, letting a beautiful cluster get a bit too spore-heavy, and while still tasty, it just wasn't as tender as I knew it could be!
![IMAGE_PLACEHOLDER_5_1: ripe oyster mushroom cluster ready to harvest]
How to Harvest
Harvesting is straightforward, but a gentle touch is key to encourage future flushes. You want to remove the entire cluster at once, rather than individual mushrooms.
- Grasp the cluster firmly: Hold the entire cluster at its base, right where it attaches to the coffee ground block.
- Twist and pull: With a firm but gentle twist, pull the cluster away from the block. It should come off relatively cleanly. Some people prefer to use a sharp, clean knife to cut the cluster at the base, but I've always had good luck with a gentle twist – it feels more organic, somehow!
- Clean up: After harvesting, you might have a few small bits of mushroom tissue left on the block. Gently scrape these off with a clean knife or your fingers. This helps prevent rot and makes way for the next flush.
My first ever oyster mushroom harvest was a bit clumsy, I admit. I was so excited, I nearly tore the whole block! But I quickly learned that a calm, decisive twist works best. The reward? A beautiful, fresh cluster of oyster mushrooms ready for the kitchen, grown right here in my humble Midlands plot!
6. Troubleshooting Common Issues and Encouraging a Second Flush
Growing mushrooms, like any form of gardening, isn't always perfectly smooth sailing. Even with my years of experience battling slugs, blight, and our famously unpredictable British weather, I've had my share of challenges with fungi too! But don't despair – most common issues are easily identifiable and often fixable. What works here in Britain is often about consistency and observation, especially with indoor growing.
Common Issues
- Contamination: This is the big one, the bane of every mushroom grower's existence. If you see green, black, or even orange fuzzy patches appearing on your coffee grounds that aren't mycelium, you've got contamination. Green mould (often Trichoderma) is particularly common and looks like powdery green dust.
- Randy's Take: "Oh, I've had my fair share of green fuzzy monsters in my early days, believe me! It’s disheartening, but it taught me the absolute importance of sterilisation and hygiene. If it's a small patch, sometimes you can try to cut it out with a very clean knife, but often, it's best to isolate the block immediately to prevent spores spreading to other projects and then unfortunately, dispose of it responsibly (not in your compost if it's got aggressive mould!). Prevention is always better than cure."
- Dry/Cracking Caps: If your mushroom caps look dry, leathery, or are starting to crack around the edges, it's a sign they're not getting enough humidity. This is especially true in our sometimes-dry UK homes, even if it's damp outside!
- Randy's Take: "I've definitely had this issue, particularly during those cold, dry spells we get in the Midlands when the central heating is cranked up. My solution is usually more frequent misting – sometimes 3-4 times a day – or making sure my humidity tent (a clear plastic bag with holes) is doing its job effectively."
- Leggy Stems/Small Caps: If your mushrooms are growing long, thin stems with tiny caps, they're typically desperate for more fresh air exchange.
- Randy's Take: "This is a classic sign of CO2 buildup. I learned this the hard way when my first few flushes looked more like spindly alien fingers than delicious oysters! Now, I make sure to fan the area around the block a few times a day or open a window nearby for a brief period. My greenhouse, while great for tomatoes, needs good ventilation too, and the same principle applies here."
- No Growth/Stalled Mycelium: If your mycelium seems to have stopped growing or pins aren't forming, it could be a few things: too dry, too cold, or simply needing a bit more time.
Troubleshooting Table: Common Oyster Mushroom Problems
| Problem | Appearance | Cause | Randy's Fix (UK Context)
Harvesting Your Bounty: When and How to Pick Your Fresh Oyster Mushrooms
Okay, so you've done the hard graft, you've nurtured your little mycelial friends, and now you're seeing those beautiful, delicate mushroom clusters expanding before your very eyes. This is it! This is the payoff, the grand finale of your first flush. It’s a moment of pure magic, honestly. For me, it ranks right up there with pulling up the first perfect potato from my raised beds or seeing the first ripe 'Gardener's Delight' tomato blush in my greenhouse here in the Midlands. The joy of something you've grown yourself, ready for the plate, is just unbeatable.
When to Harvest
Knowing when to pick your oyster mushrooms is paramount for ensuring the best flavour and texture. You want to catch them in that sweet spot – just as the caps have fully expanded and begun to flatten out, but crucially, before the edges start to curl upwards dramatically. If they start curling up, it means they're getting ready to drop their spores, which can make them a bit tougher and less flavourful.
In my UK garden setup, especially with the ambient temperatures in my utility room or a cooler corner of the kitchen, I've found this "prime time" usually arrives about 5-7 days after you first spot those tiny little pins forming. The caps will be a decent size, typically ranging from 3-10 cm across, depending on the specific oyster variety you're growing and how densely the cluster has formed. They'll look plump, vibrant, and incredibly fresh.
I learned the hard way with my very first batch not to wait too long. I was so fascinated watching them grow that I let one beautiful cluster go a tad too far. When I finally harvested, there was a fine white dust (spores!) all over the shelf below, and while still perfectly edible, the texture was noticeably firmer than the subsequent, perfectly-timed flushes. Lesson learned: observe closely and act decisively!
![IMAGE_PLACEHOLDER_5_1: close-up of perfectly ripe oyster mushroom cluster, showing flat caps and no spore drop]
How to Harvest
Harvesting is thankfully quite simple, but approaching it with a gentle hand is key. You want to remove the entire cluster from the block in one go, rather than trying to pick individual mushrooms. This helps protect the mycelial network for future flushes.
- Grasp the Cluster Firmly: With a clean hand, firmly grasp the entire mushroom cluster at its base, right where the stems meet the coffee ground block.
- Twist and Pull: Apply a firm but gentle twisting motion while pulling the cluster away from the block. It should detach fairly cleanly. Some growers prefer to use a sharp, sterilised knife to cut the cluster at its base, and that works too. Personally, I've always found a careful twist-and-pull method to be effective and satisfying. It feels more connected to the plant, much like twisting a courgette from its stalk.
- Clean Up the Block: After you've removed the main cluster, you might notice some small remnants of mushroom tissue left on the block. It’s a good idea to gently scrape these off with a clean knife or your fingers. This bit of tidying helps prevent any leftover tissue from rotting and potentially inviting unwanted moulds, clearing the way for the next flush to emerge cleanly.
My very first harvest was a hilarious spectacle of excitement and near-disaster. I was so giddy I practically wrestled the block! But I quickly learned that a calm, deliberate twist is all it takes. The reward for that gentle effort? A beautiful, fresh cluster of oyster mushrooms, grown right here in my humble Midlands home, ready to be enjoyed.
6. Troubleshooting Common Issues and Encouraging a Second Flush
Growing mushrooms, much like any aspect of gardening here in the UK, isn't always a perfectly smooth ride. Even with my five years of experience battling slugs in my raised beds, contending with tomato blight in the greenhouse, and generally navigating our famously unpredictable British weather, I've certainly had my share of head-scratching moments with fungi. But don't despair! Most common issues are fairly easy to identify and, thankfully, often fixable. What works here in Britain, whether in the garden or the grow room, is usually about consistent observation and a bit of practical problem-solving.
Common Issues
- Contamination: This is the big one, the bane of every mushroom grower's existence. If you see patches of green, black, orange, or even pink fuzzy growth appearing on your coffee grounds that definitely isn't the white, fluffy mycelium, then you've got contamination. Green mould (often Trichoderma) is particularly common and looks like powdery green dust.
- Randy's Take: "Oh, I've had my fair share of green fuzzy monsters in my early days, believe me! It's incredibly disheartening to see your hard work get taken over by mould, but it was a harsh lesson that hammered home the absolute importance of thorough sterilisation and immaculate hygiene. If it's a small, isolated patch, sometimes you can try to carefully cut it out with a very clean, sterilised knife. However, more often than not, it's safest to immediately isolate the contaminated block to prevent spores from spreading to any other mushroom projects you might have, and then, unfortunately, dispose of it responsibly. I never put contaminated blocks in my compost bin; it's just not worth the risk of spreading the spores. Prevention really is always better than cure in this instance."
- Dry/Cracking Caps: If your mushroom caps appear dry, leathery, or start to develop cracks around their edges, it's a clear signal that they're not receiving enough humidity. This can be a particular challenge in our relatively dry UK homes, especially when the central heating is on full blast during the colder months, despite what the damp British weather outside might suggest!
- Randy's Take: "This is an issue I've certainly encountered, especially during those crisp, dry spells we occasionally get here in the Midlands when the heating goes on. My go-to solution is almost always more frequent misting – sometimes 3-4 times a day if needed – or ensuring that my makeshift humidity tent (a clear plastic bag with plenty of air holes) is properly sealed and doing its job of trapping moisture around the block. You've got to create that microclimate!"
- Leggy Stems/Small Caps: If your mushrooms are growing long, thin stems with disproportionately small caps, they're typically crying out for more fresh air exchange. This indicates a buildup of carbon dioxide.
- Randy's Take: "Ah, the classic 'alien finger' look! I learned this the hard way when my first few flushes looked more like spindly, pale growths than delicious, robust oysters. This is a tell-tale sign of CO2 buildup. Now, I make it a point to fan the area around the block several times a day with a piece of cardboard or even just my hand, or I'll open a nearby window for a brief period to get some fresh air circulating. Even my greenhouse, while fantastic for my heirloom tomatoes, needs good ventilation to thrive, and the same principle absolutely applies to mushroom cultivation."
- No Growth/Stalled Mycelium: If your mycelium seems to have stopped growing after inoculation, or if pins aren't forming after exposure to fruiting conditions, it could be a few factors: the block might be too dry, the temperature could be too cold, or sometimes, it simply needs a bit more patience and time. Fungi work on their own schedule!
Troubleshooting Table: Common Oyster Mushroom Problems & Randy's Fixes
| Problem | Appearance | Likely Cause | Randy's Fix (UK Context)
