
Introduction: Unlocking the Power of Perennial Division for a Thriving UK Garden
Alright, fellow green thumbs, gather 'round! If you're anything like me, you've probably stood in your garden, a mug of lukewarm tea in hand, looking at a magnificent perennial that's just... well, gotten a bit too magnificent. Maybe it's flopping, flowering less, or just hogging all the space. That's exactly where I found myself a few years back, staring at a colossal Hosta 'Sum and Substance' that had practically swallowed my favourite path in my 800 sq ft Midlands garden. And that, my friends, is when I truly embraced the magic of perennial division.
For me, gardening isn't just a hobby; it's a full-blown obsession, a calling I discovered after years hunched over a keyboard in IT. Now, with over five years of getting my hands dirty in the unpredictable British climate, I've learned that one of the most powerful, yet often overlooked, techniques for keeping your garden vibrant, healthy, and ever-expanding is perennial division. Think of it as hitting the refresh button on your favourite plants, giving them a new lease on life, and – here’s the best bit – getting free plants to fill those empty spots or share with mates.
I remember my first attempt, armed with nothing but a rusty spade and a prayer. It was a bit of a hack job on a particularly stubborn Daylily, and honestly, I thought I'd killed it. But to my amazement, not only did the original plant bounce back with renewed vigour, but I had three new, healthy plants ready to go! Since then, I’ve refined my techniques, made a few more mistakes (especially when our British weather decides to throw a curveball), and now I want to share everything I’ve learned from my own UK garden. We’re going to dive deep into how mastering perennial division, whether in spring or autumn, can transform your patch into a thriving, bountiful haven. Let’s get stuck in!
Why, When, and Which Perennials to Divide: Spring vs. Autumn Timing
So, you might be wondering, "Why bother splitting my perfectly happy plants?" Great question! I asked myself the same thing when I first started. But after seeing my established clumps of things like Hardy Geraniums 'Rozanne' or my beloved purple Coneflowers (Echinacea purpurea) start to look a bit tired, woody in the middle, or just generally less floriferous, I understood.
The 'Why' of Perennial Division:
- Rejuvenation: Over time, many perennials become overcrowded. Their root systems get tangled, competing for nutrients and water, leading to reduced vigour and fewer blooms. Division helps to 'reset' them, encouraging fresh, strong growth from the younger, outer sections of the plant. I’ve seen this firsthand with my Siberian Irises; after a good division, they practically explode with flowers the following season.
- Multiplication: This is perhaps the most exciting part for a gardener on a budget (and let's be honest, who isn't?). You can turn one plant into two, three, four, or even more, completely free of charge! I’ve filled entire borders in my 800 sq ft garden by simply dividing existing plants, saving a fortune on nursery purchases. It's how I managed to get so many Hostas around my pond area without breaking the bank.
- Space Management: In a small garden like mine here in the Midlands, space is a premium. Dividing overgrown plants helps to keep them within their allotted boundaries, preventing them from smothering their neighbours. My Alchemilla mollis (Lady's Mantle) can be a real thug if left unchecked, so regular division keeps it in its place.
- Improved Plant Health: Division can remove dead or diseased sections of a plant, promoting overall health. It also improves air circulation around the crown, reducing the risk of fungal issues.
The 'When' and 'Which': Spring vs. Autumn Timing in the UK
Deciding when to divide is probably the most crucial factor, and it largely depends on the plant's flowering time and, of course, our notoriously unpredictable British weather. A general rule of thumb I've learned from trial and error is: divide spring and summer bloomers in autumn, and late summer/autumn bloomers in spring. This gives the newly divided sections ample time to establish their roots before they need to put energy into flowering or going dormant for winter.
One mistake I made early on was trying to divide a huge clump of Phlox paniculata 'Bright Eyes' in late spring, just as it was sending up its flower stalks. It utterly sulked, barely flowered that year, and took ages to recover. I learned the hard way that dividing a plant when it's actively trying to bloom is like asking it to run a marathon with a broken leg – it just doesn't have the energy.
Here’s a detailed breakdown I’ve put together, based on what works best in my UK garden:
| Feature | Spring Division (Early Spring: March - Early April) | Autumn Division (Late August - October) |
|---|---|---|
| Best for | Late summer and autumn bloomers (e.g., Asters, Sedum, Helenium, Chrysanthemums) | Spring and early summer bloomers (e.g., Hostas, Daylilies, Irises, Peonies, Phlox) |
| Why this timing? | Plants are just emerging from dormancy; root growth is prioritised before flowering. | Plants have finished flowering; root growth can establish before winter dormancy. |
| Benefits | Minimal disruption to the current year's bloom; quick recovery with spring rains. | Allows plants to establish over winter, ready for a strong spring growth. |
| Considerations | Risk of late frosts if divided too early; needs consistent moisture as weather warms. | Risk of very wet, cold soil leading to rot if divided too late; needs protection from severe frosts. |
| Common UK Examples | Sedum 'Autumn Joy', Aster 'Little Carlow', Helenium 'Mardi Gras', Japanese Anemones, Ornamental Grasses | Hosta 'Halcyon', Hemerocallis (Daylilies), Siberian Irises, Bearded Irises, Hardy Geraniums (most), Alchemilla mollis, Bergenia |
| Randy's Personal Tip | For my Sedums, I wait until I see the first little shoots, then I know the soil is warming up enough. For Japanese Anemones, I do it when they're just starting to wake up, but be warned, they're prolific! | I always aim for early autumn for my Hostas and Daylilies, giving them a good 6-8 weeks before the really hard frosts hit here in the Midlands. This allows enough time for the new roots to knit into the soil. |
Remember, these are general guidelines. Always observe your specific plants. Some, like peonies, absolutely detest being moved and will protest by not flowering for a year or two (I learned that one the hard way with a gorgeous 'Sarah Bernhardt' peony!). Others, like Hostas, are incredibly forgiving. If in doubt, a quick search for your specific plant variety will usually give you the best advice for UK conditions.
Essential Tools and Soil Preparation for Successful Perennial Division
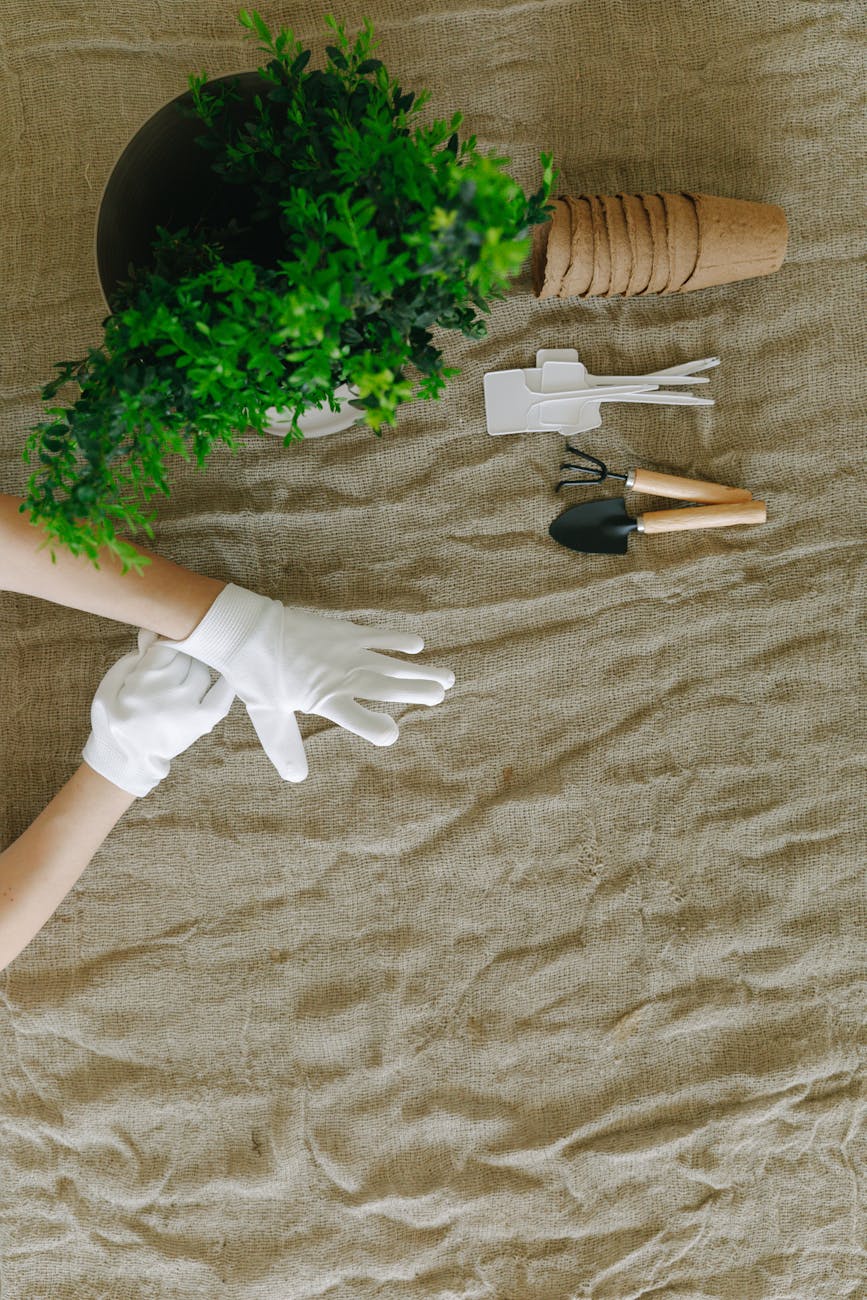
Right, before we get our hands properly dirty, let’s talk gear. You don't need a shed full of fancy gadgets, but having the right tools makes the job infinitely easier and less stressful for both you and your plants. Trust me, trying to wrestle a deeply rooted perennial with a flimsy trowel is a recipe for frustration (and probably a broken handle, which I've experienced more than once!).
Here are the essentials I rely on in my UK garden:
- A Good Quality Spade or Fork: This is your primary weapon. A sturdy garden fork is brilliant for lifting plants with dense, fibrous root systems, as the tines can gently tease the roots apart. A sharp spade is excellent for cutting through woody crowns or large clumps. I've got a trusty stainless steel spade that's been with me for years and makes light work of even the most stubborn clumps.
- Strong Garden Knife or Old Saw: For woody or very dense crowns (think Hostas, Daylilies, or even some ornamental grasses), a sharp, robust garden knife or even an old serrated kitchen knife works wonders. I even keep an old saw specifically for those really tough, woody centres of older plants. Clean cuts are key to preventing disease.
- Trowel: Handy for smaller plants, finer root systems, or for digging out individual sections.
- Secateurs/Pruners: Essential for trimming back foliage before or after division, and for tidying up any damaged roots. I always make sure mine are sharp and clean to avoid crushing stems or ragged cuts.
- Wheelbarrow or Tarp: You’ll need somewhere to put the lifted plant and excess soil. A tarp is great for protecting your lawn or path from soil spillage, especially when you're working with a large clump.
- Buckets or Trays: For holding your newly divided sections, especially if you can't replant them immediately. I often fill a few with a little water to keep the roots moist if I'm doing a big dividing session.
- Gloves: Protect your hands, especially if you're dealing with thorny plants or have sensitive skin.
Soil Preparation: Laying the Groundwork for Success
Just like moving into a new house, your newly divided plants need a welcoming, well-prepared home. This step is crucial for ensuring they establish quickly and thrive in their new spot. In my Midlands garden, which tends to be heavy clay, I've learned that amending the soil is non-negotiable.
Before you even lift the plant:
- Water Thoroughly: The day before you plan to divide, give the plant you're moving a really good drink. Well-hydrated roots are less prone to damage and the surrounding soil will be easier to work with.
- Prepare the New Site: This is vital. Dig the new planting holes before you divide. Make them generously sized – at least twice as wide as the root ball you expect, and just as deep. This gives the new roots plenty of space to spread out.
- Amend the Soil (Crucial for UK conditions!):
- For heavy clay soils (like mine!): Incorporate plenty of organic matter such as well-rotted compost, mushroom compost, or leaf mould. This improves drainage and aeration, preventing the roots from sitting in waterlogged conditions, which is a common killer in our wet British winters.
- For sandy soils: Organic matter is still your best friend, as it helps to improve water retention and provides a slow release of nutrients.
- General Improvement: A handful of slow-release granular fertiliser (like a balanced NPK ratio) can give your new plants a gentle boost, but don't overdo it. The focus is on root establishment, not immediate top growth.
- My Personal Trick: I always keep a bag of good quality, peat-free multi-purpose compost handy. When I backfill the hole, I mix it 50/50 with the existing amended soil. This creates a lovely, friable environment directly around the new root ball, encouraging quick establishment.
The effort you put into soil preparation now will pay dividends later, ensuring your newly divided perennials not only survive but truly flourish in their new homes.
Step-by-Step Guide: Mastering Spring Division for Early Bloomers
Alright, let's get down to the nitty-gritty! Spring division is fantastic for those late summer and autumn stars that are just waking up. Think about your Asters, Sedums, Heleniums, or even some of your ornamental grasses that might be getting a bit too wide. I usually tackle this task here in the Midlands around March or early April, once the worst of the winter frosts have passed and the soil is workable, but before the plants put on too much active growth.
Here’s how I approach it in my garden:
Step 1: Prepare Your Work Area and Gather Your Tools
Before you even touch the plant, make sure you have everything ready: your spade, garden knife, secateurs, wheelbarrow/tarp, and those buckets of water if you're holding divisions. This prevents you from having to rush or leave exposed roots while you hunt for a missing tool. I always lay down a tarp next to the plant I'm dividing – it saves so much clean-up time later.
Step 2: Cut Back Foliage (If Necessary)
For plants that have already started to put on a bit of spring growth, or if they're evergreen, I'll often cut back the existing foliage by about one-third to one-half. This reduces the amount of moisture the leaves need, allowing the plant to focus its energy on establishing new roots after division. For something like a large Sedum, I'll trim back last year's dried stems right down to the ground. For something like a Japanese Anemone, I'll just trim any really long, straggly leaves.
Step 3: Dig Up the Mother Plant
This is where the muscle comes in!
- Assess the Plant: Look at the plant's overall size and shape. You're aiming to get as much of the root ball as possible.
- Start Digging Wide: Using your spade or fork, begin digging a circle around the plant, about 6-12 inches (15-30 cm) away from the crown, depending on the plant's size. My rule of thumb is to go as wide as the foliage spread.
- Go Deep: Push your tool straight down into the soil, leveraging it to loosen the root ball. Work your way around the entire plant, gradually prying it up. Be patient and gentle – you're trying to minimise root damage.
- Lift Carefully: Once the root ball feels loose, carefully lift the entire clump out of the ground. I often use both my spade and fork for larger plants, gradually working under the root ball to lever it up onto the tarp or into the wheelbarrow. My big clump of Helenium 'Moerheim Beauty' needed a real team effort to lift last spring!
Step 4: Divide the Clump
Now for the main event! This is where you get to decide how many 'new' plants you want.
- Shake Off Excess Soil: Gently shake or brush off some of the loose soil from the root ball. This will help you see the root structure and identify natural divisions.
- Identify Natural Divisions: Look for individual plant crowns or sections that seem to be growing independently. Often, you'll see younger, more vigorous growth around the edges and an older, woodier centre.
- Choose Your Method:
- Hand Pulling/Teasing: For plants with fibrous roots that aren't too dense (like many Hardy Geraniums or some ornamental grasses), you can often gently pull the clump apart with your hands. This is my preferred method as it causes the least damage.
- Using Forks Back-to-Back: For denser, more fibrous clumps (Hostas, Daylilies), insert two garden forks back-to-back into the centre of the clump. Then, use the handles as levers to gently pry the clump apart. This provides even pressure and minimises root tearing.
- Cutting: For very woody or tightly matted crowns (like mature Sedums or large ornamental grasses), you'll need your sharp garden knife or even an old saw. Slice straight through the crown, ensuring each division has a good portion of roots and at least one or two 'eyes' (growth buds). I find this method essential for my mature clumps of 'Karl Foerster' Feather Reed Grass.
- Discard the Old Centre: Often, the very centre of an old, large clump will be woody, spent, or less vigorous. Don't be afraid to discard this part. Focus on keeping the younger, healthier sections from the outer edges.
Step 5: Trim and Prepare Divisions
Once you have your individual divisions:
- Inspect Roots: Trim off any damaged, diseased, or excessively long roots using your secateurs. Aim for healthy, white roots.
- Trim Foliage (Again): If you didn't do it earlier, or if your divisions still have a lot of leaves, cut back the foliage by about one-third to one-half. This reduces moisture loss and stress on the newly forming root system.
Step 6: Replant Your Divisions
You've done the hard work, now give them a good home!
- Place in Prepared Hole: Set each division into its new, prepared hole, ensuring the crown (where the stems meet the roots) is at the same level it was in the original plant. Don't bury it too deeply or leave roots exposed.
- Backfill and Firm: Gently backfill the hole with your amended soil mixture, making sure to work it in around all the roots. Lightly firm the soil around the plant with your hands to remove any large air pockets.
- Water Thoroughly: This is critical! Give each newly planted division a deep, thorough watering immediately after planting. This helps settle the soil around the roots and provides much-needed moisture. I often add a little liquid seaweed feed to the water to help with transplant shock.
- Mulch (Optional but Recommended): A layer of organic mulch (like compost or bark chips) around the base of the plant will help conserve soil moisture, suppress weeds, and regulate soil temperature – all beneficial for new root growth in our varied British spring weather.
Step 7: Post-Division Care (UK Specifics)
For the next few weeks, keep a close eye on your newly planted divisions.
- Consistent Moisture: Spring can be notoriously dry or suddenly very wet here in the UK. Don't let the soil dry out completely, especially during dry spells. Water regularly until the plants are visibly established and putting on new growth.
- Protection from Late Frosts: If you've divided early in spring, keep an eye on the forecast. A sudden late frost can be detrimental to young, vulnerable plants. A layer of horticultural fleece draped over them overnight can offer crucial protection. I’ve learned this the hard way after a surprise April frost zapped some of my newly divided Eryngiums!
- Patience: It can take a few weeks for new growth to appear, and some plants might not flower as robustly in their first season after division. Give them time, and they will reward you with renewed vigour and beauty.
Mastering spring division is incredibly rewarding. It’s a chance to breathe new life into your garden, propagate your favourite plants for free, and connect even more deeply with the rhythm of the growing season here in the UK. Happy dividing!
5. Step-by-Step Guide: Mastering Autumn Division for Summer-Flowering Perennials
Alright, so we've covered the spring bloomers, but what about those glorious summer-flowering perennials that have given us so much joy through the warmer months? For these beauties – think Asters, Heleniums, Rudbeckia, some Phlox varieties, and even my beloved Sedums – autumn is generally the golden window for division. The soil is still warm from the summer sun, but the intense heat has passed, giving the plants a chance to settle in before winter dormancy.
In my 800 sq ft Midlands garden, I usually aim for late September through October, before the really hard frosts set in. The key is to get them back into the ground with enough time for their roots to get a good hold before the ground gets too cold and stops growth. I've learned the hard way that leaving it too late means they just sit there, vulnerable, through a harsh British winter.
Here's how I approach it for my summer stunners:
- Preparation is Still Key: Just like in spring, I get my new planting sites ready first. I dig in a good amount of well-rotted compost from my own heaps, maybe a bit of grit if the spot is heavy clay (which, let's be honest, is a common story here in the UK Midlands!). I make sure the soil is loose and ready to welcome new roots.
- Digging Up: Once the plant has finished flowering – or at least its main flush – and its foliage is starting to look a bit tired, it’s time. I use my trusty digging fork and gently (but firmly!) work my way around the plant, about 6-12 inches out from the crown, depending on its size. The goal is to lift the entire clump with as much of the root ball intact as possible. For a mature Aster 'Monch' I divided last autumn, I had to really put my back into it – those things can get enormous!
- Cleaning and Inspection: Shake off any excess soil so you can clearly see the root structure. This is where I look for the healthy, vigorous parts with plenty of fibrous roots and visible growth buds. Any dead, woody, or mushy sections get ruthlessly pruned away. I'm looking for fresh, young growth on the outer edges of the clump, as these are usually the most productive.
- Dividing the Clump: Now for the fun part!
- For fibrous-rooted plants (like Asters or Heleniums): I often use two digging forks, back-to-back, pushed into the centre of the clump and then levered apart. It sounds brutal, but it's very effective and often cleaner than trying to hack at it. Alternatively, a sharp spade or even a robust old bread knife (don't tell my wife!) can work for smaller clumps. I aim for divisions roughly the size of a small dinner plate, each with several strong shoots and a good root system.
- For plants with rhizomes or fleshy roots (like some Sedums): These often pull apart more easily, or you can cut them cleanly with a sharp knife, ensuring each piece has a growth bud or 'eye'. My 'Autumn Joy' Sedum is a classic for this; I just snap off sections, making sure they have a bit of stem and root.
- Replanting Promptly: This is critical for autumn divisions. Get them back in the ground as quickly as possible. Plant them at the same depth they were previously, backfill with your prepared soil, and firm gently. I always make sure there are no air pockets around the roots – that's a killer for young divisions.
Here's a quick comparison of the two main division timings I use in my UK garden:
| Feature | Spring Division (Early Bloomers e.g., Hostas, Daylilies) | Autumn Division (Summer Bloomers e.g., Asters, Rudbeckia) |
|---|---|---|
| Timing | Early spring, as new growth emerges (March-April in the Midlands) | Early autumn, after flowering but before hard frosts (late Sept-Oct in the Midlands) |
| Plant State | Dormant or just breaking dormancy, less foliage to manage | Recently flowered, foliage still present but starting to fade |
| Soil Temp. | Warming up, encouraging quick root establishment | Still warm from summer, but cooling, encouraging root growth before dormancy |
| Water Needs | Often less initial watering needed due to spring rains, but monitor dry spells | Crucial immediate watering, then monitor through drier autumn periods |
| Risk Factor | Late frosts can damage new shoots if divided too early | Early hard frosts can prevent establishment if divided too late |
| Recovery Time | Quick establishment, often blooms same year (though possibly reduced) | Good establishment before winter, strong bloom the following season |
| Randy's Tip | Watch out for those unpredictable British spring frosts! Cover new divisions if needed. | Get them in the ground fast! Don't let roots dry out. Mulch is your friend. |
6. Post-Division Care: Nurturing Your Newly Multiplied Plants for Vigorous Growth
So, you've successfully dug, divided, and replanted – brilliant job! But the work isn't quite done. The next few weeks are crucial for ensuring your newly separated plants settle in and thrive. I've learned that good post-division care can make all the difference between a struggling plant and a robust, multiplying success story in my UK garden.
The absolute first thing I do after replanting any division, regardless of whether it's spring or autumn, is give it a really good drink. And I mean a proper drink. This isn't just a sprinkle; I want that water to penetrate deep down and settle the soil around those delicate new roots. Last spring, after dividing some Hellebores, I got distracted by a new batch of heirloom tomato seeds for the greenhouse and didn't water them thoroughly enough. A week later, a sudden dry spell hit, and they looked very sorry for themselves. I learned my lesson there!
Here's my routine for nursing those divisions:
- Consistent Watering: For the first few weeks, I keep a close eye on the soil moisture. I aim for consistently moist, but not waterlogged, soil. This is especially important if we get one of our classic dry spells here in the UK. I'll often water every day or two for the first week, then gradually reduce frequency as the plant establishes. For autumn divisions, a good initial soak is vital, but then you might find our typical British autumn rain takes over some of the work.
- Mulching for Protection: This is one of my favourite tricks, especially for autumn divisions. A good 2-3 inch layer of organic mulch – I use my own homemade compost or well-rotted leaf mould – around the base of the plant does wonders. It helps retain soil moisture, suppresses weeds (which can compete with your young plants), and, crucially for autumn divisions, provides a bit of insulation against those early winter chills. It's like tucking them into bed for the winter!
- No Immediate Feeding: Resist the urge to fertilise immediately. Your newly divided plants are stressed, and their focus should be on establishing roots, not putting on leafy growth. I usually wait until they've shown clear signs of new growth – typically a month or two, or until the following spring for autumn divisions – before giving them a very light feed with a balanced organic fertiliser.
- Protection from Pests and Critters: Weakened plants can be more susceptible to pests. I keep an eye out for slugs and snails, especially in our damp UK climate, as they love tender new growth. I use organic slug pellets or a good old evening patrol with a headlamp and bucket.
- Winter Protection (Autumn Divisions): If you've divided something a bit more borderline hardy, or if a really harsh winter is forecast, a thicker layer of mulch, or even some horticultural fleece, can offer valuable protection for autumn divisions. I generally don't bother for my hardy perennials, but for some of the slightly more tender Asters, I might add an extra layer of leaf mould.
7. Troubleshooting and Advanced Tips for Maximising Success in Your UK Garden
Even with the best intentions and techniques, gardening throws curveballs. I've certainly had my share of perennial division mishaps over my five years of intensive gardening here in the Midlands! Learning from them is part of the joy, and sharing those lessons is even better.
Common Problems I've Encountered (and How I Deal with Them):
- No Growth or Slow Growth:
- Issue: The plant just sits there, looking miserable, or barely puts out any new leaves.
- Randy's Experience: This happened to a clump of Phlox I divided too small one spring. Each division only had one or two shoots and a tiny root system.
- Solution: Often, this means the division was too small, or the roots dried out during the process, or the soil wasn't properly prepared. Ensure your divisions are a decent size (like a pint pot minimum for most things), keep roots moist, and plant into well-prepared, friable soil. In autumn, ensure adequate watering and mulching. Sometimes, they just need time – don't give up on them too quickly!
- Wilting and Drooping:
- Issue: The leaves go limp and sad shortly after replanting.
- Randy's Experience: Classic sign of root shock or not enough water. This is especially common if you divide on a warm, sunny day.
- Solution: Water, water, water! Provide temporary shade if the sun is intense. Consider trimming back some of the foliage at planting time to reduce water loss through transpiration, especially on larger divisions. I've found this really helps with my Rudbeckia divisions.
- Pests and Diseases:
- Issue: Newly established plants seem to attract slugs, snails, or show signs of fungal issues.
- Randy's Experience: Weakened plants are like an open invitation. Our damp UK climate is perfect for slugs!
- Solution: Keep a watchful eye. Maintain good garden hygiene, clear away debris where pests hide. Ensure good air circulation around plants to deter fungal diseases. Healthy, well-established plants are much more resilient.
- UK Weather Woes:
- Issue: Unpredictable British weather – late frosts, sudden heatwaves, prolonged wet spells.
- Randy's Experience: Oh, where to begin! I once divided some lovely hardy Geraniums in early spring, only for us to get a freak late April frost. They looked very unhappy. And trying to divide anything during a summer drought is just asking for trouble.
- Solution: Be flexible with your timing. Watch the long-range forecast. For spring divisions, have some horticultural fleece ready to protect against unexpected frosts. For autumn divisions, ensure they have enough time to establish before the ground freezes solid. If it's too wet, hold off, as working waterlogged soil compacts it and causes root rot.
Advanced Tips from My UK Garden:
- Potting Up Divisions: Not all divisions need to go straight back into the ground. If you have too many, or want to give them away, pot them up into good quality compost. This gives them a safe nursery environment. I often pot up extra Hostas and Sedums to give to friends or swap at local gardening club meetings here in the Midlands. It's a fantastic way to spread the plant love!
- Using Rooting Hormone (Sparingly): For particularly tricky plants, or if you're taking smaller divisions, a dusting of rooting hormone can sometimes give them an extra boost. I don't use it for everything, but for some of my more precious or slower-to-establish varieties, I find it can make a difference.
- Soil Amendments Specifics: While general compost is great, consider specific amendments for your plants. My Delphiniums, for example, love a bit of added grit and bone meal for drainage and phosphorus, whereas my ferns appreciate a bit more leaf mould for acidity and moisture retention. Know your plants' preferences!
- Staggered Division: If you have a huge clump of something like a daylily that needs dividing, don't feel you have to do the whole thing at once. You can divide half of it this year and the other half next year. This ensures you still get some display in your garden and reduces the workload.
- Keep Records: This might sound like the former IT worker in me, but I keep a simple notebook. I jot down what I divided, when, where I replanted it, and how it performed. This is invaluable for learning what works (and what doesn't!) in my specific UK garden conditions.
Conclusion: Multiply Your Joy, One Division at a Time!
And there you have it, fellow gardeners! Mastering perennial division isn't just a chore; it's a truly rewarding skill that will transform your UK garden. It’s about so much more than just cutting up plants; it’s about understanding their life cycles, breathing new life into tired clumps, and quite literally multiplying the joy they bring.
We've covered the why, the when, and the how for both spring and autumn divisions, tailored specifically for our unique British climate. From rejuvenating those magnificent Hostas and Daylilies in spring to giving a new lease of life to your summer-flowering Asters and Rudbeckias in autumn, you now have the tools and the confidence to tackle it. Remember the crucial post-division care – especially that initial watering and mulching – and don't be afraid to troubleshoot when things don't quite go to plan. I've certainly had my share of learning experiences along the way!
Think of it: free plants! Imagine filling a new border, sharing with neighbours, or simply getting more blooms from your favourite varieties, all for the cost of a bit of effort and a sharp spade. It's truly a cornerstone of sustainable, thrifty gardening, and something I've come to absolutely adore in my 800 sq ft Midlands haven.
So, grab your digging fork, observe your plants, and embrace the adventure. Your garden, and your wallet, will thank you. Happy dividing, and I can't wait to hear about your successes!
