
Introduction: The Unique Challenges of Transplanting Taprooted Plants
Right, let's talk about something that can make or break a garden, especially here in our often-fickle British climate: transplanting. We've all been there, haven't we? You pick up a gorgeous perennial or a promising young shrub from the nursery, bring it home, pop it in the ground, and then… it just sits there. Or worse, it shrivels up and dies. It's heartbreaking, and trust me, I've had my share of those moments in my 800 sq ft Midlands garden. When I first started gardening five years ago, fresh out of the IT world and absolutely buzzing with enthusiasm, I thought all plants were created equal when it came to moving them. Oh, how wrong I was!
I learned the hard way that not all root systems are built the same, and those with a prominent, single taproot are a whole different beast. I remember trying to move a stunning Echinacea purpurea 'Magnus' that I'd bought in a small pot a year prior, thinking it would be fine. I dug it up like I would a fibrous-rooted Geranium, and despite my best efforts, it sulked for weeks and never really recovered. It was a proper head-scratcher until I started digging into the 'why'.
The truth is, successfully establishing taprooted perennials and shrubs from nursery pots for long-term garden health isn't just about digging a hole and plopping them in. It requires a bit more finesse, a touch more understanding of what's going on beneath the soil, and crucially, knowing how to work with our specific UK conditions. In this article, I'm going to share all the lessons I've learned, the mistakes I've made (and hopefully you won't have to!), and the practical tips that have genuinely worked in my UK garden. We'll get those deep-rooted beauties thriving, I promise!
Identifying Taprooted Perennials and Shrubs: What Makes Them Special?
So, what exactly is a taproot, and why does it make a plant so much more sensitive to transplanting? Imagine a carrot, or a parsnip – that big, central root that dives deep into the soil? That's essentially a taproot. Unlike many plants that spread out a network of fine, fibrous roots close to the surface, taprooted plants develop one primary, thick root that grows straight down, often with smaller lateral roots branching off it. This structure is brilliant for anchoring the plant, accessing deep water and nutrients, and making them incredibly drought-tolerant once established.
Here in my UK garden, I've come across plenty of plants with this characteristic. Think about the majestic Lupins (Lupinus polyphyllus) with their stunning spires, or the vibrant Oriental Poppies (Papaver orientale) that burst into colour in early summer. Even some of our favourite fruit trees, like apples and pears, can develop strong taproots when grown from seed, though nursery stock often has a more fibrous root ball from grafting. Understanding this difference is key because that deep taproot is incredibly important to the plant's survival and is very easily damaged. If that main root snaps or is disturbed too much during transplanting, the plant struggles to recover because it loses its primary lifeline to the deeper soil.
I learned this the hard way with a gorgeous 'Ladybird' Lupin a few seasons back. I bought it as a small plant, thinking it would be easy to move. When I unpotted it, I could already see that thick root heading straight for the bottom of the pot. Despite my careful handling, it simply never thrived after planting out. What works for a Dahlia, which has tuberous roots, or a Heuchera with its mounding, fibrous roots, simply doesn't cut it for these deep divers.
Here’s a quick comparison to help you identify what you’re dealing with:
| Feature | Taprooted Plants | Fibrous-Rooted Plants | Randy's UK Garden Tip |
|---|---|---|---|
| Primary Root | One thick, central root growing deep | Many fine, branching roots spreading out | Always check the base of the pot – if you see one thick root emerging, be extra cautious! |
| Root Depth | Can extend very deep (e.g., several feet) | Primarily in the top 12-18 inches of soil | Great for clay soils here in the Midlands, as they can push past compaction. |
| Anchoring | Excellent stability, resistant to wind damage | Good stability, but less deep anchorage | My established Echinacea laugh at our blustery autumn winds! |
| Drought Tol. | High, once established (accesses deep water) | Moderate to high, depending on root mass | Essential for those dry spells we get in late spring/early summer. |
| Transplant Sensitivity | VERY HIGH – main taproot easily damaged, slow to recover | Low to Moderate – root ball holds together better | This is why we're having this chat! Handle with kid gloves. |
| Common UK Examples | Echinacea, Lupinus, Papaver orientale, Sea Holly (Eryngium), many young fruit trees, some shrubs like Wisteria. | Hostas, Geraniums, ornamental grasses, most common annuals, many vegetables (e.g., lettuce, spinach). | I've had success with 'Summerberry' Echinacea here, but only when I respect its roots. |

Optimal Transplanting Seasons for UK Gardens: Ensuring Success
Timing is absolutely everything, especially when you're dealing with the temperament of a taprooted plant and the glorious unpredictability of British weather. I've learned through trial and error (and a fair few plant losses!) that trying to shift these plants at the wrong time is practically signing their death warrant. Getting the season right gives your plant the best possible chance to establish itself without the added stress of extreme temperatures or insufficient moisture.
In my UK garden, I really focus on two main windows for transplanting taprooted plants: Autumn and Early Spring.
Autumn Transplanting: The Unsung Hero for Taproots
For many taprooted perennials and shrubs, autumn is arguably the best time to get them in the ground. Why? Because the soil is still warm from the summer sun, which is crucial for encouraging root growth, but the air temperatures are cooling down. This means less stress on the top growth, allowing the plant to focus its energy on sending out those vital new roots. Plus, here in the UK, we can usually count on a good amount of natural rainfall through autumn, saving you a lot of watering hassle.
- When: I aim for late September through to early November, before the really hard frosts set in. You want to give them at least 4-6 weeks to settle before the ground freezes solid. This is when I've successfully moved mature Helleborus (which have surprisingly deep roots) and planted new bare-root fruit trees.
- Randy's Tip: One mistake I made was waiting too late – thinking I could squeeze it in just before Christmas. The ground was too cold, and the plants just sat there, dormant, and struggled to get going in spring. Now, if the forecast hints at prolonged freezing, I hold off.
Early Spring Transplanting: A Fresh Start
If autumn isn't possible, early spring is your next best bet. The soil is starting to warm up again, and the plants are just beginning to break dormancy, meaning they're ready to put out new growth. However, this window can be trickier, especially with our notoriously variable March and April weather here in the Midlands. You're racing against the clock a bit, as you want to get them in before they've put on too much top growth, which increases transplant shock.
- When: I look for a window from March to early May, after the last hard frosts but before the real heat of late spring/early summer kicks in. For example, I've had good success planting new Lupinus seedlings in April when they're still small and haven't fully developed their deep taproot yet.
- Randy's Tip: Be prepared for potential cold snaps or late frosts, which can hit newly planted specimens hard. Have some fleece ready, just in case. And keep an eye on rainfall – early spring can be surprisingly dry, so regular watering is crucial until they're established.
What to Avoid: Summer and Winter Transplanting
Attempting to transplant taprooted plants in the full heat of summer or the depths of winter is generally a no-go in my UK garden. In summer, the combination of high temperatures and the plant actively growing means huge stress on the root system, leading to severe transplant shock and often failure. In winter, the cold, wet, or frozen soil offers no encouragement for root growth, and the plant simply won't establish. I once tried to move a small Eryngium planum in August because it was in the wrong spot, and it just never recovered despite my best efforts to water it. Lesson learned!
Setting the Stage: Essential Site and Plant Preparation
Okay, so you've got your taprooted beauty, and you've picked the perfect time of year. Now, let's talk about getting everything ready, because preparation is truly half the battle with these particular plants. Skimping on this stage is a surefire way to invite transplant shock, and we definitely don't want that for our precious plants! I approach this with the same methodical thinking I used to apply to fixing IT problems – break it down, prepare thoroughly, and anticipate issues.
Site Preparation: The Future Home
Choosing the right spot and getting the soil ready is paramount for a plant that wants to send its roots deep.
- Choosing the Right Spot: Taprooted plants often thrive in well-drained soil, as their deep roots can rot in waterlogged conditions. Here in my Midlands garden, I've got some patches of heavy clay, which can be tricky. For plants like Echinacea, I always look for a sunny spot that doesn't hold water. If it's a bit shady, they might grow, but they won't flower as prolifically.
- Soil Amendment: If you have heavy clay like parts of my garden, or very sandy soil, amending it is key. I always dig in a generous amount of well-rotted garden compost or homemade compost from my bins. This improves drainage in clay and water retention in sand, creating a more hospitable environment for those deep roots. I aim for at least a spade's depth of improvement.
- Digging the Hole: This isn't just any old hole! For a taprooted plant, you want it to be at least twice as wide as the nursery pot and just as deep, or slightly shallower. The width allows those lateral roots to spread out easily, and keeping the depth right ensures the plant isn't planted too deep, which can lead to rot. I always make sure the sides of the hole aren't compacted and "smooth," especially in clay, as this can create a barrier that roots struggle to penetrate. I rough up the edges with my trowel.
- Pre-Watering the Hole: Before you even think about putting the plant in, give the hole a good soak. I fill it with water, let it drain completely, and then do it again. This ensures the surrounding soil is moist, encouraging the roots to venture out, and it helps prevent dry pockets that can suck moisture from your new plant.
Plant Preparation: From Pot to Patch
Now for the plant itself – treating it gently is crucial.
- Pre-Watering the Plant: An hour or two before transplanting, give your plant in its nursery pot a thorough drink. This hydrates the plant and helps the root ball slide out more easily, reducing the chance of breakage.
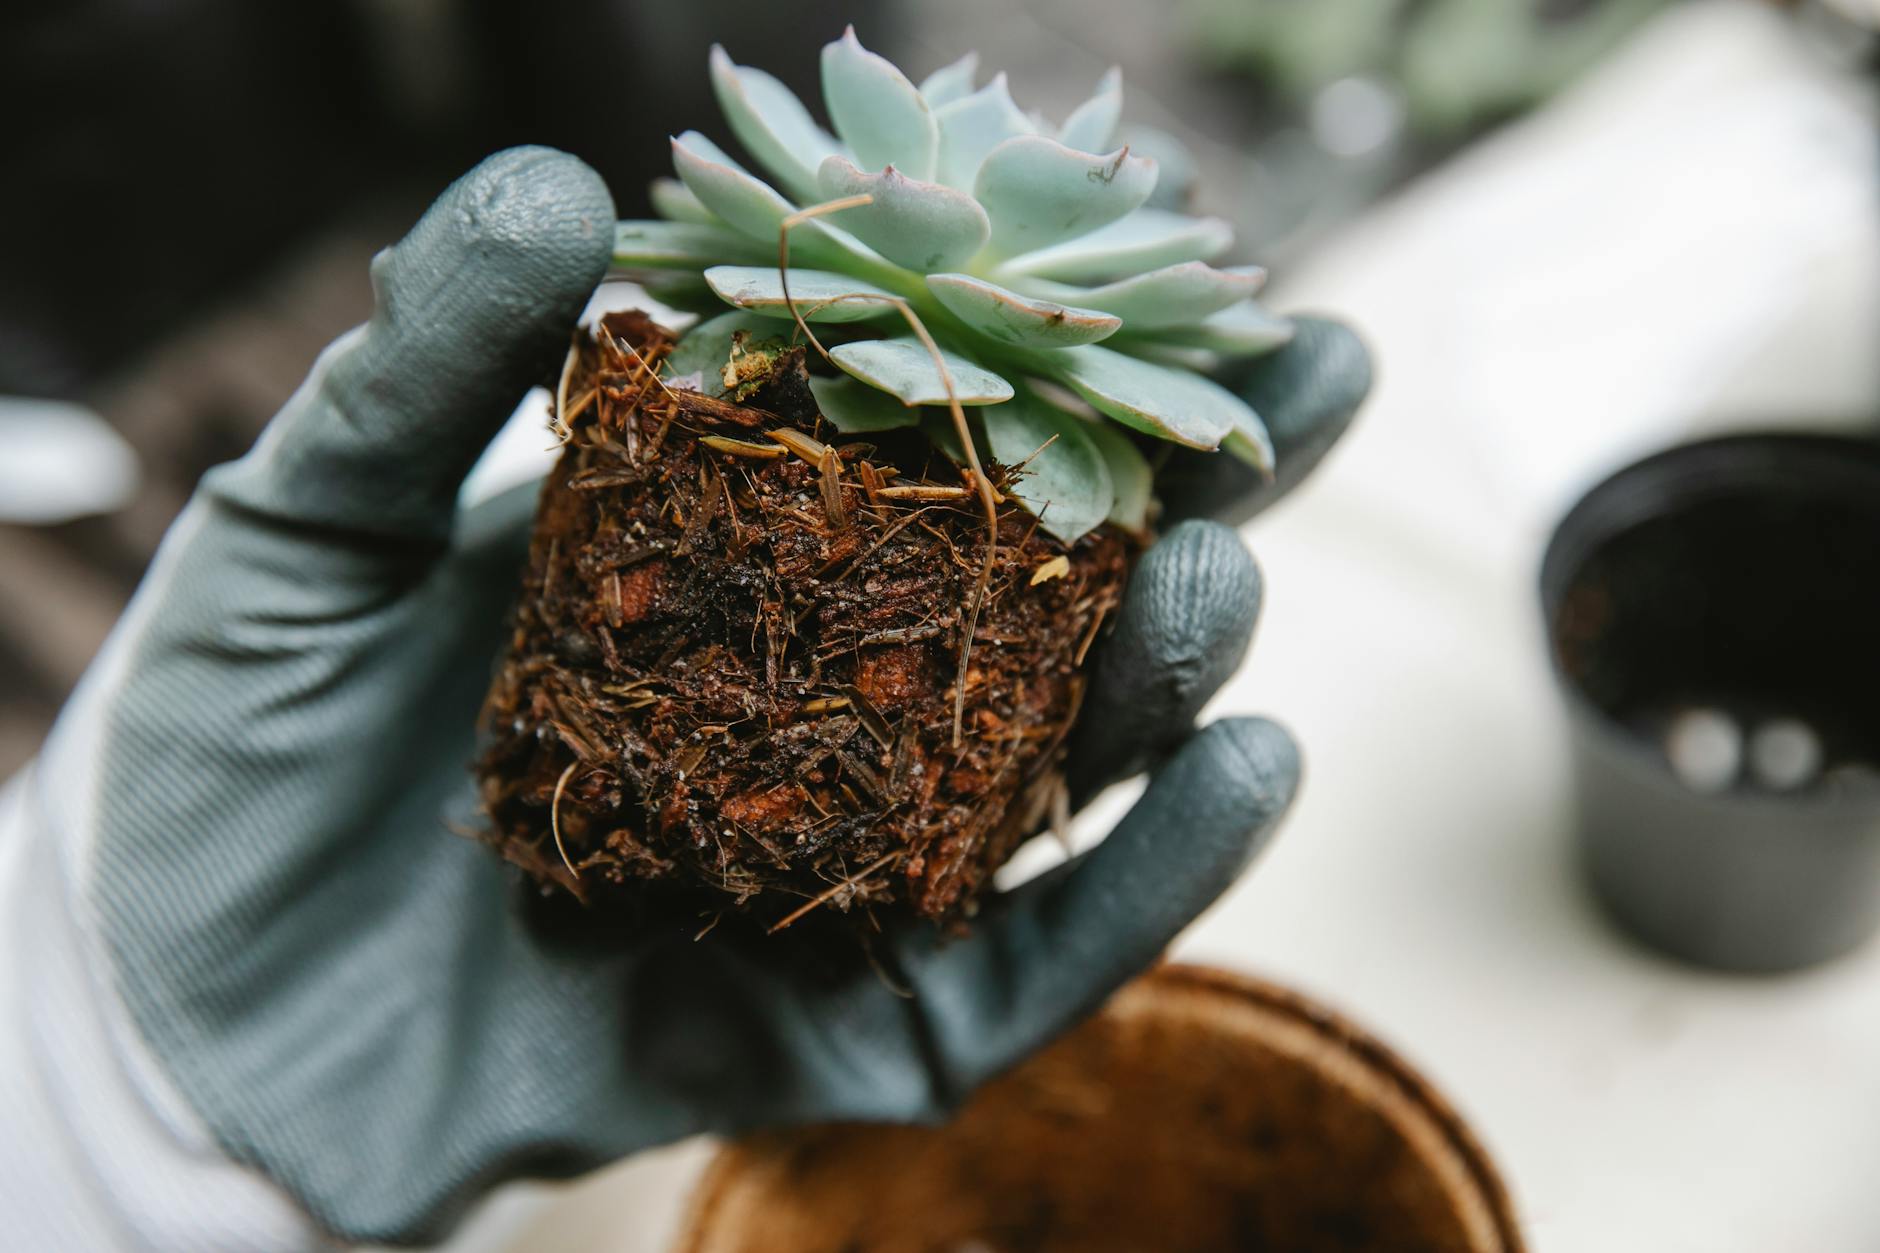
- Gentle Removal from the Pot: This is where many go wrong. Never yank a taprooted plant out by its stem! I gently lay the pot on its side, tap the bottom and sides firmly, and then carefully slide the plant out. If it's stubborn, I might use a trowel to loosen the edges or even cut the pot away if it's plastic and I'm really struggling. My goal is to keep that root ball as intact as humanly possible.
- Inspecting the Roots: Once out of the pot, take a quick look. You want to see healthy, often white-ish roots. If you see roots circling tightly at the bottom (pot-bound), resist the urge to tease them out vigorously like you might with a fibrous-rooted plant. For a taprooted plant, very gently loosen any circling roots at the very perimeter, but do not disturb the main taproot. Any damage to that central root can be fatal. I usually just make a few small vertical cuts along the side of the root ball if it's severely pot-bound, hoping to encourage new, outward growth without disrupting the core.
Here's my pre-transplant checklist to keep you on track:
| Task | Why It Matters for Taproots | Randy's UK Garden Tip |
|---|---|---|
| Choose Right Spot | Ensures good drainage, prevents root rot, optimal light | Sun is usually best for flowering. If your soil is heavy clay like mine, consider raising the bed slightly. |
| Amend Soil | Improves drainage/water retention, fosters root growth | Generous is key! I use a 5-gallon bucket of compost per square metre for new beds. |
| Dig Wide Hole | Gives lateral roots space to expand, reduces initial resistance | At least double the pot's width. Don't dig too deep, planting too low is a common killer. |
| Pre-Water Hole | Prevents moisture shock, encourages roots to grow outwards | Fill, drain, fill, drain. You want the surrounding soil to be damp, not just the hole. |
| Water Plant in Pot | Hydrates plant, eases removal, less root damage | An hour before, give it a good soak until water runs from the bottom. |
| Gentle Pot Removal | Minimizes stress on the crucial taproot | Tap, don't pull! Support the root ball from underneath as you slide it out. |
| Inspect Roots (Carefully!) | Identifies pot-bound issues, allows minor correction | Resist the urge to aggressively untangle the taproot. A few gentle vertical slashes on the sides are usually enough. |
5. Step-by-Step Guide: Gently Transplanting to Avoid Root Shock
Right, you’ve done all the prep work – the soil’s ready, your plant’s hardened off, and you’ve picked the perfect day here in the UK. Now for the moment of truth: getting that precious taprooted plant from its pot into its new home without causing a meltdown. This is where patience and a gentle hand really pay off. I’ve learned this the hard way, mind you, by rushing it and seeing some beautiful eryngiums just sulk for weeks.
Here’s my tried-and-tested method for success in my Midlands garden:
- Water the Pot First: About an hour before you plan to plant, give the nursery pot a good soak. This helps the rootball slide out more easily and reduces the stress on the plant. I usually just dunk the pot in a bucket of rainwater I've collected from the greenhouse roof until the bubbles stop.
- Dig the Hole: Your hole should be twice as wide as the pot and roughly the same depth. This gives the roots plenty of loosened soil to spread into. For my raised beds, I'll often add a handful of my homemade compost to the bottom, just to give it a little boost.
- Extract the Plant Gently: This is the most crucial step for taprooted plants. Carefully turn the pot on its side, or even upside down, supporting the plant with one hand. Gently tap the bottom of the pot until the rootball slides out. Avoid pulling the stem! If it's stuck, you might need to run a knife around the inside edge or even carefully cut the pot away. I once snapped the main taproot of a gorgeous 'Queen of the Night' lupin trying to yank it out – never again!
- Inspect the Roots (But Don't Tease!): Unlike fibrous-rooted plants where you might gently tease out congested roots, for taprooted plants, you want to disturb them as little as possible. If you see any roots circling the bottom (pot-bound), you can make a few very shallow, vertical cuts with a clean knife down the sides of the rootball – just enough to encourage new outward growth, but absolutely no major untangling.
- Position and Backfill: Place the plant in the centre of the hole, ensuring the top of the rootball is level with the surrounding soil. This is critical for taprooted plants – planting too deep can lead to stem rot, and too shallow can dry out the crown. Backfill the hole with the excavated soil, gently firming it around the rootball with your hands to remove any large air pockets. Don't compact it too much, though; the roots need to breathe.
- Water In Thoroughly: Give the plant a really good drink immediately after planting. This settles the soil around the roots and helps eliminate those smaller air pockets. I use a watering can with a rose attachment for a gentle, even soak. You want the water to penetrate deep, reaching the bottom of the taproot.

6. Nurturing Your New Plant: Watering, Feeding, and Protection
Once your taprooted beauty is in the ground, the real establishment phase begins. This initial period, usually the first few weeks or even months, is vital for its long-term health. Think of it as nursing a newborn; they need consistent care to grow strong. Our unpredictable British weather can throw a spanner in the works, so staying vigilant is key!
Watering: The Lifeblood of Establishment
Consistent moisture is non-negotiable for newly transplanted taprooted plants. Their job now is to push that main taproot deeper into the soil, and they can't do that if they're constantly struggling with drought.
- Frequency: In my 800 sq ft garden, especially in those raised beds which can dry out quicker, I aim to water every 2-3 days if there’s no rain, sometimes daily during a particularly dry spell or heatwave like we had last summer. Stick your finger into the soil about an inch or two – if it feels dry, water.
- Depth: It’s better to water deeply and less frequently than to give shallow dribbles. You want the water to reach the entire rootball and encourage that taproot to stretch down. I give each new plant a good litre or two of water, letting it soak in slowly.
- Technique: Water at the base of the plant to avoid wetting the foliage, which can encourage fungal diseases, especially in our damp UK climate. I use a watering can for precision, or if I'm doing a lot of new planting, I might set up a leaky hose for slow, deep watering.
Feeding: Less is Often More
For taprooted plants, especially perennials and shrubs, I generally advise against heavy feeding right after transplanting. The focus should be on root establishment, not vigorous top growth.
- Initial Boost: If your soil is particularly poor, a sprinkle of a balanced, slow-release organic granular feed mixed into the backfill soil can be beneficial. I often use a handful of pelleted chicken manure or a good quality general-purpose organic feed (like Blood, Fish and Bone) when I'm preparing the planting hole.
- After Establishment: Once you see clear signs of new growth (usually a month or two after planting), you can consider a light liquid feed if the plant seems sluggish, but honestly, if you’ve prepared your soil well with compost, it might not even be necessary in the first year. Overfeeding can burn tender new roots.
Protection: Battling the British Elements
Our UK weather, bless it, can be a bit of a rollercoaster. Protecting your new plants from extremes is crucial.

Here's a comparison of common protection methods I've used:
| Protection Method | Primary Purpose (UK Garden) | Randy's Experience (Midlands) | Pros | Cons |
|---|---|---|---|---|
| Cloche/Bell Jar | Early spring frost, pests, slugs | Essential for my early delphiniums and brassicas. Small, effective. | Excellent for individual plant protection, warms soil. | Can overheat on sunny days, limited size. |
| Horticultural Fleece | Frost, strong winds, sun scorch | My go-to for protecting tender new shrubs or larger perennials during unexpected late frosts. | Versatile, breathable, allows light/water through. | Can look untidy, needs securing, can get waterlogged. |
| Windbreak (Stakes & Netting) | Strong prevailing winds (root rock) | Crucial for exposed plants on the edge of my raised beds, especially taller varieties. | Simple, effective, allows air circulation. | Only protects from wind, not cold or sun. |
| Shade Netting | Intense summer sun (scorching) | Rarely needed in my Midlands garden, but a lifesaver for new hydrangeas during heatwaves. | Prevents leaf burn, reduces water stress. | Reduces light, less common requirement in UK. |
| Mulch | Moisture retention, temperature regulation | My absolute favourite! A thick layer of compost or wood chip around everything. | Suppresses weeds, retains moisture, insulates roots. | Can harbour slugs if too thick/wet, needs topping up. |
7. Ensuring Long-Term Health: Troubleshooting and Ongoing Care
Even with the best intentions, new plants can sometimes throw a wobbler. Don't panic! I've had my share of plants that looked like they were on their last legs, only to bounce back with a bit of extra TLC. Learning to read your plants is part of the fun – and the challenge – of gardening here in the UK.
Troubleshooting Common Post-Transplant Issues:
- Wilting: This is perhaps the most common symptom of transplant shock. It usually means the roots aren't taking up enough water to support the foliage.
- Randy's Fix: Check the soil moisture. Is it too dry? Water deeply. Is it waterlogged? That's trickier – ensure drainage is good. Sometimes, a bit of temporary shade (a fleece draped over a cane) can help reduce moisture loss from leaves while roots recover. I had a 'Miss Willmott's Ghost' eryngium almost give up on me after a hot spell, but consistent deep watering brought it back.
- Yellowing Leaves: This can indicate several things: overwatering, underwatering, or nutrient deficiency.
- Randy's Fix: Again, check soil moisture first. If it's too wet, hold off watering. If it's dry, water. If neither seems to be the issue and it's been a few weeks, a very dilute liquid feed might help, but often it's just the plant adjusting and shedding older leaves.
- No New Growth: If your plant looks healthy but just isn't doing anything, it's likely busy establishing its root system underground.
- Randy's Fix: Be patient! Taprooted plants often put all their energy into getting that deep root established before they show much top growth. As long as it's not wilting or yellowing, give it time. Some of my lupins can sit there looking dormant for weeks after planting before suddenly bursting into life.
- Pests and Diseases: Stressed plants are more susceptible.
- Randy's Fix: Keep an eye out. Slugs and snails are notorious for munching on tender new growth in our damp climate. I use wool pellets around my more vulnerable plants. For aphids, a squirt of soapy water usually does the trick. Healthy, well-sited plants are always more resistant.
Ongoing Care for Long-Term Health:
Once your taprooted plant has visibly settled in and is putting on new growth, you can ease into a more regular care routine.
- Mulching: This is probably my top tip for long-term health in my garden. A good 2-3 inch layer of organic mulch (like well-rotted compost or wood chippings) around the base of your plants will do wonders. It suppresses weeds, retains soil moisture, and slowly releases nutrients. I mulch everything in my raised beds twice a year, usually in spring and autumn.
- Watering (Established Plants): Most established taprooted perennials and shrubs are quite drought-tolerant once their deep roots are in. You'll still need to water during prolonged dry spells, especially here in the Midlands where we can get baking summers, but less frequently than newly planted ones.
- Feeding (Established Plants): With good soil and regular mulching, taprooted plants often need very little additional feeding. If they're showing signs of nutrient deficiency (pale leaves, poor flowering), a balanced organic feed in spring can give them a boost.
- Pruning: Follow specific pruning guidelines for your particular plant. For perennials, this often means deadheading spent flowers to encourage more blooms and cutting back old foliage in autumn or spring. For shrubs, it's about maintaining shape, size, and promoting flowering.
Conclusion: The Deep Roots of Success
There you have it – my full rundown on mastering the transplant of taprooted perennials and shrubs for long-term garden health here in the UK. It might seem like a lot of steps, but honestly, it all boils down to respect for the plant, understanding its unique needs, and a good dollop of patience.
I know how tempting it can be to rush things, especially when you’re excited about a new addition to your garden (trust me, I’ve been there – my greenhouse is practically bursting with heirloom tomato seedlings every spring!). But with taprooted plants, taking that extra time to prepare the site, handle the rootball gently, and provide consistent aftercare truly makes all the difference.
In my 800 sq ft Midlands garden, I’ve seen this strategy transform struggling plants into magnificent specimens. My 'Crimson Glory' achillea, which I nearly lost to root shock, now stands tall and proud, attracting a buzz of pollinators. And those 'Black Knight' scabious? Their deep taproots mean they laugh in the face of a dry spell, rewarding me with weeks of beautiful, dark blooms.
So, next time you’re eyeing up a gorgeous delphinium or a sturdy lavender bush at the nursery, remember these tips. Give those taproots the best possible start, and they'll reward you with years of robust growth, stunning flowers, and a resilience that will make you proud. Happy planting, fellow UK gardeners! Let's get those roots established deep and strong.
