Don't Toss Those Old Seeds Yet! The Value of Reviving Questionable Packets
Alright, fellow green thumbs, let's talk about that drawer, that dusty tin, or that old shoe box filled with seed packets. You know the ones – half-used, some with dates long past, others just a bit… suspect. For years, when I first started my gardening journey here in the UK Midlands, I'd look at those packets with a sigh and usually, straight into the bin they'd go. "Too old," I'd think, "not worth the faff." What a mistake that was! As a former IT worker, I used to love problem-solving, and it turns out, gardening offers just as many satisfying puzzles, especially when it comes to coaxing life from what seems like nothing.
Now, with five years of intensive experience coaxing everything from vibrant heirloom tomatoes in my greenhouse to hardy root vegetables in my raised beds, I've learned that patience and a few simple tricks can save you a surprising amount of money and prevent a whole lot of waste. My 800 sq ft backyard, packed as it is, means every seed, every plant, every inch of soil has to count. And let me tell you, there's a unique thrill that comes from reviving a packet of 'Black Krim' tomato seeds that you thought were long dead, especially when those varieties can be a bit pricier to replace here in Britain.
Why bother? Well, beyond the obvious financial savings, there's the satisfaction of sustainable gardening. Plus, sometimes those older packets hold varieties you can't easily find anymore, or perhaps a special heirloom passed down. I've personally brought back some amazing 'Purple Podded Pole' beans from a packet I found tucked away from three seasons ago, and they gave me a bumper crop despite our notoriously unpredictable British summer. So, before you condemn those questionable seeds to the compost heap, stick around. I’m going to walk you through the simple, tried-and-tested methods I use in my own UK garden to figure out if there's still life in them, and how to give them the best possible chance to sprout.
The Float Test: Your First Line of Defence Against 'Dead' Seeds
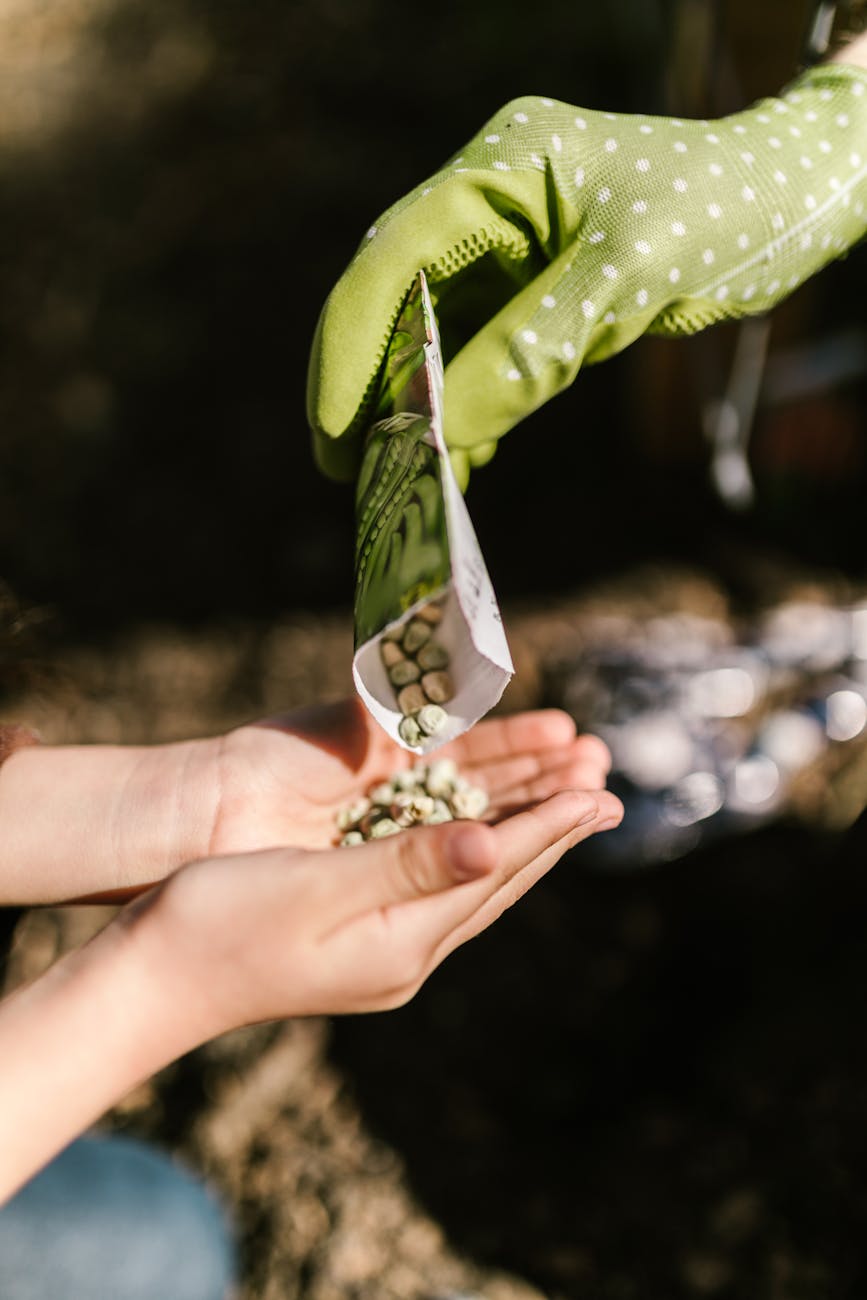
When I'm faced with a pile of old seed packets, especially those that are a year or two past their "best by" date, my very first port of call is always the float test. It's gloriously simple, barely takes any time, and gives you a quick, visual indication of whether you're dealing with empty husks or potentially viable seeds. I swear by this method for my more precious varieties, like the 'Costoluto Fiorentino' tomatoes I love to grow in my greenhouse, or any of those slightly more expensive herb seeds. It saves me from wasting valuable compost and precious time.
The principle is straightforward: viable seeds are generally dense and full of life-sustaining material, so they'll sink in water. Non-viable seeds, often hollow or degraded, will float. Now, it's not 100% foolproof – some perfectly good seeds can float due to trapped air, and some truly dead ones might sink – but it's an excellent initial filter. I've used this countless times to quickly thin out a batch of questionable squash or bean seeds before committing them to the soil. Last spring, I had a packet of 'Waltham Butternut' squash seeds from 2021, and about half of them floated. Guess which ones I didn't bother sowing?
Here's how I do it in my own kitchen:
- Gather Your Seeds: Pick a small, manageable batch from your questionable packet. I usually go for about 10-20 seeds, depending on how many I need.
- Prepare the Water: Fill a clear glass or small bowl with room-temperature water. Tap water is absolutely fine here in the UK.
- Add the Seeds: Gently drop your seeds into the water.
- Wait: Give them about 10-15 minutes. Some seeds, especially larger ones, might take a little longer to absorb water and sink.
- Observe:
- Sinkers: These are your champions! Gently scoop them out, dry them on a paper towel, and they're ready for your next viability test or even direct sowing if you're feeling brave.
- Floaters: Most of these are likely duds. You can discard them.
This simple step has saved me so much heartache and wasted effort in my 800 sq ft garden. It's a fantastic first filter, especially when you're working with limited space and want to maximise your chances of success in our often-challenging British climate.

The Paper Towel Test: Accurately Assessing Germination Rates
Once I’ve done the float test, especially for seeds that passed, or for smaller seeds that don't lend themselves well to floating (like tiny carrot or lettuce seeds), my next step is always the paper towel test. This is where my old IT brain really kicks in – it’s methodical, gives clear data, and lets me calculate an actual germination rate. Why is that important? Because knowing roughly how many seeds will sprout means I can sow the right amount, saving precious space in my propagators and ensuring I don't run out of seedlings for my raised beds or greenhouse.
I learned this lesson the hard way a few years back with some 'Crimson Crush' F1 tomato seeds. They were a bit old, but I was desperate for that blight resistance in our damp UK summers. I optimistically sowed a whole tray, assuming good viability. Only about 30% popped! I had wasted compost, heat, and valuable time, having to resow and play catch-up. Now, I always run a paper towel test on any questionable packet before committing to a full sowing. It’s particularly useful for those varieties that are expensive or hard to find here in the UK.
Here's my approach:
- Select Your Seeds: Choose a representative sample, usually 10-20 seeds, from the packet you want to test. This helps you calculate a percentage.
- Dampen Paper Towel: Take a sheet of kitchen paper towel and dampen it thoroughly with water – not dripping, but uniformly moist. I find slightly warm water works best to mimic ideal germination conditions.
- Arrange Seeds: Lay your chosen seeds out on one half of the damp paper towel, ensuring they're not touching each other.
- Fold and Roll: Fold the other half of the paper towel over the seeds, then carefully roll it up.
- Place in Bag: Slip the rolled paper towel into a clear plastic bag (a Ziploc bag works perfectly) and seal it, leaving a tiny gap for air exchange. This creates a mini-greenhouse, maintaining humidity.
- Warm Spot: Place the bag in a warm location. For most vegetable seeds, I aim for around 20-25°C (68-77°F). In my UK home, this might be on top of the fridge, near a radiator (but not directly on it), or in my heated propagator if it's not in use.
- Monitor: Check daily for signs of germination. Keep the paper towel moist; if it starts to dry out, mist it lightly.
- Record Results: As seeds sprout, carefully count them. Once no new seeds have germinated for a few days (usually after 7-14 days, depending on the seed type), you can calculate your germination rate. If 7 out of 10 seeds germinated, that's a 70% rate!
This data is incredibly empowering. If I get a 70% rate, I know I need to sow about 30% more seeds than I normally would to get my desired number of plants. If it’s below 50%, I might consider buying a new packet or sowing a lot more.
Paper Towel Test vs. Direct Sowing Comparison
| Feature | Paper Towel Test | Direct Sowing (Untested Seeds) |
|---|---|---|
| Control | High (consistent moisture, temperature) | Low (variable soil moisture, unpredictable UK weather) |
| Accuracy | Very High (precise germination rate) | Low (can be affected by pests, inconsistent conditions) |
| Resource Waste | Minimal (no compost, less space) | High (wasted compost, propagator space, time) |
| Time to Results | Faster (ideal conditions accelerate germination) | Slower (waiting for soil to warm up, variable conditions) |
| Risk of Failure | Low (identifies non-viable seeds early) | High (can lead to sparse beds, needing to resow) |
| Best For | Old, expensive, or slow-germinating seeds | Fresh, reliable seeds with known high viability |
| My UK Garden Experience | Essential for maximising space in my 800 sq ft garden and dealing with our often-chilly spring soil. | A gamble, especially with our unpredictable British climate. I've learned to avoid this for questionable seeds. |
Essential Pre-Germination Techniques: Waking Up Dormant Seeds
So, you've got your "sinkers" from the float test, and maybe even a good germination rate from your paper towel test, but some seeds just refuse to wake up. This is where my experimental side really kicks in! Some seeds, especially those from plants with tough outer shells or specific environmental requirements (often due to their natural habitat), have built-in dormancy mechanisms. It’s like they’re hitting the snooze button on life. For us UK gardeners, giving these a bit of a kickstart can make all the difference, especially when our growing season can feel frustratingly short. I've personally revived 'Purple Podded Pole' beans from a packet three years past its date using warm water, and it felt like a triumph! Scarification, while it sounds drastic, saved my bacon with some 'Wild Rocket' seeds that just refused to sprout otherwise.
Here are the main pre-germination techniques I use in my Midlands garden:
1. Soaking (Warm Water Bath)
This is probably the most common and easiest method. Many seeds, particularly larger ones with hard seed coats like beans, peas, corn, and some squashes, benefit from soaking. It softens the seed coat, allowing water to penetrate more easily and kickstarting the germination process.
- My Method: I'll place seeds in a small bowl of warm (not hot!) water, usually around 20-25°C (68-77°F), for 12-24 hours. For really stubborn seeds, I might even use a thermos to keep the water warm. I've found this particularly effective for my heirloom climbing beans, like 'Cherokee Trail of Tears', which can be slow to get going in our often-cool UK spring soil. After soaking, I sow them immediately.
2. Scarification
This sounds a bit aggressive, but it's simply about physically breaking or weakening the hard outer shell of the seed. This allows water and oxygen to reach the embryo inside, overcoming a type of physical dormancy. It's often necessary for seeds with extremely tough coats, like some herbs, native wildflowers, or certain perennial vegetables.
- My Method: I use a few different approaches depending on the seed size:
- Sandpaper: For larger, flatter seeds (e.g., sweet peas, nasturtiums, some bean varieties), I gently rub them between two pieces of fine-grit sandpaper until I see a slight dulling of the seed coat.
- Nail Clippers/File: For really hard, round seeds (e.g., some fruit seeds, very tough beans), I'll carefully nick the seed coat with nail clippers or a small file, ensuring I don't damage the embryo inside.
- Shaking in a Jar: For small, numerous seeds, I've sometimes put them in a jar with some coarse sand and shaken them gently for a minute or two.
I've successfully scarified 'Sweet Pea' seeds that were a couple of years old, getting a fantastic flush of germination compared to the unscarified ones. It really speeds things up, which is crucial for getting a good display before the end of our British summer.
3. Stratification (Cold or Warm)
Stratification mimics the natural conditions seeds would experience in the wild.
- Cold Stratification: This involves exposing seeds to a period of cold, moist conditions to break dormancy. It's common for many temperate perennials and trees, and some vegetables that originate from colder climates.
- My Method (for UK gardeners): While less common for typical annual vegetables, I've used this for some perennial herbs or specific hardy vegetables. I mix the seeds with a small amount of damp sand or peat-free compost, place them in a sealed plastic bag, and pop them in the fridge (not freezer!) for 4-12 weeks.
- Warm Stratification: Less common for UK-grown garden vegetables, but some tropical or sub-tropical seeds require a period of warm, moist conditions before they'll germinate. This is usually followed by a cold period, but for most UK veg, we're focused on warm soil for germination.
Pre-Germination Techniques Comparison
| Technique | What it Does | Best For (Seed Types) | Randy's UK Experience & Notes |
|---|---|---|---|
| Soaking | Softens tough seed coats, allowing water uptake. | Large seeds with hard coats (beans, peas, corn, squash). | My go-to for old bean and pea seeds. Crucial for getting a quick start in our often-cool UK spring. I always use lukewarm water for 12-24 hours. Don't overdo it, or seeds can rot! |
| Scarification | Physically breaks or weakens the seed coat. | Seeds with very tough, impermeable coats (sweet peas, nasturtiums, some herbs, certain tree/shrub seeds). | Essential for my sweet peas and some wild rocket varieties that just won't budge. Use fine sandpaper or carefully nick with clippers. Be gentle; you don't want to damage the embryo. |
| Cold Stratification | Mimics winter, breaking dormancy for temperate plants. | Perennials, some hardy annuals, native wildflowers. | Less common for my typical annual veg, but I've used it for perennial herbs like lavender or some specific hardy brassicas. A damp paper towel in a bag in the fridge for a few weeks works well, but takes patience! |
| Warm Stratification | Mimics warm, moist conditions, often followed by cold. | Tropical/sub-tropical seeds. | Rarely needed for my UK vegetable garden unless I'm trying something very exotic in the greenhouse. For most common seeds, consistent warmth during germination is usually enough. |
Remember, not every seed will respond, and some really are past their prime. But by using these methods, you'll significantly increase your chances of success and gain a much deeper understanding of the incredible life force held within those tiny packets.

5. Creating the Ideal Environment: Optimising Conditions for Old Seed Success
So, you've done the float test, maybe even the paper towel test, and your old seeds are showing signs of life or at least aren't completely duds. Fantastic! Now comes the crucial next step: providing them with the absolute best environment to transition from sleepy embryo to thriving seedling. This is where I've seen many folks, including my past self, stumble, especially with the quirks of our UK climate.
Temperature: The Warm Hug Old Seeds Need
Old seeds often need a bit more encouragement, and warmth is usually the key. For most veg, I aim for a consistent soil temperature of 18-24°C (65-75°F). This is easy enough in a heated propagator or on a heat mat. In my greenhouse here in the Midlands, even in early spring, the air temperature can be alright during the day, but the soil stays stubbornly cold overnight. That's why for my precious 'Marmande' and 'Costoluto Fiorentino' heirloom tomato seeds, which can be a bit slow even when fresh, a heat mat is non-negotiable. I've learned this the hard way: trying to germinate heat-lovers too early without supplemental heat in a chilly British spring is a recipe for disappointment and wasted time.
If you don't have fancy equipment, a warm spot in your house, like on top of a fridge or near a radiator (but not on it, that's too drying), can work. Just make sure it's consistent. I remember one season I tried to start some old 'King Edward' potato seeds (yes, you can grow potatoes from true seed!) on a windowsill, and they took forever, barely germinating. The fluctuating temperatures between day and night just weren't cutting it. Now, any questionable seed goes straight onto a heat mat in my greenhouse.
Light: Sunshine (or LED) for Tiny Sprouts
Once those first cotyledons emerge, light becomes critical. In the UK, especially during late winter and early spring, natural light can be pretty scarce and weak. A south-facing windowsill is a good start, but often it’s simply not enough to prevent leggy, weak seedlings, especially if you're starting them early indoors.
I used to rely solely on my south-facing kitchen window, and I ended up with spindly tomato and pepper plants that looked like they'd stretched for miles. Now, I use LED grow lights for all my early starts. They provide consistent, strong light for 12-16 hours a day. It makes a huge difference, resulting in stocky, strong seedlings ready for my raised beds or greenhouse. For old seeds, which already have a disadvantage, giving them the best light from day one can significantly improve their chances of success.
Humidity: Keeping Moisture Just Right
Old seeds, once they've taken up water, need that moisture maintained. A clear plastic dome, propagator lid, or even a simple cling film cover over your seed trays creates a mini-greenhouse effect, keeping humidity high and preventing the delicate surface of the potting mix from drying out too quickly. This is especially important in our often-dry heated homes during early spring.
However, I've also learned that too much humidity with poor air circulation can lead to damping off – a dreaded fungal disease that can wipe out a tray of seedlings overnight. So, once you see sprouts, make sure to ventilate daily for a short period. I just prop open the lid of my propagator for an hour or two each morning. It's a fine balance, but crucial for success here in Britain.
Potting Mix: The Foundation for Fragile Life
For old seeds, a high-quality, sterile seed-starting mix is paramount. You want something fine, free-draining, and low in nutrients. Avoid garden soil or general-purpose compost, as these can contain pathogens that cause damping off, and their chunkier texture isn't ideal for tiny, fragile roots.
I always use a peat-free, fine-grade seed compost. It provides a clean slate for those struggling old seeds. I've heard stories, and even experienced once myself, trying to save a few quid by using some older, coarser compost for seeds, and the germination rate plummeted. The struggle for those little roots to establish in a dense, unsterile environment just isn't worth it.
Watering: A Gentle Hand
Watering is another area where old seeds need extra care. They've woken up, but they're still delicate. Bottom watering is my preferred method. Place your seed tray in a larger tray of water and let the compost wick up the moisture. This prevents disturbing tiny seeds or young sprouts, and it ensures even saturation without overwatering. Once the surface of the compost looks moist, remove it from the water.
I also keep a fine mist spray bottle handy for light top-ups if the very surface looks dry. Overwatering is a common killer of seedlings in the UK, especially when combined with our cooler temperatures. It starves the roots of oxygen and encourages fungal growth.
6. Troubleshooting Tips: What to Do When Old Seeds Are Slow to Sprout
Even with the best preparation and environment, old seeds can be temperamental. Here in my 800 sq ft Midlands garden, I've had plenty of moments staring at an empty seed tray, wondering if my efforts were in vain. Don't despair! Here's my tried-and-tested troubleshooting guide.
Patience is a Virtue (Especially with Old Seeds!)
This is probably the biggest piece of advice I can give. Fresh seeds might pop up in 3-5 days; old seeds can take weeks, sometimes even a month or more. I remember one year I was trying to germinate some ancient 'Cosmic Purple' carrot seeds. After two weeks, nothing. I was about to give up and start fresh, but I decided to give them another week. Lo and behold, tiny green shoots started to appear on day 20! Their viability was clearly reduced, and they needed much longer to wake up.
Don't assume failure too quickly. Keep the conditions consistent, and give them a good long wait. Mark your calendar for the maximum expected germination time plus an extra week or two for old seeds.
Re-evaluate Your Conditions
If nothing's happening after a prolonged wait, go back to basics and double-check your environment:
- Temperature: Is it consistently within the optimal range? Has it dropped due to a cold snap here in the UK? My greenhouse can fluctuate wildly in early spring, so I'm always checking the thermometer.
- Moisture: Is the potting mix consistently moist but not waterlogged? Poke your finger gently into the mix. If it's bone dry, you've missed a watering. If it's squishy, you might be overwatering, which leads to rot.
- Light (if already sprouted): Are your trays getting enough light? If not, they might be using all their energy stretching for light rather than pushing out roots or further leaves.
- Depth: Did you plant them too deep? A common mistake, especially with fine seeds. A light dusting of vermiculite can help maintain moisture without burying them too much.
Gentle Disturbance (Sometimes Helps!)
Sometimes, a little disturbance can trigger germination. This isn't a scientific method, but I've found it occasionally works. If I have a tray of slow old seeds, I might gently mist the surface, or very carefully, with a toothpick, gently poke the soil surface around where I know the seeds are. The slight agitation or fresh oxygen can sometimes kickstart a stubborn seed. I wouldn't do this for very delicate seeds, but for larger ones like beans or corn, it's worth a shot before giving up.
Consider Re-doing Pre-Germination
If you skipped pre-germination techniques like scarification or stratification on a particularly old packet, or if your initial attempt at the paper towel test showed very low numbers, you might want to try again with a fresh batch of seeds from the packet, incorporating those techniques more rigorously. Some old seeds just need that extra push to break dormancy. I once had a packet of 'Bright Lights' Swiss chard that simply wouldn't sprout until I gave them a good 24-hour soak.
Watch Out for Fungal Issues (Damping Off)
One of the most heartbreaking issues is damping off. You see sprouts, you get excited, and then the next day, they're flopped over at the base, looking like they've been cut. This is a fungus that thrives in overly wet, cool, and poorly ventilated conditions.
- Prevention is key: Use sterile seed-starting mix, ensure good air circulation (ventilation!), and avoid overwatering.
- Act fast: If you see any signs, remove affected seedlings immediately to prevent spread. A light dusting of cinnamon powder (a natural fungicide) on the surface can sometimes help, but once it takes hold, it's tough to stop. I've had entire trays of 'Sweet Million' tomatoes fall victim to damping off in a humid British spring before I got my ventilation right.
Pest Patrol: Fungus Gnats
Moist seed-starting conditions can attract fungus gnats. While not directly harmful to sprouts, their larvae feed on organic matter and can damage delicate roots. If you see tiny black flies buzzing around your seedlings, it's a sign. Reduce watering, ensure good airflow, and consider yellow sticky traps. I keep a few in my greenhouse around my propagation area just in case.
7. Giving Old Seeds a Second Chance: Grow More, Waste Less!
Well, there you have it – my full rundown on reviving those 'dead' seeds. From the initial float test to the paper towel germination and all the pre-treatment wizardry, I hope I've shown you that those forgotten packets aren't necessarily destined for the bin.
For me, this isn't just about saving a few quid, though that's certainly a bonus, especially when you're trying to fill an 800 sq ft garden like mine! It's about so much more. It's about the sheer joy of bringing something back to life, the satisfaction of coaxing growth from something that seemed hopeless. It's about preserving valuable genetics, especially with heirloom varieties like my beloved 'Cherokee Purple' tomatoes, where every seed feels like a tiny piece of history.
It's also a fundamental part of sustainable gardening. In my journey from an IT desk to digging in the soil here in the Midlands, I've become obsessed with reducing waste and making the most of every resource. Throwing away viable seeds just doesn't sit right with me. Every successful sprout from an old packet is a little victory against waste and a step towards a more productive, resilient garden.
I’ve learned countless lessons through trial and error in my UK garden, from battling slugs in a damp spring to celebrating a bumper crop of 'Black Krim' tomatoes in a good summer. And testing old seeds has been one of the most rewarding experiments. It teaches patience, observation, and an appreciation for the incredible life force held within those tiny dormant packages.
So, please, don't let those old packets languish. Dig them out! Give them a chance! You might be surprised by what you can achieve. And when you do get those unexpected sprouts from a forgotten packet, do share your successes with me and the wider UK gardening community. It’s all part of the wonderful, experimental, and incredibly rewarding journey of gardening here in Britain. Happy growing!