Introduction: Is Your Potted Plant Feeling the Squeeze?
I'll bet you’ve been there, haven't you? Staring at a once-thriving potted plant – maybe a glorious 'Moneymaker' tomato that's suddenly looking a bit lacklustre in your greenhouse, or a vibrant lavender in a patio pot that's just… stopped. It’s wilting despite consistent watering, growth has stalled, and frankly, it just looks a bit fed up with life. Believe me, I know that feeling well. When I first started transforming my 800 sq ft Midlands backyard into the productive garden it is today, I made plenty of mistakes, and overlooking root-bound plants was a common one. I’d be scratching my head, wondering if it was our notoriously unpredictable British weather, a nutrient deficiency, or some invisible pest.
Over my five years of intensive gardening here in the UK, especially with my beloved heirloom tomatoes and herbs in containers, I’ve learned that sometimes, the problem isn't above ground – it's a silent struggle happening right beneath the soil. Your plant might just be feeling the squeeze, literally! Being root-bound is a surprisingly common issue in container gardening, and it can seriously hinder your plant's ability to thrive, no matter how much love and compost you throw at it.
But here’s the brilliant news: it’s almost always fixable! In my experience, a little intervention can turn a struggling, root-choked plant into a flourishing specimen once more. I've salvaged countless plants, from 'Padron' chilli peppers in my greenhouse that were practically suffocating, to perennial herbs like rosemary that needed a serious root haircut. Today, I'm going to share everything I've learned through my own trials and errors in my UK garden about diagnosing, untangling, and strategically repotting these stressed-out plants. We'll get your container garden not just surviving, but absolutely thriving, even with our unique British climate challenges.
Diagnosing Root-Bound Woes: Signs and Symptoms to Watch For
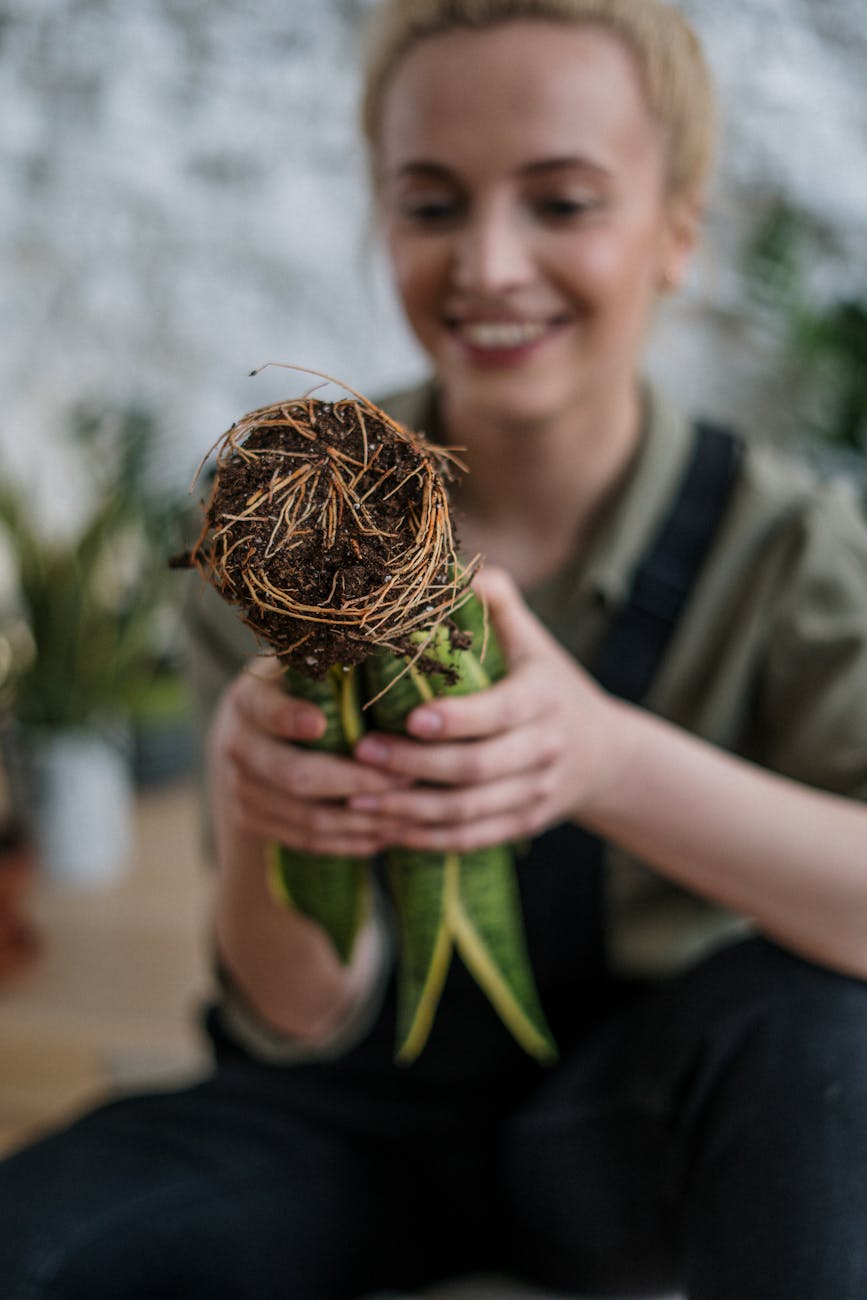
Learning to spot the signs of a root-bound plant is like gaining a superpower in the garden. For years, I mistook these symptoms for other problems, leading to wasted effort and frustrated plants. I remember one particularly stubborn 'Sungold' tomato I had in a grow bag in the greenhouse a couple of seasons back. It was wilting every afternoon, even after a good soak, and I just couldn't figure it out. I added more feed, checked for pests, even moved it to a shadier spot (which, for a tomato, was a terrible idea!). It was only when I finally pulled it out of its bag that I saw the dense, matted mess of roots – a clear case of being root-bound. That was a real "aha!" moment for me, and since then, I've learned to pay close attention to these tell-tale signs.
Here are the key symptoms I look out for, along with a bit of my personal experience:
- Stunted or Slowed Growth: This is often the first thing I notice. If your plant, like a young 'Crimson Crush' tomato, just isn't putting on new leaves or flowers at the rate it should, despite adequate light and nutrients, it could be struggling for space below ground.
- Wilting, Even After Watering: This is a classic. The roots are so tightly packed they can’t efficiently absorb water, or the pot dries out incredibly quickly. I’ve seen this happen with my patio herbs, especially in a dry spell here in the Midlands. You water, and within hours, they're drooping again.
- Water Running Straight Through: You water, and it immediately gushes out the bottom of the pot. This means the water can't penetrate the dense root ball effectively. It’s a sure sign that something’s amiss.
- Roots Emerging from Drainage Holes: This one's pretty obvious! If you see a tangled mess of white or brown roots poking out the bottom, your plant is literally trying to escape its confines. I’ve seen some hilarious examples of this, especially with my vigorous courgettes in large pots.
- Roots Circling the Soil Surface: Less common, but sometimes you'll see roots pushing up and circling just under the top layer of potting mix. It's another sign they're out of room.
- Potting Mix Compaction: The soil might look incredibly dense and hard, not fluffy and aerated, because the roots have taken over all the space.
To help you differentiate, I've put together a quick comparison table of root-bound symptoms versus other common issues I've encountered in my UK garden:
| Symptom | Root-Bound Plant (Randy's Experience) | Nutrient Deficiency (e.g., Nitrogen) | Overwatering | Pest Damage |
|---|---|---|---|---|
| Growth | Stunted, slow, overall lack of vigour. My 'Shirley' tomatoes often showed this first. | Yellowing lower leaves, weak stems. New growth might be pale. | Wilting, yellowing, soft stems, often accompanied by rot at the base. | Visible holes, chewed edges, distorted new growth, sticky residue, or tiny insects. |
| Leaves | May wilt even after watering, sometimes slightly yellowed from stress. | Yellowing (often from bottom up), stunted. | Yellowing, drooping, soft and mushy. | Holes, spots, discolouration, curling, or actual pests visible (e.g., aphids on my broad beans). |
| Water Absorption | Water runs straight through, pot dries out incredibly fast. | Absorbs water normally, but may still show stress. | Soil stays soggy for days, plant looks waterlogged. | Normal water absorption, unless roots are damaged by root-eating pests (less common in pots). |
| Roots (if visible) | Dense, matted, circling, emerging from drainage holes. | May look normal, or slightly sparse if plant is weak. | Dark, mushy, foul-smelling (root rot). | Could be fine, or might show damage if soil pests are present (e.g., vine weevil larvae in UK gardens). |
| Potting Mix | Very dense, hard to penetrate. | May look normal, or depleted if nutrients are leached. | Constantly wet, often with a stale smell. | Normal. |
| UK Specific Considerations | Common in quick-growing plants (tomatoes, courgettes) in smaller pots, especially during warm spells. | Nutrient leaching is common in our rainy British summers, requiring regular feeding. | Overwatering is easy in our cooler, wetter periods. | Slugs, snails, aphids, and whitefly are common UK pests that cause visible damage. |
Essential Tools and Prep: Gearing Up for Root Revival
Alright, you’ve diagnosed the problem! Now, before we get stuck in, it’s time to gather your gear. I’ve found that having everything ready before you start makes the whole process smoother and less stressful for both you and your plant. There’s nothing worse than having a plant half-out of its pot and realising you’ve forgotten something crucial! My little greenhouse often doubles as my potting shed, and I always lay out an old tarp or a sheet of cardboard to catch any spilled potting mix – it saves a lot of sweeping up later!
Here’s my go-to list of essential tools and materials for root revival:
- A New Pot (or the Same One, Cleaned!): This is critical. Generally, I go for a pot that’s just one size up – usually about 2-4 cm (1-2 inches) wider in diameter than the old one. Going too large can lead to overwatering issues, which I've learned the hard way with my greenhouse cucumbers. If you're putting the plant back into the same pot, make sure it's thoroughly cleaned and sterilised to prevent disease.
- Fresh, High-Quality Potting Mix: This is your plant’s new home, so don't skimp! For my vegetables and herbs here in the Midlands, I always opt for a good quality, peat-free multi-purpose compost. I often add a bit of perlite for extra drainage, especially for my peppers, and some slow-release organic fertiliser if the plant is a heavy feeder like my 'Gardener's Delight' tomatoes. Make sure it's slightly pre-moistened before you start – not soaking wet, but nicely damp.
- Sharp Pruners or Snips: Clean and sharp is key! This ensures a clean cut on any roots you need to remove, minimising damage and preventing disease. I always give mine a quick wipe with rubbing alcohol before and after use.
- A Small Trowel or Hand Fork: For gently loosening the old potting mix and helping to backfill the new pot.
- A Chopstick, Old Fork, or Your Fingers: These are invaluable for gently teasing apart those stubborn, matted roots. I usually start with my fingers and move to a chopstick for the really dense bits.
- Watering Can: Ready with some lukewarm water to give your plant a good drink after repotting. I often add a little seaweed extract to the water for an extra boost to help with transplant shock.
- Gloves: Optional, but good if you want to keep your hands clean.
Before I even touch the plant, I always take a moment to prepare the new pot. I add a layer of fresh, moistened potting mix to the bottom – enough so that when the plant goes in, the top of its root ball will be about 2-3 cm (1 inch) below the rim of the new pot. This leaves enough space for watering and prevents the soil from washing out. A little bit of prep goes a long way to making this operation a success!
Gentle Untangling & Strategic Pruning: Freeing Your Plant's Roots
This is the most delicate part of the entire process, where you truly free your plant from its constricted state. It can feel a bit like performing surgery, and I admit, the first few times I tackled a severely root-bound plant, I was incredibly hesitant, worried I'd do more harm than good. I remember a particularly dense root ball on a 'Thai Basil' plant – I thought I’d never get it untangled! But I’ve learned that a little courage, combined with a gentle touch, is all it takes.
Here’s how I approach this crucial step in my UK garden:
- Carefully Remove the Plant: Gently tip the pot on its side, or even upside down if necessary, supporting the plant's base with your hand. Tap the bottom and sides of the pot to help loosen the root ball. Sometimes, for really stubborn ones, I might need to slide a thin knife around the edge of the pot, but usually, a good squeeze and a tap does the trick. Once out, you'll likely see the dense, tangled mess that confirms your diagnosis.
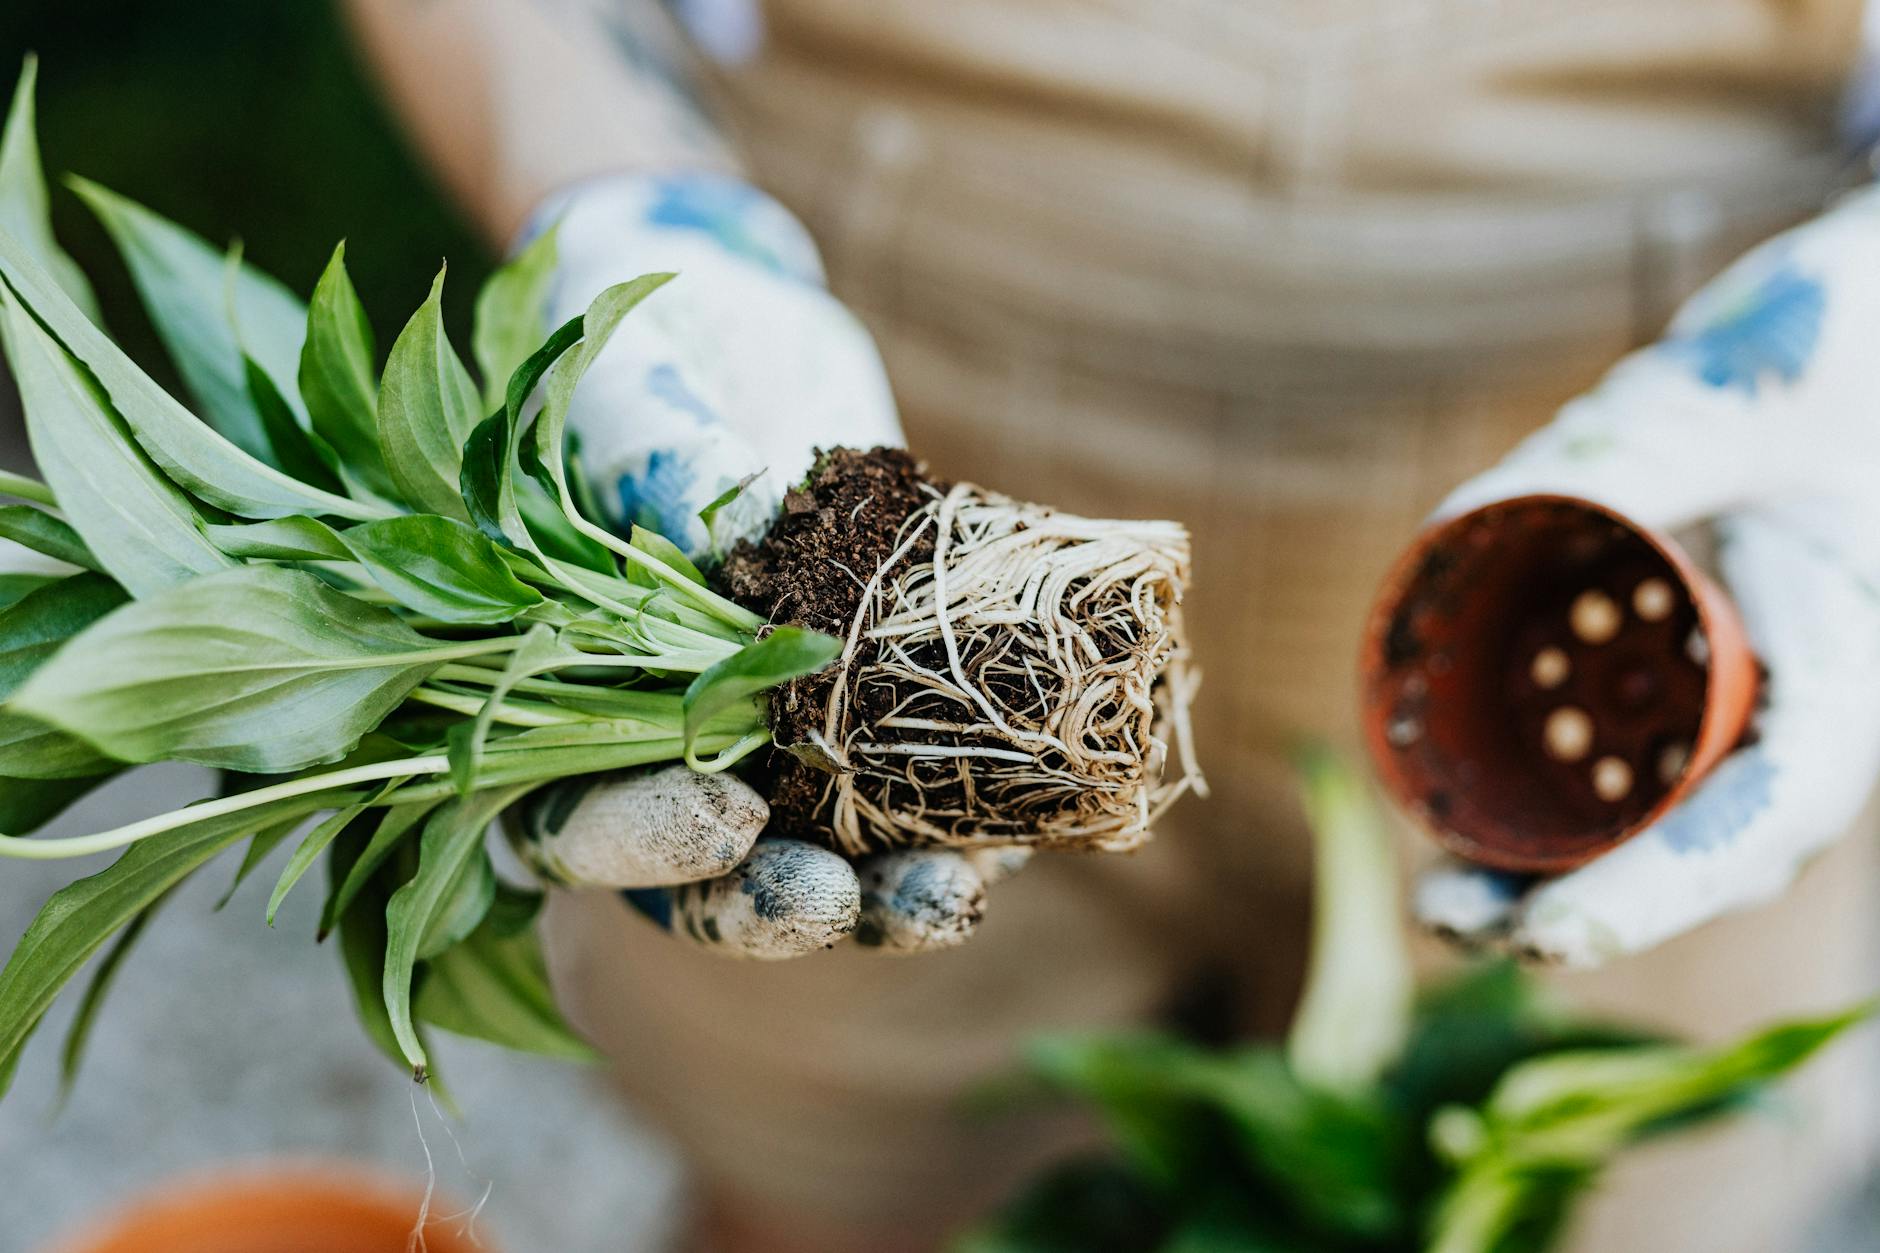
- Assess the Root Ball: Take a good look. Are the roots circling tightly around the outside? Is there a thick mat at the bottom? Are they healthy (usually white or light brown) or do they look dark and mushy (a sign of rot, which needs more aggressive pruning)?
- Gentle Untangling: This is where your fingers, chopstick, or fork come in. Start from the bottom of the root ball and gently tease the roots apart. The goal is to loosen them so they're no longer circling and can spread out into the new potting mix. I often try to "unwind" the circling roots. Don't be afraid to be firm, but always be gentle. I usually aim to loosen about the outer third of the root ball.
- Strategic Pruning: For very severe cases, or if you spot any damaged or rotten roots, pruning is necessary.
- Circling Roots: Use your clean snips to make 3-4 vertical cuts about 1-2 cm (half an inch) deep into the outer root ball, evenly spaced. This encourages new roots to grow outwards rather than continuing to circle. I've found this particularly effective for my greenhouse peppers that are notorious for tight roots.
- Matted Bottom: If there's a thick, impenetrable mat of roots at the very bottom, you can carefully slice off the bottom 1-2 cm (half an inch) with your pruners. This sounds drastic, but it stimulates new root growth.
- Damaged/Dead Roots: Snip off any roots that are dark, mushy, or clearly dead. These won't recover and can potentially harbour disease.
I always remember a lesson I learned with a struggling 'Black Krim' tomato. I was too timid with the roots, just gently teasing them. While it helped a bit, the plant still didn't truly take off. The next year, with a similar situation, I was bolder with the vertical cuts and trimming the bottom, and that plant absolutely exploded with growth. It taught me that sometimes, a little controlled "trauma" is exactly what the plant needs to thrive.
Here’s a look at different untangling techniques I've tried:
| Technique | Description | Randy's Experience & Best Use (UK Context) | Pros | Cons |
|---|---|---|---|---|
| Gentle Finger Teasing | Using your fingers to carefully pull apart the outer roots, trying to unwind any circling ones. | My go-to for most plants, especially delicate herbs or younger plants. Works well for moderately root-bound plants. | Least stressful for the plant, minimal root damage. | Can be time-consuming for severely matted roots, might not fully untangle. |
| Chopstick/Fork Method | Using a chopstick or small fork to gently prod and loosen dense root masses from the bottom upwards. | Excellent for denser root balls, like established tomatoes or woody herbs (rosemary). | More effective at breaking up tight masses than fingers alone. | Can accidentally break more delicate roots if not careful. |
| Vertical Slicing | Making 3-4 vertical cuts (1-2 cm deep) into the outer root ball with clean pruners. | Essential for severely root-bound plants where roots are tightly circling. Works wonders for vigorous veg. | Highly effective at encouraging outward root growth. | More invasive, can cause temporary shock if not followed by good aftercare. |
| Trimming the Bottom | Slicing off the bottom 1-2 cm of a densely matted root ball. | Used for extreme cases where the bottom is an impenetrable disc. Great for fast-growing perennials. | Removes the most congested part, strongly stimulates new root growth. | Most invasive, higher risk of shock if plant is already stressed or if not done with sharp tools. |
| Washing Roots | Gently washing away all old potting mix from the roots under a tap to fully expose them, then trimming. | I only use this for specific situations, like dividing houseplants or bare-rooting for specific projects. | Allows full inspection and precise pruning of every root. | Extremely stressful for the plant, removes beneficial soil microbes, not ideal for most repotting. |
5. The Art of Repotting: Choosing the Right Pot and Fresh Compost
Right, once you’ve got those roots gently untangled and pruned, it’s time for the main event: getting your plant into its new home. This isn't just about chucking it in any old pot; choosing the right size and filling it with quality compost is absolutely crucial for its recovery and future growth. I've learned this the hard way more times than I care to admit, especially when I first started out and thought "bigger is always better" for pots. Spoiler: it often isn't!
Pot Size: The Goldilocks Principle
The temptation, especially after seeing those tightly packed roots, is to go for a massive pot. But resist! A pot that’s too large can lead to waterlogging, as the plant’s roots can’t absorb all the moisture from the excess compost. This creates a soggy environment, perfect for root rot – exactly what we’re trying to avoid! On the flip side, a pot that’s only marginally bigger won't give the roots enough room to flourish for long.
My rule of thumb is to go up by one pot size, maybe two if the plant was severely root-bound and is a vigorous grower. So, if it was in a 15cm pot, aim for an 18-20cm one. For my greenhouse tomatoes like the 'Gardener's Delight' or 'Sungold', which are absolute beasts, I'll often go from a 9cm starter pot straight into a 25-30cm final pot, but that's for a young plant with a lot of growing ahead. For an already established, root-bound plant, a gradual increase is kinder. I once repotted a struggling rosemary from a 15cm pot into a huge 30cm one, thinking it would love the space. It sulked for weeks and nearly drowned! I had to pull it out, dry out the root ball, and pop it back into a slightly smaller, better-draining pot. Lesson learned.
Pot Material: Terracotta vs. Plastic
- Terracotta: I love the look of terracotta, and it’s excellent for plants that prefer drier feet, like many herbs. The porous nature allows air to circulate and moisture to evaporate from the sides, preventing waterlogging. However, here in the Midlands, especially during a hot spell (rare but it happens!), they can dry out incredibly fast, meaning more watering.
- Plastic: Plastic pots retain moisture much better, which is brilliant for thirsty plants like my heirloom tomatoes in the greenhouse. They're lighter, cheaper, and easier to clean. My entire greenhouse is packed with plastic pots for my 'Cherokee Purple' and 'Black Krim' tomatoes. The main thing is to ensure they have good drainage holes. If they don't, I get the drill out!
- Glazed Ceramic: These look fantastic and retain moisture like plastic, but they can be heavy and expensive. I tend to use these for more decorative plants on the patio rather than my workhorse veg.

Fresh Compost: The Lifeblood of Your Plant
This is where you give your plant a serious boost. Old compost is depleted of nutrients and often compacted, restricting root growth and drainage. Fresh compost, on the other hand, is a powerhouse of nutrients, has excellent structure for aeration, and holds moisture beautifully.
For most of my container veg and herbs, I swear by a good quality peat-free multi-purpose compost. It's better for the environment, and I’ve found the formulations have come on leaps and bounds in recent years, performing just as well as traditional peat-based ones. For plants that will be in their pots for a long time, like some of my perennial herbs or dwarf fruit trees, I'll mix in some John Innes No. 3. It’s a loam-based compost that offers more stability and a longer-lasting nutrient supply, which is perfect for bigger, thirstier plants.
When repotting, start by adding a layer of fresh compost to the bottom of the new pot. Then, carefully centre your plant, ensuring the top of the root ball is about 2-3cm below the rim of the pot – this leaves space for watering. Fill around the sides with more fresh compost, gently firming it down to remove large air pockets, but don't compact it too much. You want that air circulation!
6. Aftercare and Prevention: Nurturing Your Revived Plant for Long-Term Health
You've done the hard work, now for the TLC! The first few days and weeks after repotting are crucial for helping your plant settle in and thrive. Think of it like recuperating after surgery – it needs a bit of peace and quiet.
Immediate Aftercare: A Gentle Hand
- Watering: Immediately after repotting, give your plant a really good, thorough watering. I mean, water until it drains freely from the bottom. This helps settle the compost around the roots and provides much-needed moisture.
- Location, Location, Location: For the first week or so, place your repotted plant in a sheltered spot, out of direct, harsh sunlight and strong winds. Here in the UK, our sun can be deceptively strong even if it doesn't feel scorchingly hot, and a strong gust of wind can stress a recovering plant. A slightly shadier, calmer spot allows the roots to start establishing without the added stress of extreme environmental conditions. My greenhouse provides a perfect convalescence ward for anything I've repotted!
- Hold the Feed: Don't fertilise immediately. The fresh compost will contain enough nutrients to get it going. Introducing extra feed too soon can actually burn delicate new roots. Wait a couple of weeks before starting your regular feeding regime.
Long-Term Health & Prevention: Staying Ahead of the Game
To avoid repeating this root-bound saga, a little ongoing care goes a long way. This is where my "former IT worker" brain kicks in – it’s all about preventative maintenance!
- Regular Checks: Every time you water, take a quick peek at the drainage holes. Are roots peeking out? Does the plant seem to be drying out unusually fast? These are signals it might be time for another inspection. For fast growers like my annual tomatoes, I'm checking them every few weeks during peak season.
- Timely Repotting: For most annuals and fast-growing perennials, plan for an annual or bi-annual repotting. Even if they don't look severely root-bound, refreshing the compost and giving them a small pot upgrade (or a root prune and back into the same pot) can make a huge difference. For my container-grown herbs, I'll often give them a root prune and fresh compost every spring.
- Root Pruning as Maintenance: Don't just save root pruning for emergencies. It can be a fantastic preventative measure. For larger, longer-term container plants that you don't want to keep upsizing the pot for (my dwarf apple tree, for example), a yearly or bi-annual root prune can keep them happy and healthy in the same pot. I usually do this in late winter/early spring before new growth really kicks off.
Repotting Strategies: Common Plants in My UK Garden
To give you a clearer idea of what I do in my own 800 sq ft Midlands garden, here's a quick comparison of my repotting approach for a few common plant types:
| Plant Type (Example) | Ideal Pot Size Increase | Compost Preference | Repotting Frequency (UK) | Randy's Notes & Advice (UK Specific) |
|---|---|---|---|---|
| Heirloom Tomatoes (e.g., 'Cherokee Purple') | From 9cm to 25-30cm final pot (one big jump) | High-quality peat-free multi-purpose with added perlite/vermiculite for drainage. | Annually (as they're annuals) | Start early in greenhouse. Good drainage is key; they're thirsty but hate wet feet. Don't be afraid to go big once for the final pot. |
| Perennial Herbs (e.g., Rosemary, Thyme) | One pot size up (e.g., 15cm to 18cm) or root prune & same pot | Peat-free multi-purpose, often mixed with grit for drainage. | Annually (spring) for small pots, bi-annually for larger. | Essential to check drainage; our UK damp winters can be brutal for Mediterranean herbs. Root prune helps keep them compact. |
| Chillies/Peppers (e.g., 'Hungarian Hot Wax') | From 9cm to 20-25cm final pot (one or two jumps) | Peat-free multi-purpose, slightly richer mix if available. | Annually (as they're annuals, grown indoors/greenhouse) | Love warmth, so ensure they're in a sunny, sheltered spot. Repotting into final pot helps them establish before summer fruiting. |
| Container Flowers (e.g., Petunias, Geraniums) | One pot size up (e.g., 10cm to 15cm) | General peat-free multi-purpose. | Annually (as they're often annuals or treated as such) | Regular feeding post-repotting is important for continuous blooms throughout our British summer. |
| Dwarf Fruit Trees (e.g., Patio Apple) | One pot size up initially, then root prune & same pot | John Innes No. 3 for stability and long-term nutrients. | Every 2-3 years for root prune/compost refresh. | Crucial for stability in windy UK conditions. Good drainage and consistent watering are vital for fruit set. |

7. Conclusion: A Thriving Future for Your Container Garden
So there you have it, fellow gardeners! Reviving a root-bound plant might seem a bit daunting at first, but I promise you, it's one of the most rewarding tasks you can undertake in your container garden. We've covered the whole journey, from spotting those tell-tale signs that your plant is feeling the squeeze, to gathering your tools, gently untangling those matted roots, selecting the perfect new home, and finally, nurturing it back to full health.
What I've learned over my five-plus years of intense gardening here in the UK, with all its unpredictable weather and unique challenges, is that our plants are incredibly resilient. They just need a bit of a helping hand and a good understanding of what they're trying to tell us. By taking the time to diagnose, untangle, prune, and repot with care, you’re not just saving a plant; you’re investing in its future, ensuring it has the space, nutrients, and healthy root system it needs to truly flourish.
There's immense satisfaction in seeing a once-struggling plant burst back into life, its leaves greener, its flowers more vibrant, or its fruit more abundant. It’s a testament to your hard work and observation. So, next time you see those roots circling, don’t despair! Grab your tools, get your hands dirty, and give your potted plants the revival they deserve. Your thriving container garden, packed with happy, healthy plants, will be your reward.
Happy gardening, and remember, every season in your UK garden is a new opportunity to learn and grow!
