The 'Side-Channel' Problem: Why Your Potted Plants Aren't Getting Enough Water
Alright, fellow gardeners! Randy here from my little patch of green in the UK Midlands. If you're anything like me, you probably spend a fair bit of time admiring your potted plants – perhaps a vibrant 'Sweet Million' tomato bursting with fruit in the greenhouse, a fragrant rosemary by the back door, or a pot of colourful petunias brightening a corner of the patio. You water them diligently, perhaps even daily during one of our surprise British heatwaves, yet you still see them wilting, looking utterly miserable. You stick your finger in, the top feels damp, but the plant clearly isn't happy. Sound familiar?
I’ve been there, more times than I care to admit, especially in my earlier gardening days. I’d carefully water my prize 'Cherokee Purple' tomatoes, convinced they were getting all they needed, only to find them drooping dramatically by mid-afternoon, despite the compost feeling moist on top. It was utterly baffling and, quite frankly, frustrating. I learned, through a fair bit of head-scratching and trial-and-error in my 800 sq ft backyard, about a sneaky, often overlooked issue: the "side-channel" problem.
This isn't some fancy, scientific term you need a degree to understand. It's simply what happens when water, instead of soaking evenly through the entire root ball of your potted plant, decides to take the path of least resistance. It channels its way down the sides of the pot, or through existing gaps, bypassing the thirsty roots entirely and draining out the bottom. Essentially, you're giving your plant a good drink, but the drink isn't actually reaching its mouth. It’s like trying to fill a bucket with a hole in the side – you pour, but most of it escapes before it can do any good. Here in the Midlands, with our often unpredictable weather – from sudden downpours to prolonged dry spells – this problem can be particularly pronounced, leaving our plants stressed and under-hydrated despite our best efforts.
Understanding the Root Causes: How Water Finds the Path of Least Resistance
So, why does water behave like a rebellious teenager, refusing to go where you tell it? It boils down to a few key culprits that I’ve identified in my own UK garden over the years. Understanding these "root causes" (pun absolutely intended!) is the first step to solving the side-channel problem for good.
One of the biggest culprits, especially with older potted plants, is compacted soil. Over time, repeated watering, the weight of the plant, and the natural breakdown of organic matter can cause the potting mix to become dense and less porous. This is particularly noticeable with peat-based composts, which, when they dry out completely, can become incredibly hydrophobic. I've seen it happen countless times in my greenhouse during a hot summer; water just beads up on the surface and refuses to penetrate, like oil on water.
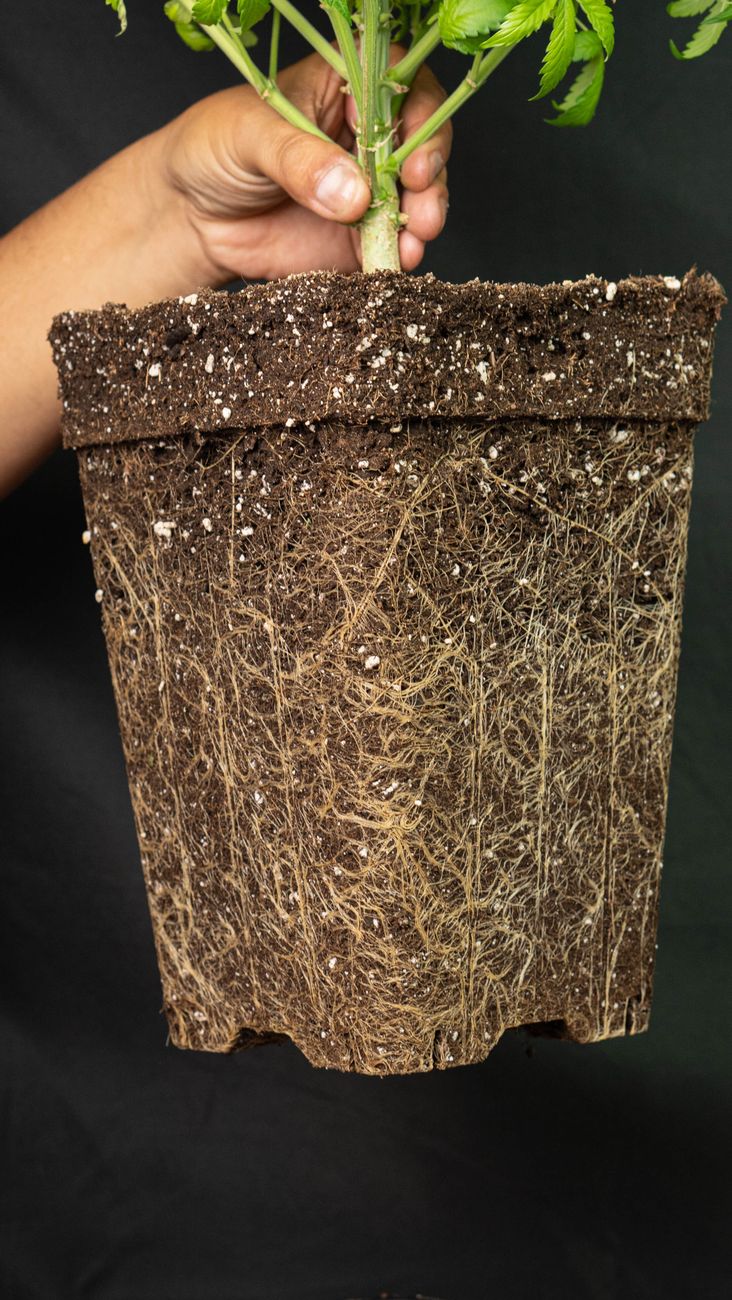
Then there's the issue of root-bound plants. As a plant grows, its roots expand to fill the pot. Eventually, they form a dense, tangled mat that leaves very little room for soil, let alone water penetration. My 'Sweet Million' tomatoes, prolific as they are, often get seriously root-bound by late summer, and I have to be extra vigilant. The water simply can't force its way through that solid mass of roots. Finally, and perhaps most obviously, are the pot edge gaps. As compost settles or roots slightly shrink, tiny channels can form between the edge of the pot and the compost. These gaps are like express lanes for water, allowing it to rush straight down and out the drainage holes, leaving the central root ball parched.
I remember one particularly frustrating summer, trying to keep a containerised rosemary alive. I’d water it, the topsoil would feel damp, but it kept looking sadder and sadder. When I finally pulled it out, I discovered the compost was bone dry in the centre, but soaking wet down the sides. That’s when the penny dropped!
Here’s a quick overview of these common culprits:
| Root Cause | Description (Randy's Angle) | My Experience in the UK Midlands | Impact on Hydration |
|---|---|---|---|
| Compacted Soil | Over time, watering and gravity press soil particles together, reducing vital air pockets and porosity. | This is a killer for my older container herbs or anything I haven't repotted in a season or two. | Water struggles to permeate; it'll often just run off the surface or find an easier route. |
| Hydrophobic Compost | Especially common with peat-based composts when they dry out completely. They start actively repelling water. | A nightmare after one of our sudden UK heatwaves! The water just sits on top, mockingly. | Most water bypasses, never truly reaching the deeper, thirsty roots. |
| Root-Bound Plants | The plant's roots have completely filled the pot, forming a dense, impenetrable mat with little to no soil left. | My 'Moneymaker' greenhouse tomatoes are notorious for this by August if I don't pot up. | Water cannot physically get through the solid root mass to hydrate the plant. |
| Pot Edge Gaps | Small channels or gaps that form between the inner wall of the pot and the shrunken/settled root ball/compost. | Often happens in older pots, or if I haven't firmed the compost properly when planting. | Water literally flows straight down these "express lanes" and out the bottom. |
Spotting the Signs: Is Your Plant Suffering from Uneven Hydration?
Okay, so you understand why it happens. Now, how do you actually tell if your beloved plant is falling victim to the side-channel problem? It’s not always obvious, and I’ve certainly misdiagnosed it in the past, thinking my plant was simply underwatered when the real issue was uneven hydration. Learning to read the signs is crucial, especially with our often-fickle British weather confusing things!
The most common and frustrating sign is the one I mentioned earlier: wilting despite recent watering. You've given it a good drink, the top of the compost feels damp to the touch, but your plant still looks droopy, leaves curling or drooping. This is a classic indicator that the water isn't reaching the deeper roots. I’ve seen this many times with my greenhouse peppers – they’d look absolutely knackered, even after a good watering, simply because the water was doing a disappearing act down the sides.
Another tell-tale sign is seeing water drain out of the bottom of the pot almost immediately after you start watering. Now, some drainage is good, but if it's running straight through within seconds, that's a red flag. It means the water isn't pausing long enough to soak into the root ball.
Of course, a very obvious visual cue is a dry topsoil that contrasts sharply with the wilting plant.
You might also notice stunted growth over time, or even signs of nutrient deficiencies, as water is essential for transporting nutrients to the plant. If the roots aren't getting water, they're not getting food either.
My favourite method for truly diagnosing the problem is a combination of the "finger test" and the "lift test." For the finger test, don’t just touch the surface. Dig your finger down into the compost by at least an inch or two (2.5-5 cm). If it's bone dry down there, even if the top is damp, you've got a problem. For smaller pots, I often use the "lift test." Lift the pot – does it feel surprisingly light despite having just watered it? A well-hydrated pot should have a noticeable weight difference compared to a dry one. If it feels light, chances are that water just zipped straight through. I learned this trick when trying to keep my containerised basil happy through a particularly hot spell; the pot felt suspiciously light even after a good soaking, confirming my suspicions.
Building a Better Foundation: Preventing Side-Channels from the Start
Prevention, as they say, is always better than cure. And nowhere is that more true than with the side-channel problem. Getting things right from the moment you pot up a plant can save you a world of bother later on, especially when you're battling our changeable British weather. I've learned these lessons through plenty of trial and error in my own 800 sq ft Midlands garden.
The first and most crucial step is choosing the right compost. I've found that a high-quality, peat-free, loam-based potting compost is an absolute game-changer. These mixes tend to hold moisture much more effectively than cheaper, often peat-heavy alternatives, but still offer good drainage. They're less prone to becoming hydrophobic when dry and compact less over time. When I'm potting up my 'Cherokee Purple' tomato seedlings for the greenhouse, I never skimp on the compost – it's the foundation of their success.
Next, it's all about proper potting technique. Don't just dump the plant in! Gently firm the compost around the root ball as you fill the pot. You want to eliminate large air pockets without compacting it too much. Crucially, leave about 2-3 cm (around an inch) of space from the rim of the pot to the top of the compost. This "watering gap" gives the water a chance to sit and soak in, rather than immediately overflowing or running down the sides. I learned this the hard way after overfilling countless pots in my early days, leading to water cascading straight off the top.
Consider gradual pot sizing. Don't put a tiny seedling into a massive pot. This leaves too much unrooted compost, which can either stay soggy and lead to root rot, or dry out excessively and become hydrophobic before the roots can reach it. Gradually pot up your plants as they grow. My young aubergines thrive with this approach, preventing waterlogging in early spring when they're still small. Finally, always give new plantings a thorough initial water-in. Water slowly and deeply until it drains from the bottom, then wait a few minutes and water again. This settles the compost around the roots, removing any remaining air pockets and establishing good contact. It's absolutely crucial for all new plants, especially after a dry spell here in the Midlands.
Here’s a look at the prevention methods I swear by:
| Prevention Method | Randy's Approach & Rationale (UK Context) | Benefits for Even Hydration | My Experience & Tips |
|---|---|---|---|
| Quality Compost Choice | I always opt for a good quality, peat-free, loam-based potting compost. It holds moisture well but still drains, perfect for UK conditions. | Better water retention, less prone to becoming hydrophobic and resisting compaction. | Absolutely essential for my greenhouse tomatoes – it really helps avoid dry spots in the summer heat. |
| Proper Potting Technique | Gently firm the compost around the root ball, ensuring good contact. Leave a 2-3cm gap from the rim for a proper watering reservoir. | Ensures roots are surrounded by moist soil, prevents initial gaps, and allows water to soak. | I learned this the hard way! Rushing leads to instant side-channels and wasted water. |
| Gradual Pot Sizing | Don't over-pot! Gradually move plants into larger pots as they grow, avoiding huge jumps in pot size. | Prevents excess unrooted compost from staying soggy or drying out too quickly and becoming problematic. | My young peppers and cucumbers really benefit from this; less risk of waterlogging in early growth. |
| Initial Water-In | Water thoroughly immediately after potting, letting it drain completely, then often top up if the compost settles significantly. | Settles the compost firmly around the roots, eliminating hidden air pockets and ensuring contact. | Crucial for all new plantings in my garden; it sets them up for success, whatever the British weather throws! |
| Adding Soil Amendments | For certain plants, I might mix in a bit of perlite for extra drainage or vermiculite for increased water retention. | Improves overall structure, preventing compaction and aiding more uniform water distribution. | Great for my container strawberries, which need consistent moisture without getting waterlogged, especially during fruiting. |
Rescue Mission: Practical Steps to Rehydrate a Neglected Root Ball
So, you've spotted the signs. That once-lush 'Sungold' tomato in its pot on the patio is looking a bit sorry for itself, the leaves are wilting, and when you water from the top, it just seems to run straight out the bottom without truly soaking in. Don't panic! I've been there more times than I care to admit, especially in my early days here in the Midlands. It's frustrating, but it's not the end for your plant. Think of it as a critical system failure – time for an emergency reboot!
My go-to "rescue mission" for a severely dehydrated root ball is a good, old-fashioned bottom watering. This technique is an absolute lifesaver, especially for smaller pots or those cherished heirloom tomatoes in my greenhouse that I simply can't afford to lose.
The Bottom-Watering Breakthrough (My Favourite Method!):
- Find a Tub: Grab a basin, bucket, or even your kitchen sink – anything that can hold a few inches of water. I often use one of those large, flexible trugs that are always handy in the garden.
- Add Lukewarm Water: Fill it with a few inches of water. Lukewarm is best; cold tap water can shock sensitive roots, especially for my greenhouse dwellers like 'Black Krim' tomatoes.
- Submerge the Pot: Carefully place your potted plant into the water. You'll often see immediate bubbles rising to the surface. This is the air escaping from the dry pockets in the compost, being replaced by water. It’s a beautiful sight for a gardener!
- Be Patient (This is Key!): This isn't a quick dip. Let the pot sit there for at least 30 minutes, sometimes an hour for really dry, larger pots. For a thirsty container of 'Salad Bowl' lettuce, 20 minutes might be enough, but a large pot of 'Marmande' tomato could take 45. The compost needs time to slowly wick the water upwards, rehydrating those parched channels and the entire root ball. I once nearly lost a prize 'Costoluto Fiorentino' tomato during a surprise heatwave here in the UK. I thought it was a goner, but after a good hour in a bucket of water, it perked right back up. It taught me a valuable lesson about patience!
- Check the Top: Don't remove it until the very top surface of the compost feels moist to the touch. This indicates the water has fully saturated the entire pot.
- Drain Thoroughly: Once rehydrated, lift the pot out and let it drain completely before returning it to its spot. You don't want your roots sitting in soggy conditions, as that can lead to a whole new set of problems like root rot.
Bottom watering is incredibly efficient because it encourages the roots to grow downwards, seeking moisture, and ensures uniform saturation. It's particularly useful for plants that hate getting their leaves wet, like some herbs prone to mildew, or when you're trying to prevent splashback onto delicate seedlings.
Beyond the Basics: Advanced Strategies for Stubborn Side-Channel Issues
Sometimes, even a good bottom-watering soak just doesn't quite cut it. You might have an older plant, one that's been pot-bound for a while, or perhaps the compost has become so compacted and hydrophobic that it's practically repelling water. In my 800 sq ft Midlands garden, I've definitely encountered these stubborn cases, especially with larger, perennial herbs or some of my overwintered chilli plants. When the usual tricks fail, it's time for a slightly more interventionist approach.
### Repotting and Root Pruning: A Fresh Start
If a plant has been in the same pot for several seasons, the roots can become incredibly dense and matted, forming a solid block that makes water penetration almost impossible. This is where a strategic repotting and even a bit of root pruning can work wonders.
- Inspection is Key: Gently remove the plant from its pot. If you see a thick, circling mass of roots with very little compost left, you've found your problem. For example, I had a potted 'Purple Sprouting Broccoli' that I tried to overwinter in a large container. By spring, the root ball was a solid, impenetrable mass.
- Loosen the Roots: Use your fingers or a small hand fork to gently tease apart the outer roots. Don't be afraid to be a little firm, but avoid ripping. My IT problem-solving brain tells me this is like defragging a hard drive – getting everything organised and ready to perform better.
- Consider Root Pruning: For very pot-bound plants, you can actually prune some of the outer, circling roots. I usually take about 10-20% off the bottom and sides with clean snips. This encourages the plant to send out new, healthier feeder roots into fresh compost. This might sound drastic, but I've done it successfully on older 'Rosemary' bushes and even some of my longer-lived 'Cayenne' chilli plants.
- Fresh Compost: Repot into the same size pot (if you want to maintain its size) or a slightly larger one, using a high-quality, fresh potting mix. Ensure it's specifically designed for containers, offering good drainage and aeration. I always opt for peat-free compost here in the UK, as it's better for the environment. Make sure to follow the "Building a Better Foundation" advice from earlier in the article for this new potting.
### The Wetting Agent Approach (Use with Caution!)
For truly hydrophobic compost – where the surface just beads water rather than absorbing it – a wetting agent can be a temporary solution. These are essentially surfactants that reduce the surface tension of water, allowing it to penetrate dry compost more easily.
- What I've Learned: I've only used these a couple of times on very specific, extremely dry patches in larger raised beds that had become compacted, not typically for my everyday potted plants. They can be helpful, but they're not a substitute for good watering practices or fresh compost.
- How to Use: Follow the manufacturer's instructions carefully for dilution. Apply as a drench. You'll notice the water starts to soak in rather than run off.
- Randy's Caveat: I see these as a last resort. They can sometimes affect the beneficial microbial life in your soil if overused, and I always prefer natural methods where possible. They can also be a bit pricey for the home gardener. For most UK home gardeners, a good bottom soak or repotting will be far more effective and less risky.
### Choosing the Right Pot Material: A UK Perspective
The material of your pot can also influence how prone your plant is to side-channeling and uneven hydration, especially with our often-changeable British weather.
| Pot Material | Pros (UK Context) | Cons (UK Context) | My Experience (Midlands Garden) |
|---|---|---|---|
| Terracotta | Excellent breathability, prevents overwatering. | Dries out quickly in summer heatwaves. Heavy. Prone to cracking in winter frosts. | Great for herbs like 'Thyme' or 'Rosemary' that like drier feet. Needs more frequent watering during dry spells. |
| Plastic | Retains moisture well, lightweight, affordable, durable. | Can lead to waterlogging if drainage is poor. Less breathable. | My go-to for most veg, especially thirsty 'Heirloom Tomatoes' in the greenhouse. Good drainage holes are essential. |
| Glazed Ceramic | Retains moisture well, decorative. | Poor breathability, can easily waterlog. Heavy. Prone to cracking in frosts. | I use these for display, but I'm extra careful with drainage and watering. |
| Fabric Pots | Excellent aeration, prevents root circling, good drainage. | Dries out very quickly. Less aesthetically pleasing for some. | Fantastic for my 'Charlotte' potatoes and large 'Calabrese' broccoli – promotes really healthy root systems. Needs daily watering in summer. |
For my thirsty greenhouse tomatoes, plastic pots are practical because they hold moisture better, meaning less daily watering when I'm busy. However, for my drought-tolerant Mediterranean herbs on the patio, terracotta is often a better choice, allowing the soil to dry out a bit more between waterings, reducing the risk of side-channels forming due to prolonged saturation.
Cultivating Consistency: Your Guide to Evenly Hydrated, Thriving Potted Plants
We've covered a lot, haven't we? From understanding those sneaky side-channels to rescuing a parched plant, and even getting into some advanced tactics. As an ex-IT worker, I often think of gardening as a complex system – and water is the lifeblood of that system. Getting it right, especially in pots, is fundamental to success.
Here in my 800 sq ft Midlands garden, I've learned that truly thriving potted plants come down to a few core principles, all built on consistency and observation:
- Prevention is Paramount: It all starts with the right foundation. Choosing a high-quality, well-draining potting mix, ensuring adequate drainage holes, and watering thoroughly from the very beginning will set your plants up for success. Don't skimp on the compost – it's the home for your roots!
- Know Your Plant & Pot: Different plants have different needs, and different pot materials behave differently. A 'Patio Snacker' cucumber in a plastic pot will have very different watering requirements than a 'Mint' plant in terracotta. Get to know what each of your plants prefers.
- Observe, Don't Just Water: Don't water purely on a schedule. Get your fingers dirty! Feel the compost. Lift the pot to gauge its weight. Look at the leaves. These are all clues that tell you what your plant truly needs. This is the real-time monitoring that makes all the difference.
- Embrace the Soak: Whether it's a regular top-down drench until water runs out the bottom, or a strategic bottom-watering session, ensure that when you water, you do it properly. Avoid those little sips that only wet the top layer.
- Don't Fear the Rescue: If you do spot the signs of uneven hydration, don't panic. A good, long bottom-watering session can bring a neglected plant back from the brink. I've saved countless herbs and even a struggling 'Tumbler' tomato this way.
Solving the 'side-channel' problem isn't about finding a magic bullet; it's about understanding the nuances of water movement in confined spaces and adapting your practices. It's about being present with your plants, learning from them, and responding to their needs.
I've made my fair share of mistakes over the past five years, especially dealing with our unpredictable British weather – sudden downpours followed by baking sun can really throw off your watering rhythm! But every dried-out pot or struggling plant has taught me something valuable. And that's what gardening is all about, isn't it? Learning, experimenting, and finding what works best in your little patch of the UK.
So, go forth, armed with this knowledge! Get out there, check those pots, and ensure every single root in your container garden is getting the hydration it deserves. Your plants will thank you with lush growth, abundant harvests, and that undeniable joy of seeing something you've nurtured truly thrive. Happy gardening!
