G'day fellow gardeners! Randy here from my little patch in the UK Midlands. You know, there's nothing quite like the feeling of planting a new fruit tree or a beautiful specimen shrub, full of hope for its future. But then the British weather, bless its cotton socks, decides to unleash a proper blustery day – or a week! – and suddenly your hopeful sapling is doing an unwelcome dance, threatening to snap or lean. I've been there, watching my young 'Conference' pear whip about, heart in my mouth. That's why I'm so passionate about strategic staking, and why I want to share what I've learned over my five years of intensive UK gardening. It's not just about stopping a tree from falling over; it's about setting it up for a lifetime of strong, healthy growth, particularly here in our often-windy British climate. Done right, staking encourages robust root development and a perfectly straight trunk, even when the gales are howling. Done wrong, and you could be doing more harm than good. So, let's dig into the nitty-gritty of making sure your young trees and shrubs stand tall and proud.
Do You Even Need to Stake? Assessing Your Tree's Needs and Site Conditions
Now, before we even think about hammering stakes into the ground, let's ask the crucial question: does your newly planted tree or shrub actually need staking? This isn't a one-size-fits-all situation, and honestly, sometimes leaving a tree to sway a little can
Selecting Your Materials: Stakes, Ties, and Protectors for Longevity and Health
Right, so we know why we're staking and how to approach it, but what about the actual bits and bobs? Like any good DIY project (and gardening often feels like one!), the right tools make all the difference. I've certainly learned this the hard way here in my Midlands garden, where a flimsy stake or a cheap tie can lead to disaster in our unpredictable British weather. Trust me, I’ve had stakes snap in a strong gust and ties rub through bark because I tried to cut corners. Never again!
Stakes: The Backbone of Support
When it comes to the stake itself, you've got options, and each has its place depending on your tree and your budget.
- Treated Softwood Stakes: These are probably the most common you'll find at any UK garden centre. They're usually pressure-treated to resist rot, which is essential for something that's going to be in the damp British soil for a year or two. They're strong, readily available, and relatively inexpensive. I've used these for my younger fruit trees, like the 'Discovery' apple I planted two years ago.
- Hardwood Stakes (e.g., Chestnut, Hazel): These are my personal favourites for a more natural look, especially if you can source them locally. They're incredibly durable and blend beautifully into the garden. I've got a fantastic local supplier of hazel stakes that I use for my larger tomato plants in the greenhouse, and they've also served well for a young 'Victoria' plum tree I put in a few years back. The downside is they can be harder to find and sometimes a bit more expensive.
- Metal Stakes (e.g., Rebar, Plastic-Coated Steel): These are incredibly strong and long-lasting. I tend to use rebar more for structural support in raised beds or for very tall climbing beans, but a sturdy plastic-coated metal stake can work for trees too. They're less aesthetically pleasing than wood, in my opinion, but for a truly exposed site or a very vigorous grower, they're a solid choice.
Ties: The Gentle Grip
This is where many people go wrong, and where I certainly made mistakes early on. The tie is the direct point of contact with your tree, so it has to be right.
- Purpose-Made Tree Ties: These are brilliant. They often come with a buckle or a figure-8 design that allows for adjustment and, crucially, prevents the tie from rubbing directly against the bark. Look for wide, flexible material – rubber or soft plastic is ideal. I've used these extensively for my 'Conference' pear tree, adjusting them every few months as the trunk thickened.
- Old Nylon Tights/Stockings: Honestly, these are a gardener's secret weapon! They're incredibly soft, stretchy, and strong. They won't cut into the bark, and they allow for some movement. I've used these for years, especially for larger plants or temporary supports. Just make sure they're clean!
- Jute Twine/Natural Fibres: For very small shrubs or temporary support in a sheltered spot, natural twine can work. However, I'd caution against using it for long-term tree staking here in the UK. It rots down, can become brittle, and can easily chafe the bark in windy conditions. I learned this when a young ornamental cherry got a nasty mark from twine during a particularly blustery autumn.
Protectors: Guarding Against the Elements (and Pests!)
Don't forget the little extras that make a big difference, especially in our British gardens.
- Bark Protectors/Anti-Chafe Sleeves: These are often rubber or felt sleeves that fit around the stake and the tie to provide an extra layer of cushioning. They're fantastic for preventing rubbing, particularly on young, thin-skinned trees.
- Spiral Tree Guards: If you've got rabbits, deer, or even just curious squirrels in your area (and who doesn't in the UK?), these are a lifesaver. They protect the lower trunk from nibbling damage. I have a fair few rabbits that visit my Midlands garden, so any new planting gets one of these as standard.
- Drainage/Aeration Aids: While not strictly "protectors," ensuring good drainage around the base of your stake can prevent rot, especially in heavy clay soils like some parts of the Midlands. Sometimes I'll put a handful of gravel around the base of the stake hole before driving it in.
Here's a quick comparison table of the materials I've just been chatting about:
| Material Type | Best For | Pros | Cons | Randy's Tip for UK Conditions |
|---|---|---|---|---|
| Stakes | ||||
| Treated Softwood | General use, fruit trees, small ornamental | Readily available, cost-effective, durable, strong | Less aesthetic, often chemically treated | Check for FSC certification. Good for exposed sites where strength is paramount. |
| Hardwood (Hazel) | Natural gardens, larger shrubs, long-term | Very durable, natural look, strong | Harder to source, can be pricier | Excellent for my small garden where aesthetics matter; source locally if possible. |
| Metal (Rebar) | Very exposed sites, heavy trees, temporary | Extremely strong, reusable, long-lasting | Unattractive, can heat up in sun, conductive | Use sparingly for trees; best for heavy-duty structural support or very temporary needs. |
| Ties | ||||
| Purpose-Made | All young trees, any size | Designed to prevent chafing, adjustable, durable | Can be expensive for many trees, sometimes rigid | Essential for my young fruit trees; check regularly for snugness, especially after growth spurts. |
| Old Nylon Tights | Temporary, larger trees, emergency | Soft, stretchy, free, won't cut into bark | Appearance (if you care!), can degrade over time | My go-to for quick fixes or for larger, established trees needing light support. |
| Jute Twine | Small shrubs, temporary, very sheltered | Natural, biodegradable | Breaks down, can chafe bark easily, less strong | Only for very small, temporary tasks in my sheltered greenhouse; avoid for long-term tree support. |
| Protectors | ||||
| Bark Protectors | All young trees, especially thin-barked | Prevents chafing, adds cushioning | Another item to buy | A must-have for windy sites or if you're using slightly stiffer ties. |
| Spiral Tree Guards | Areas with rabbits/deer, new plantings | Protects bark from gnawing, cheap | Can restrict trunk expansion if left too long | Non-negotiable in my Midlands garden; rabbits are a menace! |
Step-by-Step Installation Guide: Securing Your Young Tree for Optimal Growth
Right, let's get down to business. You've got your tree, your stake, your ties, and maybe some protectors. Now, how do we put it all together without damaging anything or making it look like a dog's dinner? I've staked more trees than I can count in my 800 sq ft garden, from a tiny 'Blackcurrant Ben Sarek' bush to the more substantial 'Braeburn' apple tree, and I’ve learned a few tricks.
- Plant Your Tree First: This might sound obvious, but it's crucial. Get your tree planted properly, watered in well, and firmed into the ground before you even think about the stake. You don't want to be wrestling with a stake and a bare-rooted tree at the same time.
- Positioning the Stake: The Wind is Your Guide: This is probably the most important step. Drive your stake into the ground on the prevailing wind side of the tree. Here in the UK, especially in the Midlands, our prevailing winds often come from the southwest. By placing the stake on this side, the wind will push the tree away from the stake, preventing it from rubbing. I learned this the hard way when a young 'Conference' pear I planted ended up rubbing against the stake constantly because I'd just plonked it down on the easiest side. It eventually caused a nasty wound.
- Driving the Stake:
- Distance from Trunk: The stake should be about 15-30cm (6-12 inches) away from the trunk. You want to give the root ball space and avoid driving the stake through the roots.
- Depth: Drive the stake firmly into the ground to at least 45-60cm (18-24 inches) deep, or about a third of its total length. It needs to be rock solid. A sledgehammer or a heavy mallet is your friend here. If your soil is particularly stony, you might need a digging bar to create a pilot hole first. I've broken a few cheap mallets on our stubborn clay soil!
- Height: The top of the stake should reach about one-third to half-way up the tree's trunk, or just below the lowest branches. This allows the upper part of the tree to sway naturally, which is vital for developing trunk strength.
- Attaching the Ties: The Figure-8 Method is Gold!
- Prepare the Tie: If using a standard tree tie, thread it through the buckle. If using old tights, cut a strip about 30-40cm long.
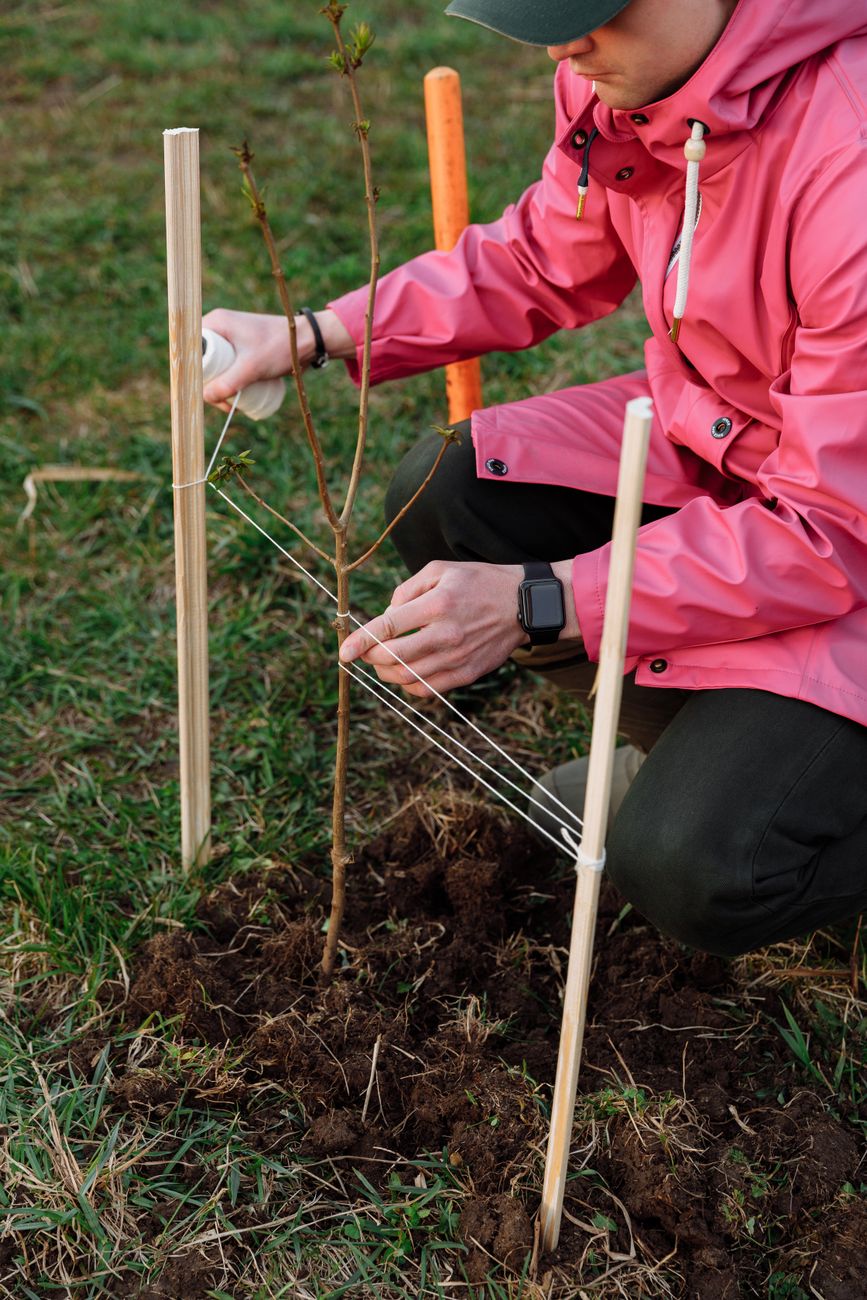
- Form a Figure-8: Wrap the tie around the tree, then twist it once or twice between the tree and the stake to form a figure-8. This creates a cushion that prevents the tree from rubbing directly against the stake, even in blustery conditions. This is the single most effective trick I've found to prevent bark damage.
- Secure: Fasten the tie firmly to the stake. It should be snug enough to hold the tree upright but loose enough to allow some trunk movement. You should be able to get a finger or two easily between the tie and the trunk. Don't overtighten! I've seen trees completely girdled by ties that were left too tight.
- Add Protectors (If Needed): If you're using a spiral guard, gently twist it around the base of the trunk. If you've got a bark protector, slide it onto the tie before you fasten it.
That's it! Step back and admire your handiwork. Your young tree now has the support it needs to establish strong roots and grow straight, even when the notorious British weather throws a tantrum.

Crucial Aftercare: Maintaining Ties, Monitoring Growth, and Timely Stake Removal
Staking isn't a "set it and forget it" job – especially not here in the UK with our ever-changing seasons. The aftercare is just as important, if not more so, than the initial installation. Neglecting this stage can actually do more harm than good to your young tree. I’ve learned this through a few painful experiences in my own garden.
Regular Checks: Your Tree's Health Check-up
I make it a habit to check all my staked trees and shrubs at least once a month during the growing season (March to October) and every couple of months in winter. Here's what I'm looking for:
- Tie Tightness: As your tree grows, its trunk will expand. A tie that was perfect in spring can become a constricting band by autumn. Always check that you can easily slip a finger or two between the tie and the trunk. If it's too tight, loosen it immediately. I once almost girdled a young 'Red Robin' photinia because I forgot to adjust its tie for a whole summer. It recovered, but it was a harsh lesson!
- Chafing and Rubbing: Even with the figure-8 method, strong winds can cause movement. Check the bark where the tie makes contact. If you see any signs of rubbing, loosen the tie, add a bark protector, or consider adjusting the stake position slightly.
- Stake Stability: Is the stake still firm in the ground? Our wet winters and windy conditions can loosen even the most well-driven stake. If it's wobbly, firm the soil around its base or re-drive it if necessary.
- Weeds: Keep the area around the base of your tree weed-free. Weeds compete for water and nutrients, which your young tree needs to establish itself. A good mulch layer helps immensely here.
Monitoring Growth: Adapting to Your Tree's Needs
As your tree grows, its needs will change.
- Height of Support: The stake should always be below the growing canopy. If your tree has shot up and the stake is now reaching into the branches, it's time to consider a shorter stake or, ideally, removal.
- Trunk Strength: Gently wiggle the tree above the stake. Does it feel firm and resilient, or is it still floppy? This "wiggle test" is crucial for knowing when your tree is ready to stand on its own.
Timely Stake Removal: The Final, Crucial Step
This is perhaps the most overlooked but vital part of strategic staking. Staking is a temporary aid, not a permanent crutch. Leaving a stake on for too long can actually weaken your tree, making it reliant on artificial support and preventing it from developing the natural strength and flexibility it needs to withstand British winds.
- When to Remove: Most young trees need staking for 1 to 2 years, sometimes 3 for slower growers or very exposed sites. The key indicator is when the tree's trunk feels strong and resilient enough to stand on its own. Perform the "wiggle test": gently push the tree back and forth. If it springs back without feeling like it's going to snap, it's likely ready.
- Why Remove:
- Weakens the Trunk: Constant support prevents the trunk from developing the necessary "reaction wood" that strengthens it in response to wind movement.
- Girdling: Left-on ties can girdle the trunk as it expands, cutting off vital nutrients and water flow. This is a death sentence for a tree. I've seen it happen, and it's heartbreaking.
- Pest and Disease Harbour: Stakes and ties can create damp spots or hidden areas where pests and diseases can take hold.
- How to Remove: Simply untie the tree and carefully pull out the stake. If the stake is particularly stubborn, a garden fork or spade can help to lever it out without disturbing the tree's roots too much. Give the tree a good drink of water afterwards, and keep an eye on it for a few days to ensure it's settling in without its support.
Conclusion: Empowering Your Trees for a Resilient Future
There you have it, fellow gardeners! We've journeyed through the ins and outs of strategic staking for newly planted young trees and shrubs, from understanding why it's so critical in our blustery UK climate to selecting the right materials, installing them correctly, and, crucially, knowing when to let go.
I know it might seem like a lot of detail for a simple stick in the ground, but believe me, every single one of these steps is born from years of trial and error in my own 800 sq ft Midlands garden. I've seen the difference it makes firsthand – the robust, straight trunks of my 'Victoria' plum and 'Discovery' apple trees standing proud, compared to the wonky, wind-battered casualties of my early, less-informed efforts.
The goal isn't just to keep your young trees upright; it's to empower them to develop strong, resilient root systems and flexible trunks that can withstand whatever our famously unpredictable British weather throws at them. It's about giving them the very best start in life, setting them up for decades of healthy growth and abundant harvests.
So, next time you plant a young tree or shrub, remember these principles. Observe your site, choose your materials wisely, install with care, and never forget the importance of aftercare and timely removal. Your efforts now will pay dividends for years to come, contributing to the beauty and bounty of your UK garden. Happy staking, and happy growing!
