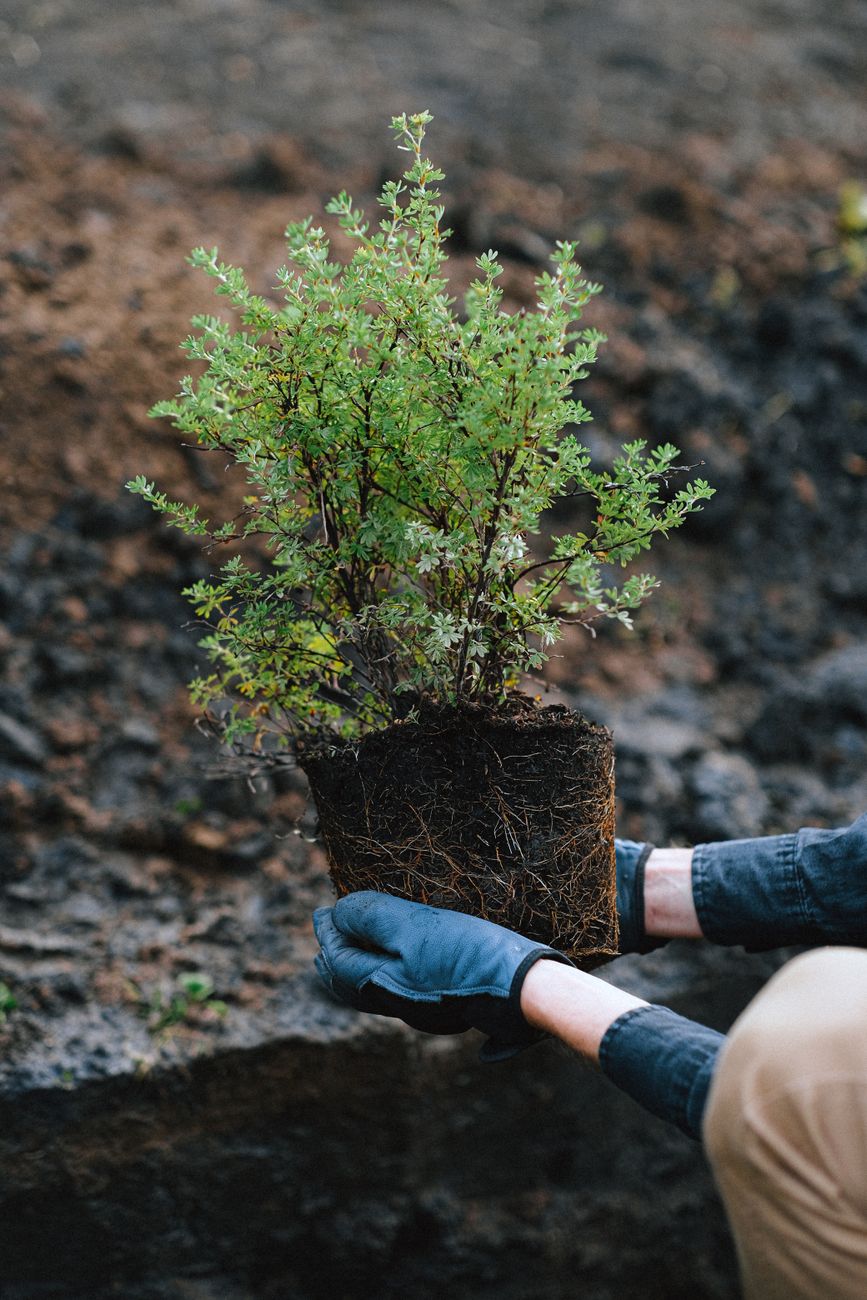
Is Your Garden Underperforming? The Hidden Legacy of Nursery Root-Bound Plants
Here in my 800 sq ft UK Midlands garden, there’s nothing I love more than seeing a plant thrive. The sheer joy of watching a tiny seedling transform into a robust producer, or a young shrub mature into a vibrant focal point, is why I swapped my IT desk for a trowel five years ago. But let me tell you, it hasn't always been smooth sailing. Like many of you, I've had my fair share of head-scratching moments, staring at a plant that, by all accounts, should be flourishing, yet it just... isn't.
I'm talking about those established shrubs and perennials that seem perpetually stuck in second gear. You’ve given them good soil, plenty of water (when our British weather isn’t doing it for you!), and even a bit of organic feed, but they just refuse to put on decent growth, flower poorly, or always look a bit… peaky. For years, I’d blame the weather – "Ah, another typically damp British summer," or "Too cold a spring for that one." Or I’d wonder if the soil wasn't quite right, or maybe I'd picked a dodgy spot. I'd even consider myself a bit of a failure as a gardener, despite my growing experience with my greenhouse tomatoes and raised bed veg.
But then, a couple of years ago, I had an epiphany, quite literally, while wrestling with a struggling ‘Blue Princess’ holly that I’d planted near my fence line. It had been in the ground for three seasons, and while it wasn't dying, it certainly wasn't living up to its name. Its leaves were a dull green, not the vibrant colour I’d seen in other gardens, and its growth was minimal. After ruling out pests, diseases, and nutrient deficiencies, I decided to take a drastic step: I carefully dug it up to inspect its roots. What I found was a revelation, and it completely changed how I approach planting anything from a nursery. The roots were still tightly coiled in the shape of the pot it came in, refusing to spread out into my rich Midlands soil. It was severely root-bound, and it had been for years, silently stifling its potential.
This isn't just a minor setback; it's a hidden legacy from the plant's early life in a pot. It's an issue that, if left unaddressed, can stunt your plants for years, leading to frustration and wasted effort. I've learned the hard way that a root-bound plant isn't just a temporary condition; it’s a physical constraint that needs active intervention, even long after it’s been planted out in your UK garden.
More Than Just Thirsty: Spotting the Subtle Signs of Unresolved Root-Bound Issues
Before my 'Blue Princess' revelation, I used to think all my struggling plants were either thirsty or hungry. I'd reach for the watering can or a handful of granular feed. And sometimes, that was the answer, especially during those unexpectedly dry spells we get here in Britain. But with root-bound plants, the symptoms are often a bit more insidious, mimicking other problems, which makes them tricky to diagnose.
Here are some of the tell-tale signs I've learned to spot in my own garden, especially with plants like my ‘Annabelle’ hydrangeas or the 'Karl Foerster' feather reed grass I have dotted around:
- Persistent Stunted Growth: This is the big one. Your plant just isn't getting any bigger, or its growth is incredibly slow compared to what you'd expect for its age and variety. My ‘Goldflame Spiraea’ was a prime example; after two years, it looked barely larger than when I bought it, despite being in prime position.
- Frequent Wilting, Even in Moist Soil: This is a classic misleader. You water it, and it perks up a bit, but then the next sunny afternoon, it's drooping again, even though the soil around it is still damp to the touch. The roots simply aren't able to access the moisture efficiently because they're so tightly packed.
- Yellowing or Pale Leaves Despite Feeding: You’ve given it a good feed, maybe some compost tea or a slow-release fertiliser, but the leaves remain pale, sometimes with green veins (chlorosis). This indicates nutrient uptake issues, as the cramped roots can't properly absorb the goodness you're providing.
- Poor Flowering or Fruiting: If a plant is putting all its energy into just surviving, it won't have much left for reproduction. My ‘Invincibelle Spirit II’ hydrangea, for instance, had disappointingly small and sparse blooms for its first couple of years, despite being a prolific bloomer elsewhere.
- Lack of Overall Vigour: The plant just looks 'unhappy' or 'struggling'. It might be more susceptible to pests and diseases because its immune system is compromised.
To help you differentiate, I've put together a quick comparison table based on my observations in my UK garden:
| Symptom | Appears Thirsty/Hungy (Typical Issues) | Appears Root-Bound (Unresolved Nursery Issue) |
|---|---|---|
| Wilting | Occurs when soil is genuinely dry; recovers fully after watering. | Occurs frequently, even when soil is moist; recovery is often slow or incomplete. |
| Leaf Colour | Pale/yellowing due to lack of water or specific nutrient deficiency (e.g., nitrogen). | Pale/yellowing despite adequate watering and general feeding; persistent. |
| Growth Rate | Slowed temporarily by stress, but picks up once needs are met. | Consistently very slow or non-existent; plant remains small for its age. |
| Response to Water/Feed | Responds well; visible improvement in vigour and colour. | Minimal or temporary improvement; problems quickly return. |
| Overall Vigour | Generally healthy once needs are met; temporary dips. | Appears weak, 'unhappy', or stressed long-term; more prone to other issues. |
If you're seeing more of the 'Appears Root-Bound' signs, especially in plants that have been in the ground for a year or more, it’s a strong indicator that you might have some hidden root issues.
From Pot to Plot: Understanding Why Nursery Root-Binding Lingers for Years
When I first started gardening, fresh out of the IT world and full of enthusiasm, I honestly thought that once a plant left its nursery pot and went into the wide-open soil of my garden, its roots would just magically sort themselves out. "Nature finds a way," I’d optimistically tell myself. Oh, how wrong I was! This is one of those crucial lessons I learned the hard way, and it’s why I'm so passionate about sharing it.
The problem is that the 'memory' of the pot shape isn't easily forgotten by a plant's root system. When a plant is grown in a pot for too long, its roots hit the sides and bottom, and with nowhere else to go, they start to circle around the inside of the container. They form a dense, tight mass that perfectly mirrors the pot's shape. This isn't just a cosmetic issue; it fundamentally alters the plant's root architecture.
Here's why that persists and causes problems years down the line in your UK garden:
- The "Pot-Shaped Memory": Those circling roots don't suddenly decide to grow outwards once they're in the ground. They continue their circular trajectory. Imagine a coiled spring; it wants to stay coiled. These roots are essentially locked into that pattern, continuing to grow around themselves rather than radiating outwards into the surrounding soil.
- Strangulation and Inefficiency: As the circling roots grow thicker, they can actually start to strangle each other. This reduces the efficiency of water and nutrient uptake. Even if your garden soil is perfectly amended with lovely compost and rich organic matter, those internal, tightly packed roots can't properly access it.
- Poor Anchor and Stability: A healthy root system should spread wide and deep, anchoring the plant firmly. A root-bound plant, however, essentially has a compact, dense ball of roots that struggles to integrate with the surrounding soil. This can make larger shrubs, especially those exposed to our blustery British winds, less stable. I had a ‘Red Robin’ photinia that struggled with every gust of wind until I finally sorted its roots.
- Limited Feeder Root Development: The crucial fine feeder roots, responsible for the bulk of water and nutrient absorption, are concentrated within that dense root ball. They struggle to penetrate the surrounding garden soil effectively, which means the plant is perpetually trying to draw all its sustenance from a very small, inefficient area, rather than exploiting the much larger volume of soil you've provided.
- Exacerbated by Soil Conditions: If you have heavy clay soil, like much of what we find here in the Midlands, it can be even harder for those circling roots to break out. Conversely, very sandy soil might not offer enough resistance for roots to anchor properly if they haven't spread out. The roots need to be encouraged to explore, and the pot-bound pattern actively prevents that.
Essentially, a root-bound plant has an internal plumbing system that's been permanently kinked. Even with the best care, it's working against itself, struggling to perform basic functions. That's why, if you suspect this is the issue, it’s time for a careful investigation.
Time to Investigate: Carefully Unearthing Your Struggling Shrubs & Perennials
Alright, this is where we get our hands dirty and confront the problem head-on. Don't worry, it's not as daunting as it sounds, but it does require a bit of care and patience. I’ve done this a good few times now, from that struggling ‘Blue Princess’ holly to a few underperforming lavender bushes, and each time, it’s been incredibly insightful.
The best time to do this in the UK is generally during the dormant season for deciduous plants – late autumn after leaf fall, or late winter/early spring before new growth really kicks in. For evergreens, or if you simply can't wait, choose a cool, overcast day in spring or autumn to minimise stress. Avoid doing this in the heat of summer or the depths of winter.
Here’s my process for carefully unearthing a struggling plant to check its roots:
- Gather Your Tools: You'll need a sharp spade or digging fork, a sturdy tarp or sheet (to place the plant on), a bucket of water, and some sharp secateurs. Having a watering can handy is also a good idea.
- Prepare the Area: Give the plant a good watering a day or two before you plan to dig it up. This makes the soil easier to work with and helps hydrate the plant. Clear away any mulch or debris from around the base.
- Start Digging Wide: Begin by digging a trench around the plant, roughly the same width as the plant's canopy, or at least 12-18 inches (30-45 cm) from the stem, depending on the plant's size. Use your spade or fork to gently loosen the soil, working your way around the plant. The goal here is to create a wide enough circle to lift the root ball without excessive damage. For my ‘Spiraea’, I dug about a foot away from the main stem.
- Work Underneath: Once you have a trench, start to work your spade or fork underneath the root ball. Go slowly, leveraging the soil. You want to try and keep as much of the existing soil around the roots as possible to minimise shock. This is often the trickiest part, especially with larger, established shrubs.
- Gently Lift: Once you feel the plant is sufficiently loosened, gently rock it from side to side and carefully lift it out of the ground. If it’s a larger shrub, you might need an extra pair of hands. Place the entire root ball, with as much soil as possible, onto your tarp.

- The Reveal – Inspecting the Roots: Now for the moment of truth. Carefully brush away some of the loose soil from the root ball. What you're looking for is that tell-tale pot shape. Are the roots still densely coiled around themselves? Can you see thick roots circling the outer edge of the root ball, rather than spreading outwards? Are they matted and difficult to separate? If so, you've found your culprit. You might even see roots growing upwards or crossing over each other, forming a tight, impenetrable mass.
Don't be disheartened if you find this; it's incredibly common, and the good news is that now you've identified the problem, you can fix it. It’s far better to discover this now and give your plant a new lease on life than to let it slowly languish for years.
Surgical Solutions: Practical Techniques for Unwinding & Pruning Stunted Root Balls
Right, you’ve carefully unearthed your struggling plant, and now you’re staring at that tangled mess of roots. Don’t panic! This is the moment for action, and while it might feel a bit like surgery, it’s often the only way to give your plant a real fighting chance. I’ve been through this countless times in my 800 sq ft Midlands garden, from a sad-looking 'Munstead' lavender to a struggling 'Happy Returns' daylily, and each time, it’s been a learning curve.
The key here is a sharp, clean tool – I usually grab my trusty secateurs or a serrated kitchen knife I keep specifically for gardening tasks. Sterilise them with rubbing alcohol before and after each plant to avoid spreading any potential nasties.
First, you need to gently tease out as many of those circling roots as possible. Imagine you’re untangling a particularly stubborn knot of string. I usually start by pushing my fingers into the root ball from the bottom, working my way up. It’s a slow process, and you will break some feeder roots, but that’s okay. The aim is to get those roots pointing outwards again, not continuing their self-strangling spiral.
For truly impenetrable, matted root balls, especially on shrubs like the Pyracantha I rescued last spring, gentle teasing just won't cut it. That’s when you need to be a bit more assertive. I'll make several vertical cuts, about 1-2 inches deep, down the sides of the root ball with my knife. Sometimes, if the bottom is particularly solid, I’ll even slice off the bottom couple of inches entirely. It feels brutal, I know, but you’re removing the problem, not harming the plant long-term. This encourages new, outward-growing roots to form.
Here’s a quick guide to help you decide how aggressive you need to be:
| Technique | Best For | Pros | Cons | Randy's UK Garden Tip |
|---|---|---|---|---|
| Gentle Teasing | Mildly root-bound perennials, smaller shrubs, plants with finer roots (e.g., some herbs) | Minimises shock, preserves more existing roots | Can be very time-consuming, ineffective for severely matted roots | Ideal for early intervention or less established plants. Do it on a mild UK day. |
| Vertical Slicing | Moderately to severely root-bound shrubs & perennials, plants with thicker, woody roots | Breaks up circling patterns, stimulates new root growth | Can be stressful if overdone, temporary setback in top growth | My go-to for most stubborn cases. Make 3-4 cuts evenly spaced. |
| Bottom Trimming | Severely matted root balls, particularly dense ones | Removes the most congested section, forces root regeneration | Highest potential for shock, requires careful aftercare | Only for truly desperate cases! I did this on a huge Sedum 'Autumn Joy' once, and it bounced back stronger. |
Remember, the goal is to free those roots so they can spread out into the surrounding soil and actually absorb water and nutrients properly. Don't be afraid to snip away any obviously dead, mushy, or completely circling roots. Focus on encouraging a radial spread.
A Fresh Start: Replanting for Optimal Root Growth and Long-Term Vitality
Once you’ve performed your root surgery, it’s time to get your plant back into the ground and give it the best possible start. This stage is just as critical as the root pruning itself, especially with our often-unpredictable British weather.
First, the planting hole. I always dig a hole that’s at least twice as wide as the root ball and just as deep. This gives those newly freed roots plenty of loose soil to expand into. In my heavy Midlands clay, I spend a good ten minutes forking the sides of the hole, breaking up any compaction and improving drainage. I’ve learned the hard way that just digging a neat hole in clay can create a 'bathtub' effect, leading to waterlogging.
I like to amend the soil I’m putting back in. For most shrubs and perennials, I mix in a good amount of my homemade compost (I'm obsessed with my compost bins!), a handful of horticultural grit for drainage, and a sprinkle of a slow-release granular feed. This provides a gentle boost without overwhelming the plant. For acid-loving plants like my 'Blueberry' bush, I'd swap in some ericaceous compost.
Carefully place your treated plant into the hole, ensuring the top of the root ball is level with, or slightly above, the surrounding soil. This is crucial. Planting too deep can suffocate the crown, especially for shrubs. Backfill the hole, gently firming the soil around the base to remove any large air pockets.

Now, for the absolute most important step: watering. Give it a really thorough drink immediately after planting, even if it's been raining. This settles the soil around the roots and eliminates any remaining air pockets. I often use a watering can without a rose for the first drench, letting the water soak in slowly. For the first few weeks, keep a close eye on it. Our British summers can be surprisingly dry, and a newly planted, stressed plant will need consistent moisture to establish. I once replanted a struggling 'Lady Emma Hamilton' rose after root pruning in a particularly dry May, and despite my best efforts, I didn't water it quite enough, and it really struggled to recover that year. Lesson learned!
Finally, I always add a good layer of mulch around the base – compost, bark chips, or even well-rotted manure. This helps retain soil moisture, suppresses weeds, and moderates soil temperature, which is a big help for a plant trying to establish itself.
Beyond the Fix: Choosing Healthy Plants and Preventing Future Root-Bound Problems
So, you’ve done the hard work, saved your plant, and given it a new lease on life. But wouldn't it be better to avoid this whole drama in the first place? Absolutely! Prevention is always better than cure, especially in the demanding world of gardening here in the UK.
The first line of defence starts right at the garden centre. I know it’s tempting to grab the prettiest looking plant, but always, always check the roots. Gently slide the plant out of its pot. If you see a dense mat of roots circling the outside, or growing out of the drainage holes, put it back. Or, if you’re feeling brave and the plant is a must-have, be prepared to do some serious root pruning before you even plant it in your garden. I’ve made the mistake of buying seemingly healthy plants only to find a solid brick of roots underneath – a real disappointment and extra work. Look for plants where the roots are just starting to reach the sides of the pot, but not yet circling.
Once you get plants home, don't leave them in their nursery pots for weeks on end. I've been guilty of this myself, especially when our British weather decides to throw a curveball and planting plans get delayed. Those small pots quickly become root-binding traps. If you can’t plant immediately, pot them up into a slightly larger container with some fresh compost. This gives them a bit more breathing room until you're ready to plant them out properly.
Thinking about long-term prevention in your own garden, it's about good horticultural practice.
- Timely Planting: Plant shrubs and perennials at the right time of year for our UK climate – typically autumn or spring – when temperatures are moderate and rainfall is more consistent.
- Appropriate Spacing: Give your plants enough room to grow. Overcrowding can lead to competition for resources, stressing plants and making them more susceptible to problems.
- Regular Monitoring: Every time you’re out in the garden, take a moment to observe your plants. Are they thriving? Are they looking a bit 'off'? Early detection is key.
My journey from a desk job in IT to a full-time gardening obsession has taught me that gardening is all about learning, observing, and sometimes, getting your hands dirty with a bit of plant surgery. Don't be disheartened if you find root-bound issues in your established plants. It's a common problem, and one that, with a bit of courage and the right techniques, you can absolutely fix.
It's incredibly rewarding to see a plant that was once struggling burst into life after you've given it the care it needed. So, go on, take a look at those underperforming plants in your garden. You might just be holding the key to their revival. And please, share your experiences in the comments below! What plants have you rescued from a root-bound fate? I’d love to hear your stories!
Happy Gardening,
Randy.
